Digital signatures
In Reader, the Digital signature feature is only available for documents where an author has selected Extend Features in Adobe Reader. In Acrobat, the users can use all signature capabilities. For more details about other options, see the Digital Signatures Guide.
Note
Due to the complexity of the digital signature settings, you may find it expedient to leverage the existing configurations via the Registry feature during installation.
Signature validation (verification)
To set a signature validation method, do the following:
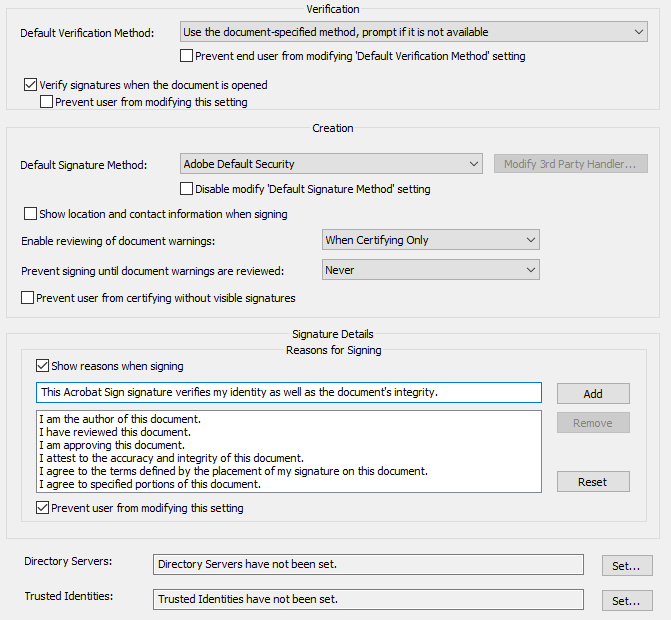
Set the Default Verification Method to one of the following:
Use the document-specified method, prompt if it is not available
Use the document-specified method, use the default method if it is not available
Always use the default method (overrides the document-specified method)
In some enterprise situations, administrators may require a method other than Adobe Default Security. For example, non-Adobe plugins may be used in business environments that require the support of biometrics, signature escrow, alternative methods of private key access, and so on. In those cases, administrators may specify an alternate plugin or provide user training on how to choose the right one. This setting is stored in:
[HKCU\Software\Adobe\<product name>\<version>\Security\cHandlers]
"aPrivKey"="Adobe.PPKLite"
"aVerify"="Adobe.NoHandler"
"bVerifyUseAlways"=dword:00000000
To lock the default verification method, check Prevent end user from modifying…. This setting sets:
[HKLM\SOFTWARE\Policies\Adobe\<product name>\<version>\FeatureLockDown\cSecurity\cHandlers\]
"bVerify"
To automatically verify signatures, check Verify signatures when the document is opened. This setting sets:
[HKCU\Software\Adobe\(product name)\<version>\Security\cDigSig]
"bValidateOnOpen"
To lock automatic signature verification, check Prevent user from modifying this setting. This setting sets:
[HKLM\SOFTWARE\Policies\Adobe\<product name>\<version>\FeatureLockdown\cSecurity\cDigSig\]
"bValidateOnOpen"
Signature creation
To configure the signing method:
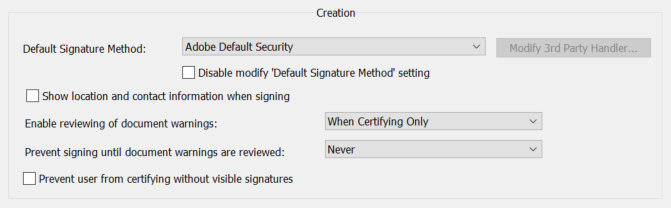
Set the Default Signature Method to one of the following:
Adobe Default Security
Ask when I sign
Third party
This setting sets:
[HKCU\Software\Adobe\(product name)\<version>\Security\cHandlers]
"aPrivKey"
Lock the default signature method by checking the Disable modify … checkbox. This setting sets:
[HKLM\SOFTWARE\Policies\Adobe\<product name>\<version>\FeatureLockDown\cSecurity\cHandlers\]
"bPrivKey"
To show the Location and Contact Info fields in the signing dialog, check Show location and contact information when signing. The data is then added to the signature block after signing. The value is stored in:
[HKCU\Software\Adobe\(product name)\<version>\Security\cPubSec]
"bAllowOtherInfoWhenSigning"
To allow signers to check document integrity before signing, Set Enable reviewing of document warnings to the desired setting:
Never
When Certifying only
Always
The document can be analyzed to determine if it contains any content that could adversely impact the integrity of the signing process. For example, a document could contain JavaScript that could change a data field before or after a signature is applied.
The value is stored in:
[HKCU\Software\Adobe\(product name)\<version>\Security\cPubSec]
"iShowDocumentWarnings"
To force a review of document warnings, set Prevent signing until document warnings are reviewed. The value is stored in:
[HKCU\Software\Adobe\(product name)\<version>\Security\cPubSec]
"iRequireReviewWarnings"
Note
Enable Reviewing of Document Warnings and Prevent signing until document warnings are reviewed settings function in tandem and should be set together. Setting both these options to Always results in the highest degree of assurance that the signing process is not adversely impacted by malicious content.
To prevent the use of invisible certification signatures, set Prevent users from certifying without visible signatures. The value is stored in:
[HKCU\Software\Adobe\(product name)\<version>\Security\cDigSig]
"bAllowInvisibleSig"
Signing reasons
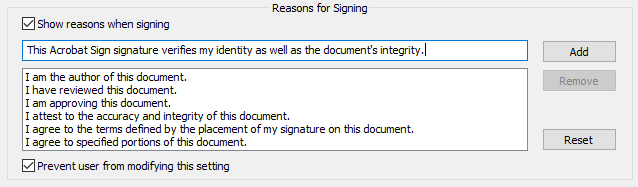
To display the Reasons field, set Show reasons when signing. It allows the signer to choose a default reason such as “I have reviewed this document” or create a new one. The value is stored in:
[HKCU\Software\Adobe\(product name)\<version>\Security\cPubSec]
"bAllowReasonWhenSigning"
Lock Show reasons when signing by choosing Prevent user from modifying this setting. The value is stored in:
[Software\Policies\Adobe\<product name>\<version>\FeatureLockdown\cSecurity\cPubSec]
"bReasons"
Directory servers
Acrobat products are shipped with pre-configured directory servers that are stored in a directories.acrodata file. The servers are used by the Trusted Identity Manager to locate certificates used in digital signature and certificate security workflows. Users can trust these certificates for signing and certifying documents and encrypting documents prior to sending them to the certificate owner. In enterprise settings, certificates are often stored on a directory server to provide users with a searchable and already trusted set of trusted identities.
If your company uses a centrally managed certificate repository, such as an LDAP directory server, you can add pre-configured server information to the installer. To do so:
In the Directory Servers field, choose Set.
Select the directory server file (directories.acrodata ) or navigate to another file.
By default, the Wizard opens the Security directory for the currently logged-on user. When set, the value is stored in
[ALL_USERS_PROFILE]\Application Data\Adobe\<product name>\<version>\Replicate\Security.
Choose Open. The text box displays a message that this feature has been set.
Note
If you select a file name other than directories.acrodata, the file will be renamed.

Removing directory servers
To unset the directory server, choose Unset. The text box displays the the message that this feature is not set.
Note
You can also deploy directory server files with the Files and Folders feature.
Trusted identities
Acrobat products do not ship with trusted identity data. Enterprise IT will typically want to install a pre-configured addressbook.acrodata file that captures Lightweight Directory Access Protocol (LDAP) information for contacts and certificates. The certificates can be delivered as already installed trusted identities with specific levels of trust set for any or all certificates used in digital signature and certificate security workflows.
In the Trusted Identities field, choose Set.
By default, the Wizard opens the Security directory for the currently logged on user. Select the directory server file
addressbook.acrodataor navigate to another file.Choose Open. The text box displays a message that this feature has been set.
If you select a file name other than addressbook.acrodata, the file is renamed.
You can also set these files with the Files and Folders feature.
The value is stored at: [ALL_USERS_PROFILE]\Application Data\Adobe\<product name>\<version>\Replicate\Security

Unsetting trusted identities
To unset trusted identities, choose Unset. The text box displays the message that this feature is not set.
Creating an addressbook.acrodata file
If you want to pre-configure the installer to trust a custom certificate or leverage trusted root CAs or certificates in digital signature workflows, you can export the required certificate to an addressbook.acrodata file. That file can then be embedded in the installer with the Customization Wizard or deployed by other means post-install.
To do so:
Open Acrobat.
Go to Preferences:
In the classic UI: Edit > Preferences.
In the modern UI: Hamburger menu > Preferences.
Choose Signatures > Identities & Trusted Certificates > More > Trusted Certificates.
Choose Import.
Browse to the certificate you want to trust. This is usually located at
C:\Users\<username>\AppData\Roaming\Adobe\Acrobat\<track name>\Security.Choose Open.
Choose Import and complete the workflow.