Tutorial: Integrate 3D functionality into 2D design environments
by Dave Klein
Articles this issue
- Edge featured video: Adobe AIR for TV
- Create Android apps with Flex "Hero" and Flash Builder "Burrito"
- Adobe InMarket: Reach millions, generate revenue
- The edge of Flash
- What's new in Adobe Flash Catalyst "Panini"
- Using the Text Layout Framework in Adobe Flash Professional CS5
- Introducing the Adobe ActionScript 3 SDK for Facebook Platform
- Tutorial: Integrate 3D functionality into 2D design environments
For several years, our favorite Adobe design tools have been adding 3D capabilities to their feature lists. Adobe Photoshop Extended has taken the deepest dive into 3D functionality by adding real 3D layers and a complete 3D toolset for manipulating, texturing, lighting, and rendering 3D objects on the Photoshop canvas. Designers cheered when Adobe added the ability to manipulate 2D planes in 3D space in Adobe Flash CS4 Professional. Even Adobe Illustrator includes 3D extrude, bevel, and rotation capabilities, along with a new perspective drawing function in the latest CS5 release.
Today's advanced 3D modeling programs can be overwhelming, but the integration of basic 3D functionality into our daily 2D design environments is making 3D easier for everyone, and it's beginning to blur the line between 2D and 3D design tools.
In this tutorial, I introduce you to Strata Enfold 3D, a real 3D plug-in for Adobe Illustrator that enables you to create die cut lines and crease fold lines to produce and interact with a 3D model right inside Illustrator. This allows designers to visualize 2D artwork that will ultimately be used for a 3D object in the real world, such as product packaging. The 3D model can then be exported from Illustrator to a 3D modeling program or imported as a 3D layer into Adobe Photoshop Extended for compositing with 2D artwork.
Here's what you need to follow along:
- Source files (ZIP, 9 MB)
- Strata Enfold 3D plug-in for Illustrator CS4 or CS5 — free 30-day trial
- Illustrator CS4 or CS5
- Photoshop CS4 or CS5 Extended (only Photoshop Extended includes 3D layers)
After completing this tutorial, you can go even further by publishing your interactive 3D model to the web or Adobe PDF using free trials of Strata Live 3D and Strata Design 3D CX (see the Summary section at the end of this tutorial for details and examples).
Getting started
To walk you through the 2D-to-3D workflow, I have created a mock project based on the familiar marketing materials from Adobe MAX 2010. We will lay out the packaging design (see Figure 1) for the fictional MAX Phone in Illustrator and use Strata Enfold 3D to cut, fold, visualize, and interact with the artwork as a 3D model directly in Illustrator before exporting it to Photoshop Extended as a 3D layer to use it in an Adobe MAX mock promotional piece.
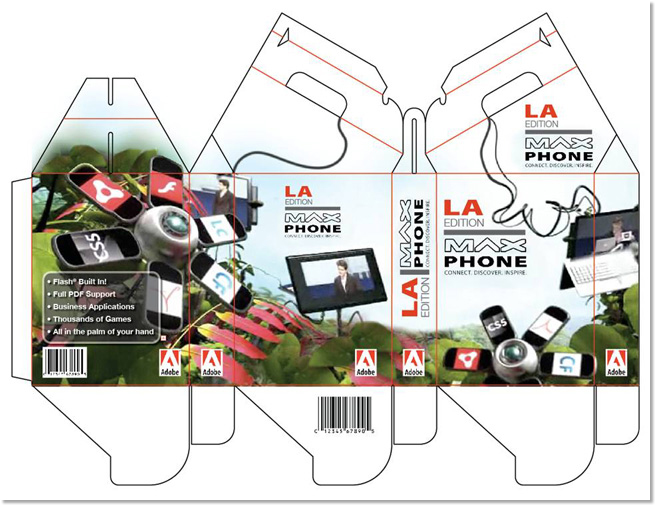
Figure 1. Mock packaging for MAX phone.
Once you've installed the Strata Enfold 3D CX plug-in software, open Adobe Illustrator and the MAX_phone_package.ai project file in the source files project folder.
This project contains all the elements of the completed packaging. Let's have a look at the folded version of the box by opening the Enfold 3D View panel. Choose Windows > Strata Enfold 3D CX and select Show Enfold 3D View. This panel shows an actual 3D view of the folded project. You can click the view and rotate the box to see it from different angles (see Figure 2).
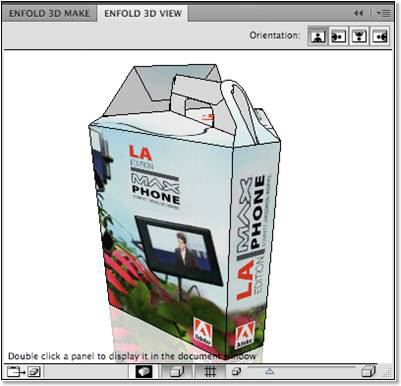
Figure 2. 3D view of the MAX Phone packaging in Strata Enfold 3D.
This package design comes from one of the Pepin Press package design book/CD combos and is already set up for use in Enfold 3D. Of course you can create your own designs from scratch or modify existing artwork using Enfold 3D.
Now let's take a quick look at how the box gets folded up. From the Enfold 3D View panel, click the panel menu (which is in the upper right corner of the panel) and choose Fold Enfold 3D Box File. This brings up a dialog box that shows an animation of the package being folded (see Figure 3). This is the environment you use to fold a project starting from a flat Illustrator file. You can also use it to modify an existing box file. Now let's step back and see how we got to this point. Click the Cancel button to dismiss this dialog box.
Figure 3. Strata Enfold 3D shows an animation of the MAX Phone packaging being folded from a flat Illustrator file to a finished box.
Going from flat to folded 3D
A folded project created with Illustrator and Strata Enfold 3D consists of three elements: cuts (these lines define the outer bounds of your project as well as any internal die cuts), creases (these lines define where your project will be folded), and graphics (the artwork used in your project).
Now let's review the components of this project. In the Layers panel, you'll see four layers: Creases, Cuts, Graphics, and Box. The first three layers correspond to the project elements we discussed earlier. The last layer, Box, is our already-folded box file. This is a special layer type that contains the 3D folding data used in the Enfold 3D View panel.
As mentioned, cut and crease lines are used to build the structural design. To see these elements more clearly, hide the Graphics and Box layers (using the Layers panel). You'll see crease lines in red and cut lines in black. These special line types are designated using the Enfold 3D Make panel.
Adding a die cut window
Now let's add a die cut window to the box. Show the Graphics layer again, and make sure it's locked. Zoom in on the center of the art board to focus on the image of the freestanding tablet phone. Let's add a die cut window where the screen image is. This type of die cut window can be used to show the actual phone inside the completed packaging. Use the Pen tool to trace out the bounds of the screen image by clicking each corner until you have a completed skewed rectangle.
Now you need to designate the rectangle as a die cut. Open the Enfold 3D Make panel. With the rectangle still selected, click the Cut stroke type in the Enfold 3D Make panel. The rectangle is now designated as a die cut. To see it in 3D, use the Select All command. (Make sure the Graphics layer is still locked so it won't be selected. The graphics don't fold; they simply get applied to the folded design.) With all the crease and cut lines selected, click the Fold button in the Enfold 3D Make panel. This takes you to the Fold Selection dialog box.
To start the folding process, select a panel to use as the base panel. For this project, click the center bottom panel. Now click Continue. The next dialog box is the 3D mode (see Figure 4). The unfolded project still appears to be flat, but you can rotate it in 3D space by clicking and dragging in the window.
Now let's do some quick folding. Click the Select All Fold Lines button. Now use the slider on the right to select 60 degrees. You can see that not all the creases are folded at the correct angle, but for now, you get the picture. You can see that the die cut window you added shows the interior of the package.
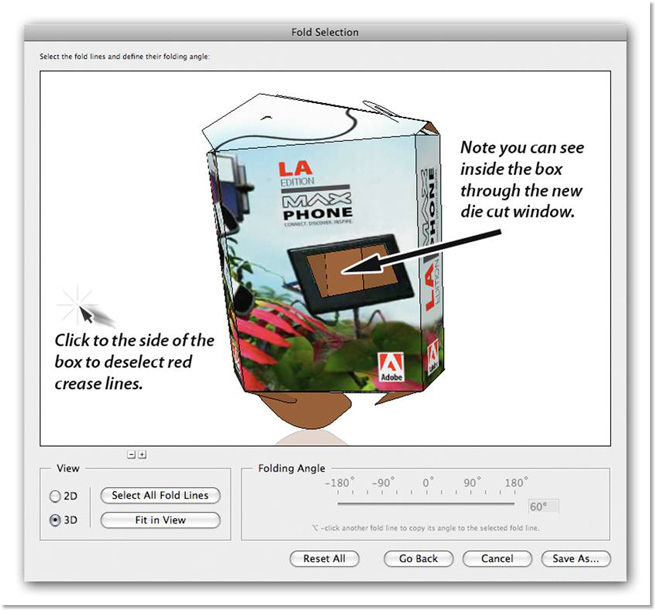
Figure 4. The 3D mode of the Fold Selection dialog box enables you to define the folding angle of the fold lines.
With a little more work, you can select individual edge creases in this window and fold them to the correct angle to get the package just right.
Exporting the 3D package
Enfold 3D gives you the option to export a 2D image as a TIFF file or as a 3D file in the U3D format, which gives you a model that can be imported to Adobe Photoshop Extended or other 3D tools in the Strata 3D CX Suite. To export the 3D package, open the Enfold 3D View panel again and select Export. In the Export dialog box, choose U3D File from the File Type pull-down menu and save your model.
Real 3D in Photoshop Extended
One of the great features of Photoshop Extended is the ability to use 3D layers. In Photoshop Extended, open the file named MAX_Phone_box_illust.psd. You have already imported your 3D model to this file. If you want to import your 3D model manually, choose 3D > New Layer From 3D File from the Photoshop Extended main menu and then navigate to the U3D file you exported from Strata Enfold 3D. (Depending on the version of Photoshop Extended you are using, you may need to adjust ambient lighting.)
Let's examine this project file to see how the 3D model of the MAX Phone packaging is used. First, in the Layers panel, hide the layers named Logo and Caption, so you can focus on the package model.
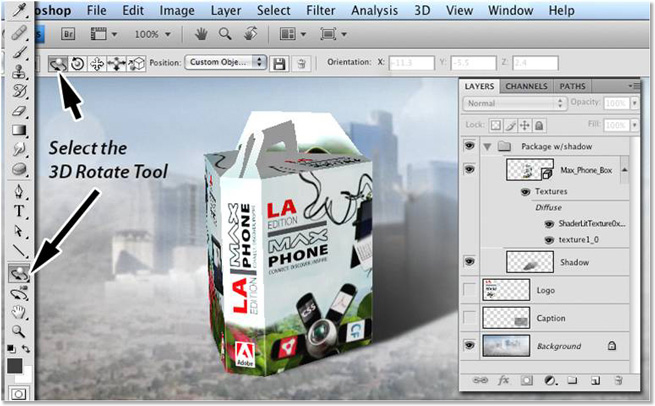
Figure 5. Modifying 3D layers in Photoshop Extended.
As you can see in Figure 5, the 3D layer has been placed in a folder group named "Package w/shadow." Let's manipulate the 3D model so you can get a feel for how to modify 3D layers to match your scene. First, select the layer named MAX_Phone_Box in the Layers panel. Now go to the Tools palette and select the 3D Object tool. You'll notice that in the Tool Options bar at the top of the Photoshop window you get a series of tool variations. Select the 3D Rotate tool on the far left. Now click your package model in the document. You can see that this tool allows you to freely rotate the model. You can also experiment with the other variations of this tool as well as use the 3D Camera tool, which alters the point from which the model is viewed. When you're finished experimenting, revert the project back to its original state.
The 3D panel is an important control center for the Photoshop Extended 3D world. To access it, choose Windows > 3D. With the 3D panel open, click the Lights button at the top of the panel. This gives you access to the light sources. In your source file, you can see that there is only one light source. Select the light named "Light 1." This activates the controls in the lower section of the panel. To enhance the lighting, change the number in the Intensity field to 3.5. The package is now much more stark and brightly lit. Then rotate the light source so that it matches the direction of the lighting on the buildings in the background as well as the shadow that was previously created.
By selecting the Rotate Light tool in the lower left section of the 3D panel, you can directly manipulate the light on the 3D model. Click the model and move the light to the left until you get something that looks like the image in Figure 6.

Figure 6. The 3D Lights panel in Photoshop Extended enables you to manipulate the lighting of your 3D object.
To get rid of the jagged, aliased edges of the 3D image, click the Whole Scene button at the top of the 3D panel. You'll see names for the mesh components (the actual geometry) that make up the model. Select Scene — the top entry in that list — to access controls to adjust the Anti-Alias setting (among a host of other powerful controls). Set the Anti-Alias pop-up menu from Draft to Best. You may notice that the inside of the package starts to show through to the outside. Since we don't want to see the inside of the packaging for this illustration, you can hide it. Click the Hide button to the left of the Inside mesh. (This works the same way as hiding a layer in the Layers panel.) Now you should see a perfect model with realistic lighting and clean edges.
Summary
I hope this tutorial sparked some ideas and got you thinking about how to leverage these tools that bridge the gap between 2D and 3D in your own design work.
If you enjoy exploring the cutting edge of new media, I recommend you also check out the Strata Live 3D CX free trial. Live 3D makes it easy to publish interactive 3D models to the web and to Adobe PDF. The example in Figure 7 uses the model we created in this tutorial. It was embedded in this page using a snippet of code similar to a YouTube video. Click and drag to experience Live 3D.
Figure 7. See and manipulate a preview of the MAX Phone packaging in Strata Live 3D.
The Strata products mentioned in this article are part of the Strata Design 3D CX Suite for Mac and PC. They are available as free trial downloads from strata.com.
Dave Klein is an online marketing consultant based in Boulder, Colorado. He has worked with several Adobe partners focusing on 3D software and technologies since early 2000. Reach him at kleinnewmedia.com.