Creating a Slide Show in Photoshop Elements 6.0
This tutorial will show you how easy it is to create a stunning Slide Show with Adobe Photoshop Elements 6.0.
Requirements
For this tutorial, you need the following software:
- Adobe Photoshop Elements 6.0
Prerequisite knowledge:
- Basic knowledge of Photoshop Elements.
Creating a Slide Show
- Select all images you would like to include in your Slide Show in the Photoshop Elements Organizer Photo Browser. You can select several images by holding down the Control key and clicking on them.
- With the images selected click on the CREATE tab in the Task pane.
- Choose the button Slide Show .... This opens the Slide Show Preferences dialog box (see figure 1).
- Confirm the dialog box with OK. The Slide Show Editor window opens.
- Click on the Quick Reorder button to easily rearrange the individual slides in your Slide Show.
- Rearrange the images by dragging and dropping them, until you are satisfied with the order.
- Move your cursor the icon between two slides. These icons represent the transition effects. Click on the triangle next to the transitions box to expand the list of transition effects (see figure 2).
- Click on the Back button to return to the Slide Show Editor standard view. Notice that all slide order and transition effects changes have been made to the Slide Show.
- Click on the first slide in the Storyboard.
- Click Enable Pan & Zoom.
- The Start bounding box has a green outline. In the Preview window, drag a corner of the bounding box to resize it. Then drag the Start box to the area of the photo where you want panning and zooming to begin. Resize the box to cover the area you want to focus on.
- Click on the thumbnail End in the Properties area. The End bounding box has a red outline. In the Preview area, resize and move the box until it covers the area you want the panning and zooming to end.
- Click on the button Add Audio in the Slide Show dialog box.
- Select an audio file and click Open.
- Click on the Fit Slides To Audio button above the Timeline. This adjusts the slides duration so the length of the Slide Show and the audio clip match.
- Click on the first slide and click on the Play button below the Preview window to begin the Slide Show.
- Click on the Pause button to stop the playback.
- When you are satisfied with your Slide Show, click on Output... at the top of the Slide Show Editor.
- Choose Send to Premiere Elements and click on OK.
- The dialog box prompts you to save your Slide Show before editing it in Adobe Premiere Elements. Click OK.
- Enter a name for the Slide Show and click Save.
Here you can change settings for your Slide Show. Remember that you can always change these settings later while creating the Slide Show.
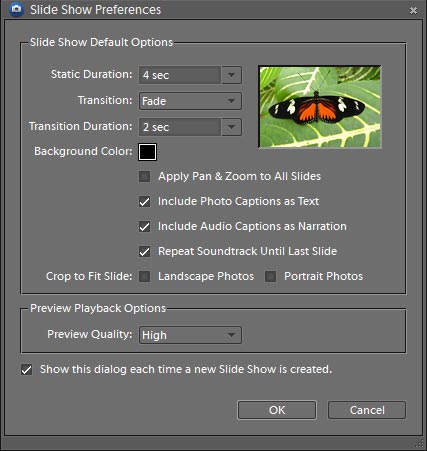
Figure 1: The Slide Show Preferences dialog box.
The Slide Show editor provides you with many ways to customize your Slide Show including adding images, text and other elements. The Slide Show Editor consists mainly of the Preview window, the Properties area where you can edit the selected object settings, and the Timeline. If you want to preview your Slide Show you can either hit the Spacebar on your keyboard or press the Play button underneath the Preview window.
You can also use this window to chose the transitions between the slides.
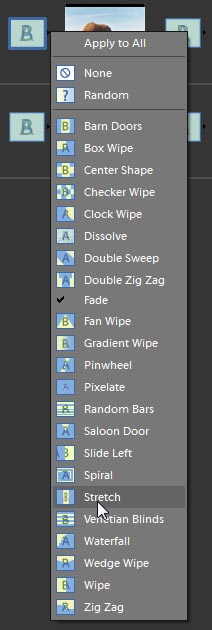
Figure 2: Easily change the transition effects.
You can also remove images from your Slide Show by selecting them and pressing the Delete key.
Notice that the Properties area shows the settings for the selected item. For example, you can add a Pan & Zoom animation.
Repeat this procedure for further images to add a dynamic effect to your Slide Show.
Now we want to add audio to the Slide Show.
You can now see a new audio track in the Organizer, below the below the Timeline. If you scroll over the audio track, you may notice that it is too short for the Slide Show. In this case, Photoshop Elements will automatically repeat the audio clip until the end of the Slide Show. If you want to manually fit your slide show to the audio clip, you could delete some images, or adjust the duration of the individual slides.
You can watch a preview of your Slide Show with all the transitions and background music.
At this point you can add further elements from the Extras area or edit single slides using the Properties area.
The following dialog box offers the following options to save your Slide Show. You can save it as a PDF file, burn it to a DVD or Video CD, view it on a connected TV set. If Adobe Premiere Elements is installed on your computer, you can also send your Slide Show to Premiere Elements for further editing (see figure 3).
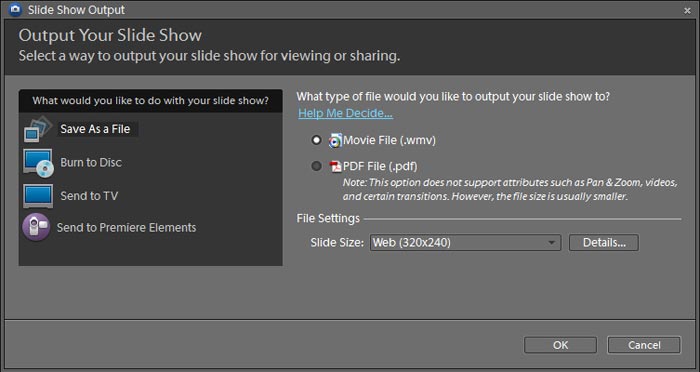
Figure 3: There are many ways to publish your Slide Show.
Adobe Premiere Elements is launched and the Slide Show is placed in the Timeline for further editing.
Where to go from here
For more information and additional tutorials, visit the Adobe Design Center.