|
Create and edit a simple object
In this section you'll begin creating artwork. First you'll create the rectangular portion of the logo. You'll draw the object as well as modify its shape and size.
Draw a simple shape
Here you'll use the Rectangle tool to draw a simple shape and the Object panel to modify its size. You'll also use the Zoom tool to increase the document's view percentage.
| 1 |
With the mylogo.fh11 file still open in FreeHand, click the Rectangle tool in the Tools panel.
 |
|
If the Rectangle tool isn't visible, the Polygon tool may be visible instead. If this is the case, click and hold the Polygon tool to display a tool pop-up menu, then select the Rectangle tool. Tools that have pop-up menus display a small arrow in their lower right corner.
 |
| 2 |
Drag the Rectangle tool diagonally on the document page to draw a rectangle, but don't release the mouse button.
 |
| 3 |
With the mouse button still held down, press and hold the Spacebar on the keyboard, then move the mouse pointer again. |
|
The rectangle moves along with the pointer, without being resized. This feature allows you to change the position of the rectangle while you draw it. |
| 4 |
Release the Spacebar to continue drawing the rectangle, and release the mouse button when you finish drawing. Don't worry about the rectangle's exact size. |
|
When you release the mouse button, the rectangle is selected in the Document window. When a simple shape is selected in FreeHand, four selection handles appear around it. |
|
Tip: At any point during the tutorial, if you accidentally deselect an object and need to reselect it, click that object using the Pointer tool.
 |
| 5 |
Select Points as the unit of measurement if it isn't already selected in the Units pop-up menu on the Status toolbar (Windows) or at the bottom of the Document window (Macintosh).
 |
| 6 |
If the Object panel is not already displayed, select Window > Object. |
|
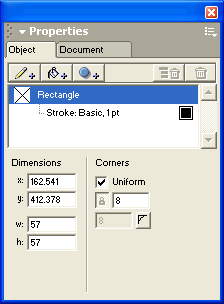
The top portion of the Object panel displays the Properties list, a hierarchical list that contains the properties for a selected object. Currently, the Rectangle item is selected, and it has one property, a stroke. The attributes for the selected property appear in the bottom portion of the Object panel. The contents of the bottom of the Object panel change depending on the property selected in the Properties list. |
| 7 |
In the bottom portion of the Object panel, set the width and height to 57, then press Enter (Windows) or Return (Macintosh). |
| 8 |
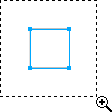
Click the Zoom tool in the Tools panel and drag a marquee (or a rectangular selection) around the rectangle. This allows you to get a closer view of the rectangle as you work.

 |
 |
|
Edit the shape
Next you'll manipulate the rectangle directly onscreen. You'll use the Subselect tool to create rounded corners. Then you'll modify the corners by entering precise measurements in the Object panel.
| 1 |
With the rectangle still selected on the page, click the Subselect tool in the Tools panel.
 |
|
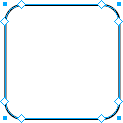
When you select the Subselect tool, the corner points on the rectangle become larger and diamond-shaped. On rectangles, these points are called radius handles. |
| 2 |
With the Subselect tool, drag one of the radius handles inward toward the rectangle's center. |
|
As you drag, the corner becomes rounded and two more radius handles appear on either side of the curve. The rest of the rectangle's corners also reflect this change, because Uniform is selected in the Corners portion of the Object panel. If Uniform were deselected, you could modify each corner independently.
 |
| 3 |
To precisely set the curve of the rounded corners, set the corner radius to 8 in the Corners section of the Object panel, then press Enter (Windows) or Return (Macintosh).
 |
|
The curve of the corners changes by the amount you specified. |
 |
|
You have created a rectangle and modified its size and shape onscreen and in the Object panel. In the next section you'll complete the rectangle by applying multiple strokes and a fill.
|