|
Apply multiple strokes and fills
In FreeHand, strokes and fills are properties of the objects to which they are applied. Objects can have any number of properties applied to them at the same time. For example, a single object can have more than one stroke and more than one fill. Live effects, which you'll learn about later in the tutorial, are also considered properties of the objects to which they are applied.
An object's properties can be reordered. Changes in property order alter the appearance of the object.
In this section you'll gain an understanding of how powerful this capability is by applying more than one property to an object and then reordering its properties.
Apply and rearrange multiple strokes
First, you'll apply two strokes to the rectangle you created previously. You'll then use the Object panel to modify the width of these strokes and rearrange their order.
| 1 |
With the rectangle you edited in the previous section still selected, click the Stroke property in the Properties list of the Object panel. The options at the bottom of the panel change to display attributes for that property. |
| 2 |
Set the stroke width to 3 in the bottom portion of the Object panel, then press Enter (Windows) or Return (Macintosh). |
| 3 |
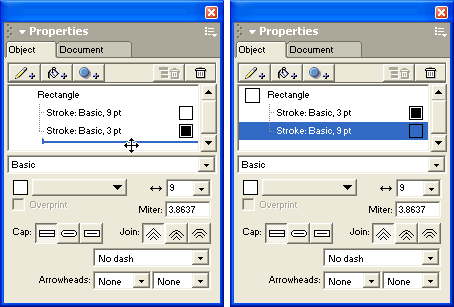
Click the Add Stroke button near the top of the Object panel. A second stroke appears in the Properties list.
 |
| 4 |
For this new stroke, set its width to 9 in the Object panel, and press Enter (Windows) or Return (Macintosh). |
| 5 |
In the Tools panel, click the stroke color box and select White as the new color.
 |
|
In the Document window, although the selection is still visible, you can no longer see the rectangle itself because the larger white stroke obscures the smaller black stroke. |
| 6 |
In the Properties list of the Object panel, drag the white stroke property below the black stroke. As you drag, a line appears indicating where the stroke will be dropped when you release the mouse button.
 |
 |
|
The rectangle in the Document window changes to reflect the change you made. At this point, you may not be able to see the effect of the multiple strokes, because the rectangle currently has no fill. You'll apply a fill in the next section.
Apply and modify a gradient fill
Gradients apply color in smooth transitions from one color to the next. Here you'll use the Object panel to apply a gradient fill to the rectangle. You'll define the gradient's colors in the Color Mixer panel, and then modify the gradient's appearance by dragging its fill handles.
| 1 |
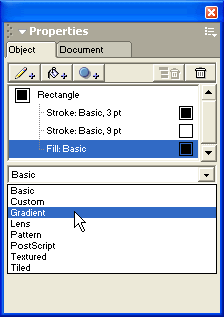
With the rectangle you modified in the previous section still selected, click the Add Fill button in the Object panel.
 |
| 2 |
Select Gradient from the fill type pop-up menu.
 |
|
The fill of the rectangle in the document and the options in the Object panel change to reflect your selection. |
| 3 |
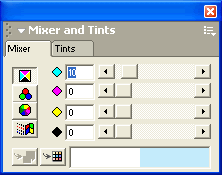
If the Color Mixer panel isn't already displayed, select Window > Color Mixer. |
|
Along the left side of the panel are color mode buttons. The color mode you select should depend on your document's intended output. CMYK is generally used for print documents, and RGB is best for screen output like web graphics. There are other modes available as well, but for the purposes of this tutorial, you'll define colors in CMYK mode. |
|
Note: For an explanation of the other color modes available, see the index of Using FreeHand MX or search the FreeHand Help topics. |
| 4 |
Click the CMYK mode button if it isn't already selected, and set the cyan value to 10 by typing or using the slider. Ensure that all other color values are set to 0.
 |
|
The color in the color box at the bottom of the panel changes to reflect the value you entered. |
| 5 |
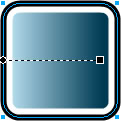
Ensure that the Object panel is open, then drag the new color from the color box of the Color Mixer panel onto the color swatch at the bottom left of the Object panel.
 |
|
The color swatch changes to display the new color you created. |
| 6 |
Use the Color Mixer panel again to create another color. This time set the Cyan value to 100 and the Black value to 60. |
| 7 |
Drag the new color from the color box of the Color Mixer panel onto the color swatch at the bottom right of the Object panel. The color swatch changes to display the second color you created. You've created a gradient out of these two new colors. |
|
The rectangle on the page displays gradient handles. You can drag these to adjust the appearance of the gradient. |
| 8 |
In the Document window, drag the right gradient handle toward the center of the rectangle slightly, as shown in the example below.
 |
|
|
By performing the previous two procedures, you discovered that you could apply more than one stroke or fill to a selected object. You also explored how to apply and edit gradients. In the next section you'll add a key component to the logo: its text.
Note: Before continuing, select File > Save. It's a good habit to save often.
|


