|
Apply special effects
Next you'll perform a variety of graphic operations to create unique effects. In the following procedures, you'll modify the PDA graphic by giving it perspective, applying a shadow, and creating transparency.
Extrude an object
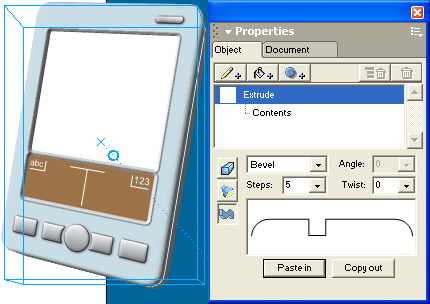
Extrusion is a powerful feature of FreeHand. It allows you to easily give flat, two-dimensional (2D) objects a 3D appearance. Here you'll extrude the body of the PDA graphic.
| 1 |
In the Layers panel, click the padlock icon beside the PDA Background layer to unlock it. |
| 2 |
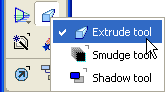
Click the Extrude tool in the Tools panel.
 |
|
If the Extrude tool isn't visible, another tool from its pop-up menu may be visible instead. If this is the case, click and hold either the Smudge tool or the Shadow tool (whichever is visible) to display the tool pop-up menu. Then select the Extrude tool. Tools that have pop-up menus display a small arrow in their lower right corner.
 |
| 3 |
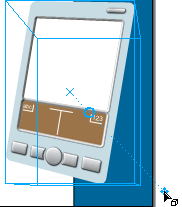
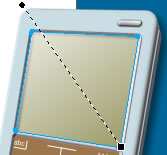
Drag from the center of the PDA graphic and toward the lower right corner as shown below. As you drag, an outline of the extruded object is displayed, and the mouse pointer drags the object's vanishing point.
 |
|
Extrude attributes appear in the bottom portion of the Object panel.
 |
| 4 |
Set the Length of the extruded object to 70. |
|
If you type a value rather than using the slider, be sure to press Enter (Windows) or Return (Macintosh) to apply the new value. This rule pertains to any option in FreeHand in which there is more than one way to specify a value. |
| 5 |
Set the x and y values for the vanishing point of the extruded object to 730 and 110. And remember, because you're typing a value into a text box, you need to press Enter (Windows) or Return (Macintosh) to apply the value. |
|
Next you'll define the surface appearance for the sides of the extruded object. You'll specify a light source to create the appearance of shading. |
| 6 |
Click the Surface button in the Object panel to display surface attributes.
 |
| 7 |
Select Left from the Light 2 Direction pop-up menu in the Object panel. |
|
Next you'll set the profile of the extruded object. The profile defines the shape of the path that the sides of the extruded object follow. To set the profile, you'll copy and paste a path from a library symbol. |
| 8 |
If the Library panel is not already displayed, select Window > Library. |
| 9 |
In the Library panel symbol list, double-click the icon beside the Bevel symbol. |
|
An editing window appears with a path displayed. |
| 10 |
Select Edit > Select > All, and then select Edit > Copy. The path is copied to the Clipboard. |
| 11 |
Close the editing window to return to your document. |
| 12 |
Click the Profile button in the Object panel to display profile attributes.
 |
| 13 |
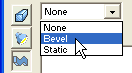
Select Bevel from the extrude type pop-up menu.
 |
|
The Profile Preview box near the bottom of the panel displays the extruded object's profile. |
| 14 |
Click the Paste In button. |
|
The preview and the extruded object in the document change to reflect the path you just copied and pasted from the library.
 |
| 15 |
In the Document window, click outside the extruded object to apply the extrude settings. |
 |
|
Apply a drop shadow as a live effect
If you completed the first tutorial in this series, you applied a live effect, the ragged effect, to the ink graphic in the logo. The ragged effect is a vector effect. Live vector effects produce vector graphics. FreeHand also lets you apply live raster effects. Live raster effects produce raster (or bitmap) graphics even when applied to a vector object.
The difference between the two is something to consider when planning a project. While vector effects scale and resize smoothly regardless of monitor or printer resolution, raster effects look best when rendered at the correct resolution for the monitor or output device on which they will be displayed.
Because this brochure document is intended for print and movie display, the resolution for raster effects has already been set for you at 144 dpi. Although this setting isn't quite as high as you might normally specify for print output, it is greater than what is required for screen output. At this resolution, the raster effects should look similar when viewed in print and when viewed onscreen in a SWF movie. To learn more about adjusting raster effect resolution, see Using FreeHand MX or search the FreeHand Help topics.
In this procedure, you'll further enhance the 3D appearance of the PDA graphic by applying a drop shadow, which is a raster effect.
In this procedure you learned about the two types of live effects, vector and raster effects. You'll apply another live raster effect in the next procedure.
Apply a gradient mask as a live effect
Next you'll apply another live raster effect, a gradient mask, to the PDA screen.
Masks are powerful tools in graphic design. You can conceal or reveal objects that lie beneath them based on the colors used in the mask. By using a gradient as the mask, you can give objects a gradual transparent appearance.
| 1 |
In the Layers panel, unlock the PDA Screen layer by clicking its padlock icon. |
| 2 |
Click the PDA graphic's white screen in the document to select it. |
| 3 |
Click the Add Effect button in the Object panel. |
| 4 |
Select Transparency > Gradient Mask from the effect type pop-up menu. A gradient mask is applied to the PDA screen. |
|
Gradient handles also appear on the object. The round handle is the start point for the gradient, and the square handle is the end point. Dragging the start point repositions the entire gradient, and dragging the end point adjusts the length and angle of the gradient. |
| 5 |
Position the gradient handles such that they appear as shown in the following illustration. Drag the start point first, then drag the end point.
 |
| 6 |
Lock the PDA Screen layer in the Layers panel to ensure that you don't accidentally move or select the PDA screen later. |
|
|
The gradient mask you applied causes the screen of the PDA graphic to appear semitransparent and reflective. Later in the tutorial, you'll be able to see its full effect, when you use the PDA screen as a clipping path for an imported animation.
Note: Remember to save your document often by selecting File > Save.
|