|
|
Completing the update page
Now that your results page contains a filtered recordset, it requires two more elements before it can become a functional update page: an HTML form and an Update Record server behavior. You can add these two building blocks in a single operation using the Record Update Form live object.
After the live object places the building blocks on the page, you can use the Dreamweaver design tools to customize the form to your liking, or the Server Behaviors panel to edit the Update Record server behavior.
To build the update page with the Record Update Form live object:
| 1 |
Open the page in Design view, then choose Insert > Live Objects > Record Update Form. |
|
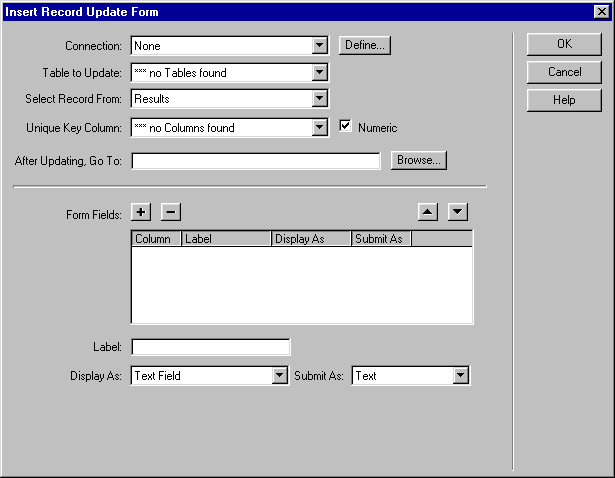
The Insert Record Update Form dialog box appears. |
|
|
|
|
|
|
|
|
|
|
| 2 |
Use the Connection and Table to Update pop-up menus to specify the database table containing the records to be updated. |
| 3 |
In the Select Record From pop-up menu, specify the filtered recordset that you created in the previous section. |
| 4 |
In the Unique Key Column pop-up menu, select a key column to identify the record in the database table. Be sure that the values in this database column are unique. (In this example each last name must be unique.) If the value is a number, select the Numeric option. |
| 5 |
In the "After Updating, Go To" box, enter the page to open after the record is updated in the table. |
|
Next, you'll create an HTML form for data entry by completing the bottom half of the dialog box. |
| 6 |
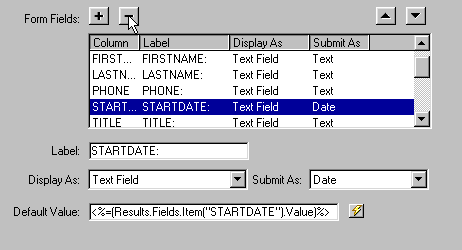
In the Form Fields area, specify the form objects you want to include on the update page's HTML form, and which columns in your database table each form object should update. |
|
By default, UltraDev creates a form object for each column in the database table. To eliminate unwanted columns from your results/update display, select a database table column and click the minus (-) button. |
|
|
|
|
|
|
|
|
|
|
|
You can change the order of the form objects on the HTML form by selecting a form object in the list and clicking the up or down arrow in the top right corner of the dialog box. |
| 7 |
Specify how the HTML form should display each data-entry field by selecting a row in the Form Fields table and entering the following information in the boxes below the table: |
 |
In the Label box, enter a descriptive label to display beside the data-entry field. By default, UltraDev displays the table column's name in the label. |
|
In the Display As pop-up menu, choose a form object to serve as the data-entry field. You can choose Text Field, Text Area, Menu, Checkbox, Radio Group, and Text. For read-only entries, choose Text. |
|
In the Submit As pop-up menu, choose the data format expected by your database table. For example, if the table column accepts last names, choose Text. |
|
If your form object is a text field, text area, or text, make sure the Default Value box displays the current value from the database. (UltraDev enters a script to perform this task by default.) Click the lightning-bolt icon to change the database value to be displayed. |
| 8 |
Click OK. |
|
|
The live object adds both an HTML form and an Update Record server behavior to your page. The form objects are laid out in a basic table, which you can freely customize using the Dreamweaver page design tools. (Make sure all the form objects remain within the form's boundaries.)
To edit the server behavior, open the Server Behaviors panel (Window > Server Behaviors) and double-click the Update Record behavior.
|
|
|
|