Combine AI speed with pro techniques for realistic composites
[Jesús Ramirez]: Great composites aren't a one-click solution; they're what happens when you combine AI with traditional skills to take them further.
My name is Jesús Ramirez.
In this video, you'll learn how to mix AI tools with traditional Photoshop skills to take a composite from a rough cutout to a result that looks like it was shot on location.
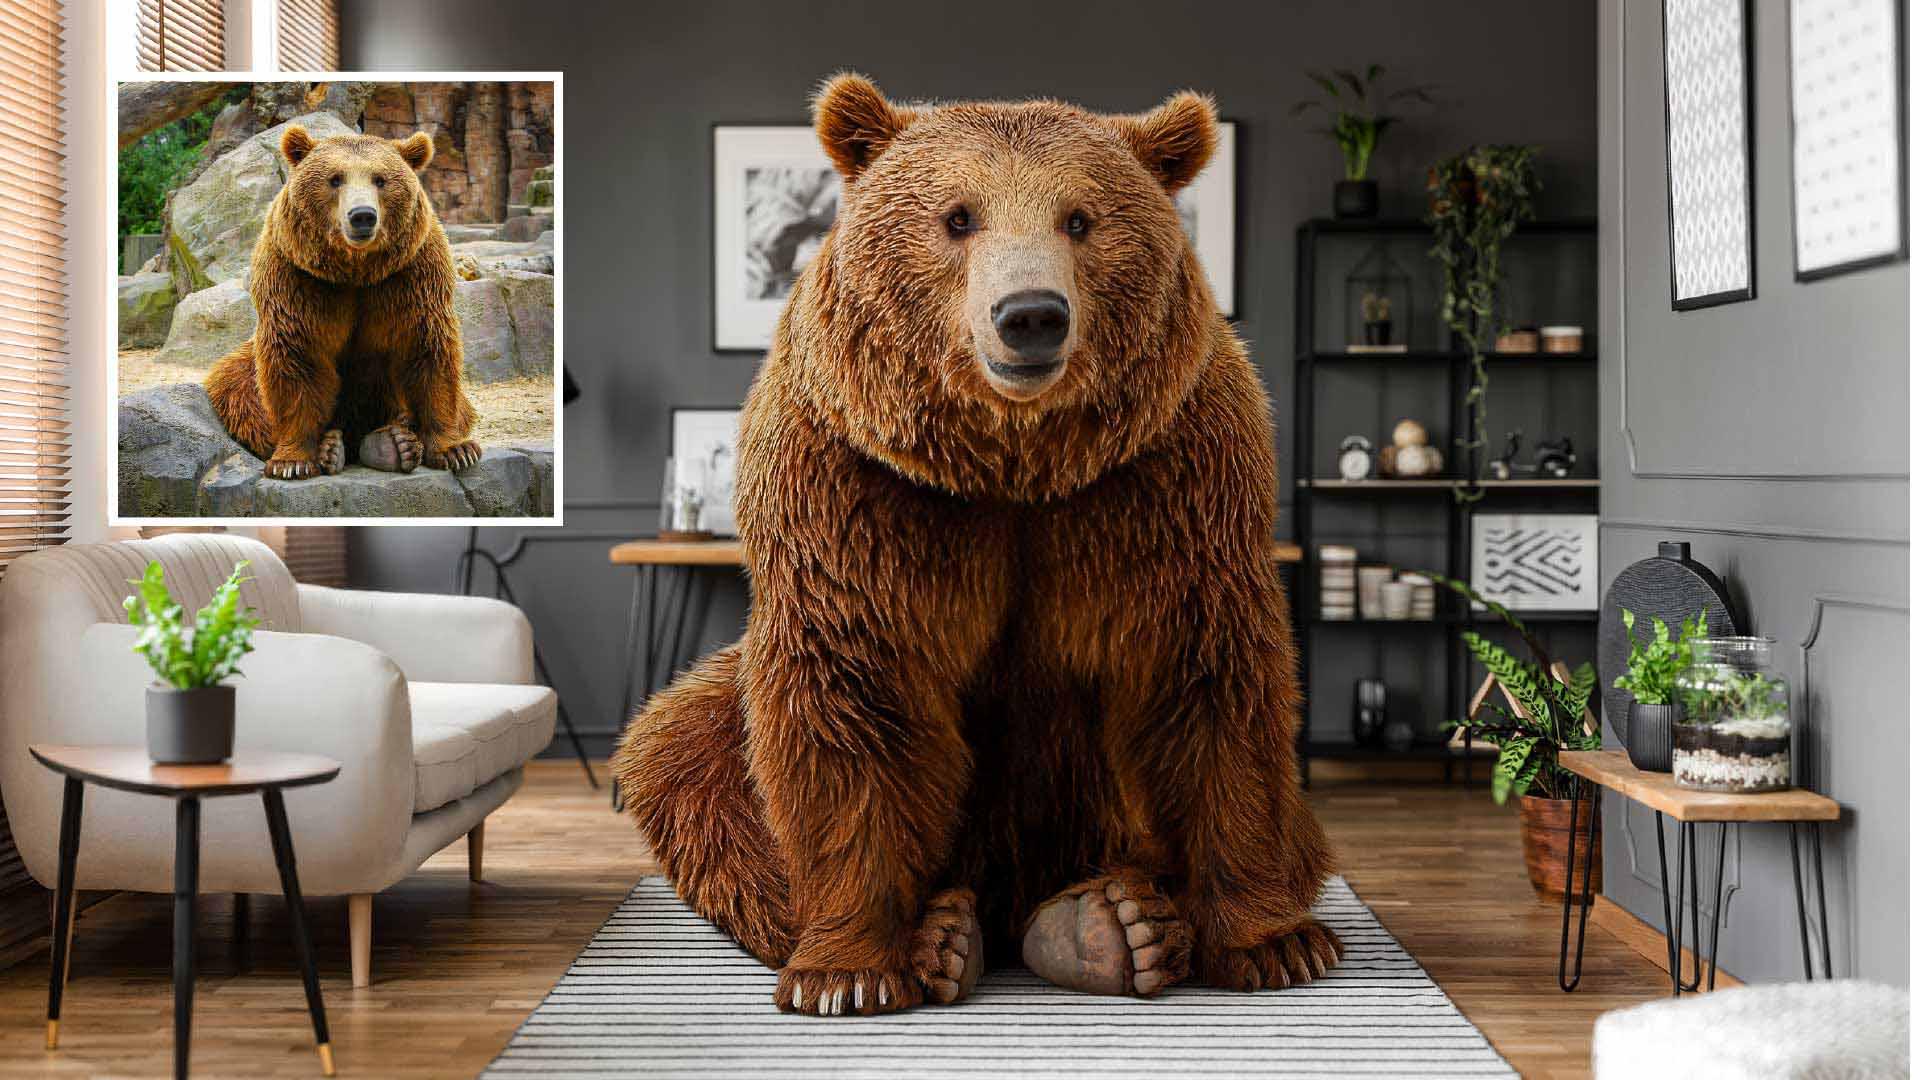
This document has two layers - the Background and the Bear.
Refine edges to show realism with custom brushes and techniques
The goal is to make it seem as if the bear is sitting on this rug.
To start, let's isolate the bear to place him in the new background.
Click the Remove background button from the Contextual Task Bar.
Photoshop uses AI to find the main subject, and creates a layer mask that hides the background automatically.
The overall cutout looks solid, but the fur edges tell a different story.
If you tap on the Z key to enable the Zoom Tool and zoom in on the fur, you'll see why.
The edges are fuzzy and not defined.
For a web graphic, that might be fine, but for professional high-resolution work, we need more.
AI tools aren't one-click solutions, and this mask is a perfect example.
It got us 80% of the way there, and now a traditional Photoshop technique will handle the rest - a custom fur brush to clean up the edges.
To get started, go into File and choose New...
Set the Width to 1080, Height to 1080, Resolution at 72, and set the Background to White.
Then click the Create button.
Now select the Curvature Pen Tool from the Toolbar.
In the Options Bar, click on the Tool Mode dropdown and choose Shape.
And set the Fill to black.
Click once on top of the canvas, once at the bottom, then click a third time near the start to close the shape.
Now click in the middle of the path and drag the curve to the left.
Do the same thing on the other side until we have something that looks like a strand of hair.
Adjust it so that the end points stay inside the document.
Now let's turn this shape into a brush.
Go into Edit and choose Define Brush Preset...
Name it 'fur' and click OK.
That hair strand shape is now your brush tip.
Now when you brush, Photoshop stamps that shape repeatedly along your stroke.
On its own, it just looks like a pattern.
But by adjusting a few settings, you can introduce randomness in the size, angle, and spacing of each stamp.
And that randomness is what makes it read as fur.
Go into the Brush Settings by clicking on this icon from the Options Bar.
Enable Shape Dynamics, increase the Size Jitter, so each brush tip is a different size.
Watch the Brush Stroke preview window at the bottom.
It updates with the settings you set.
Notice how this small adjustment is already making the brush stroke look like fur.
Now increase the Angle Jitter so each tip has a different angle.
Go into Scattering, increase the Scatter, and the Count.
Paint over another stroke and notice the difference.
Now it looks like fur.
This is the brush we'll use to paint on the mask.
Close this document without saving it.
Back in our working file, we need to contract the mask to give us room to paint the fur edges back in.
To do so, go into Filter, Other, and choose Minimum...
The Minimum filter allows you to contract the mask.
Look at the preview as I drag on the slider.
In this case, you can contract the mask about 6 pixels.
Then press OK.
Tap the Z key to enable the Zoom Tool and zoom into the fur edges.
Notice how the fur looks blurry and not defined.
Next tap B to enable the Brush Tool.
Use the left bracket key to reduce the brush size so that the fur you paint in matches the bear.
The bracket keys are to the right of the letter P on North American keyboards.
Make white your foreground color.
White reveals pixels on a mask.
Start painting along the edge.
As you reveal pixels to the mask, they'll look like fur because of the brush shape we built.
The new fur edge will not land in the exact original position, and that's fine.
You do not need an edge faithful to the original.
Instead, you're creating the illusion that this bear belongs in this room.
That's a creative judgment AI can't make and why this step is so important.
But there is one thing to fix.
The fur we're painting doesn't follow the natural flow of the bear's coat.
Here's an adjustment that will take care of that.
Go back into the Brush Settings and go into Shape Dynamics.
From here, change the Angle Jitter control to Direction.
Now the fur follows the direction you paint.
Keep your brush strokes short and deliberate following the natural growth direction of the coat.
Each stroke shapes the edge.
We'll take a moment after each one to see how it's reading.
If a stroke doesn't look right, press Control Z on Windows or Command Z on the Mac to undo and try again.
You can also tap on the arrow keys to rotate the brush to better match the direction of the fur.
Then hold the Spacebar and drag to pan around the image and keep working on the edges.
Take your time with this.
The AI selection handled the tedious work so you could be here making the creative decisions.
And this is my result.
The edges look completely natural now, and the fur looks like it belongs in the scene.
That is the power of combining AI with traditional Photoshop techniques.
Match light, color, and detail to unify the scene
But the composite isn't finished yet.
The bear's lighting and color still need to match the background.
And that's where we'll take advantage of generative AI.
Click the Harmonize button from the Contextual Task Bar.
Photoshop generates three Variations that adjust the bear's lighting, shadows, and color to match the background.
Notice that the fur edges you painted are still intact and combined with the harmonized lighting, the bear looks like it belongs in this room.
The results even include contact shadows on the rug, which grounds the composite and makes it feel real.
Click through all three Variations in the Properties panel to see if there's a better result.
Two of them stand out for different reasons to me.
The first generation has stronger shadows on the floor and wall.
The second has a better-looking bear.
The good news is that you don't have to choose between them.
You can combine them.
Press Control J on Windows, Command J on the Mac to duplicate this generative layer.
On the duplicate, set the first variation - the one with the wall shadow.
Then click on this layer's layer mask.
Select the Brush Tool from the Toolbar and make black your foreground color, and switch to a soft brush from the General Brushes - this is one of the default Photoshop brushes - and increase your brush size with the right bracket key.
Then paint with black to hide parts of the top layer you don't want, revealing the bear from the layer underneath.
So what you're doing here is keeping the wall shadow from the top layer and the bear from the bottom.
Next, let's use another traditional Photoshop technique to create the illusion of detail.
Disable the original Bear layer, then click on the first Harmonized layer, hold Shift and click on the top layer to select both.
Right-click on the selection and choose Convert to Smart Object.
A Smart Object lets you treat multiple layers as one, and you can apply non-destructive adjustments on top of everything.
Now you can go into Filter, Camera Raw Filter...
In the Effects panel, increase Texture to make the fur pop.
Do the same with Clarity.
In the Detail panel, increase Sharpening to add more definition to the fur and press OK when you're done.
Now you can click on the Smart Filters Eye icon to compare the before and the after.
Smart Filters include a mask.
Use the Brush Tool to paint with black over the wall and background areas, keeping the sharpening effect only on the bear.
And that's my final result.
Every part of it was intentional.
The AI handled what would have taken hours and traditional skills handle what AI couldn't.
That's what makes the difference between a composite that looks generated and one that looks real.
Now that you know how to combine AI tools with traditional Photoshop techniques, try it with your composites.
Again, my name is Jesús Ramirez.
Thank you for watching.


