Isolate your subject so layouts stay flexible
[Rob de Winter]: What if one photo could power everything for a social media post, a wide video thumbnail, a vertical story, without having to edit multiple versions separately?
My name is Rob de Winter, Adobe instructor, designer, and author from the Netherlands.
Today, I'll show you how to resize and reframe a single image into multiple formats with text in minutes.
We'll use Photoshop's AI to do the heavy lifting, and you'll see how modern Photoshop workflows help you move faster, giving you more time to be creative.
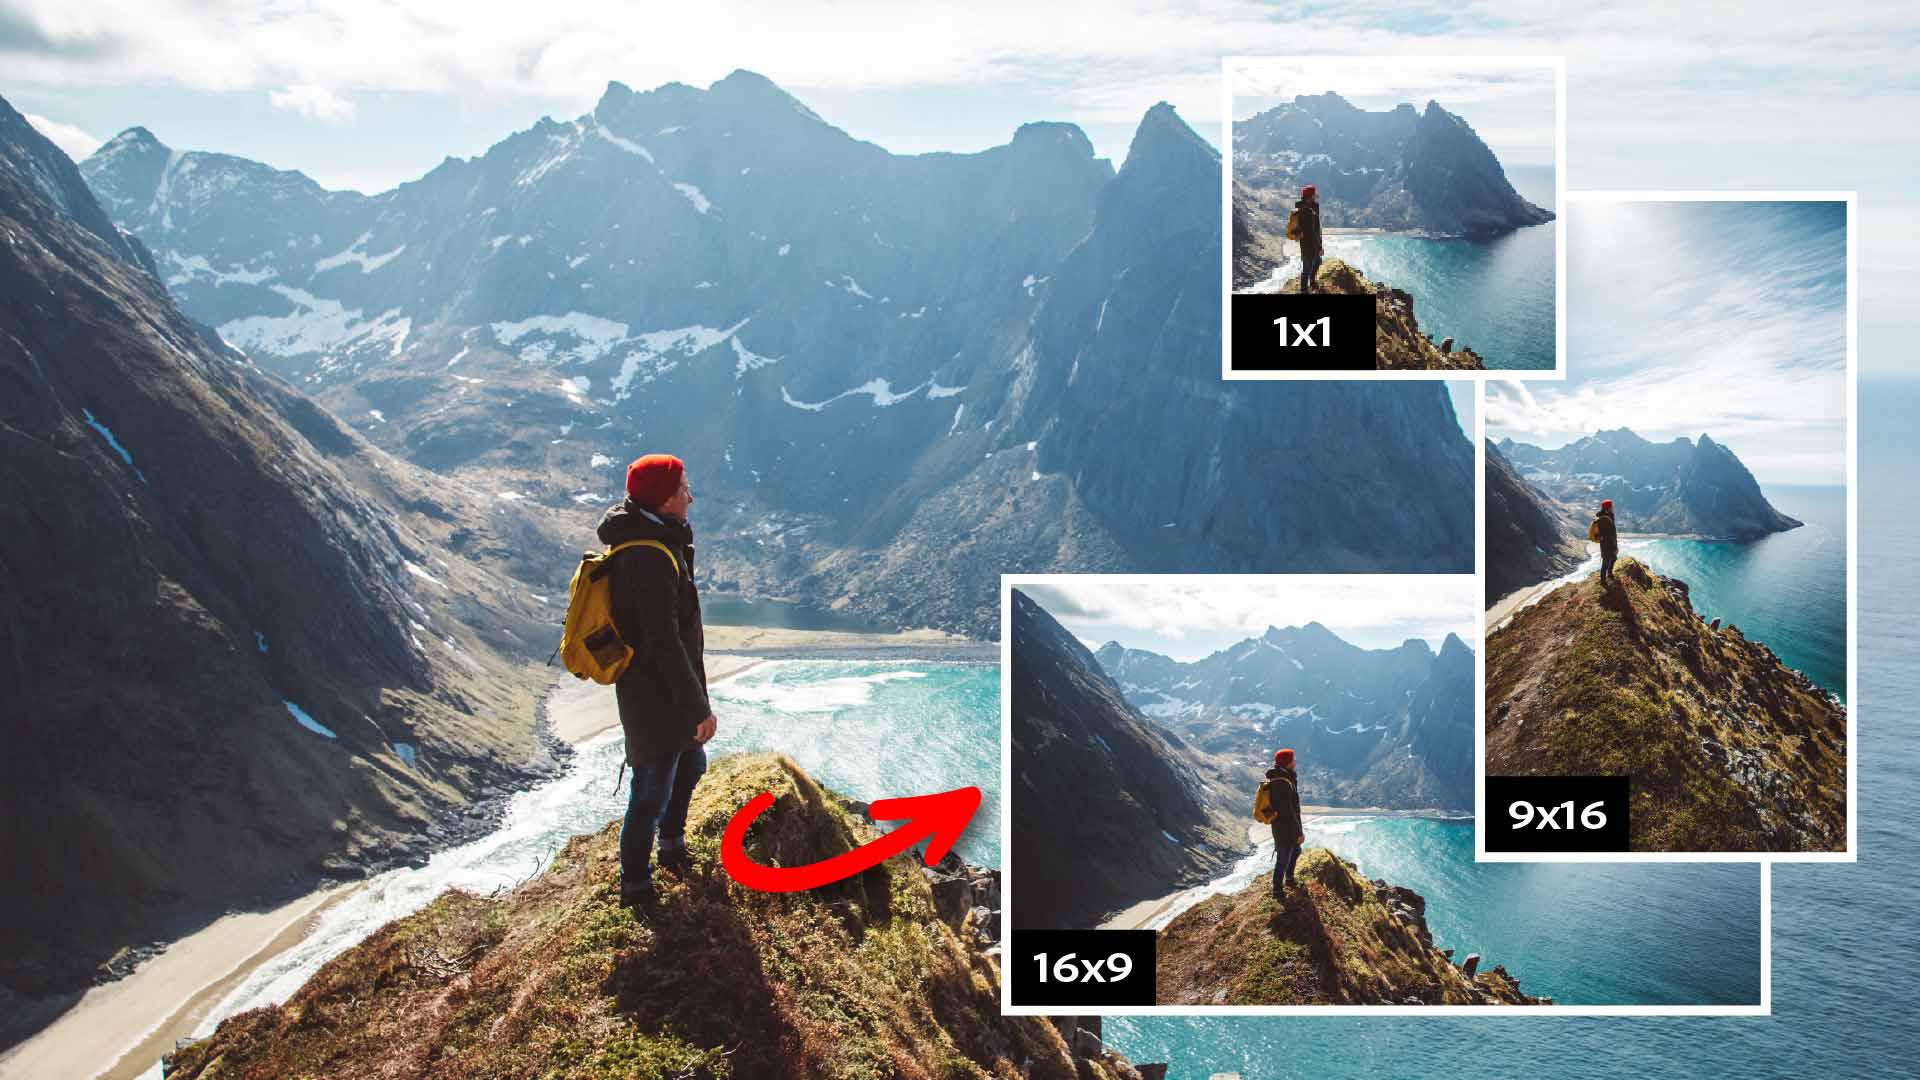
We're starting with this photo already open in Photoshop: a hiker standing on a cliff with a stunning mountain backdrop.
Before we do anything else, I want to show you something that will help you throughout this entire workflow:
Expand your canvas to the size you need to reframe without losing quality
the Contextual Task Bar.
This small bar appears wherever you're working on the image and it's context-sensitive, meaning it shows you the most relevant options for whatever you're doing at that moment.
It will help us add text, remove backgrounds, and expand our photo later on.
If you don't see it, go to Window and click Contextual Task Bar.
Let's place text behind this hiker.
To do that, we need just the hiker on its own separate layer above the background.
So the first thing we do before any expanding is duplicate the Background layer.
In the Layers panel, right-click the Background layer and choose Duplicate Layer... or use my personal favorite shortcut Command J on macOS or Control J on Windows.
With the duplicate layer selected, Click Remove background in the Contextual Task Bar.
Photoshop will automatically detect the main subject - the hiker - and cut him out.
It looks like nothing changed because the layers are stacked on top of each other.
Layer text behind your subject for depth and hierarchy
Turn off the Background layer for a second and you'll see the hiker is now isolated perfectly.
Turn the Background layer back on.
Now we're ready to work on the framing.
Instead of using a new image for each format, you can fill in content with Generative Expand.
Click on the Background layer first, because we want the generated content to land there and not on top of our subject.
Select the Crop tool.
In the Contextual Task Bar, set the Ratio to 16 : 9.
The crop overlay will snap to those proportions.
Drag the crop handles to expand the canvas.
You're now adding space on the right and the left and see empty areas appear.
In the Contextual Task Bar, click Generative Expand.
There's no need to add a prompt, so just click Generate.
Photoshop will now analyze your photo and fills in the empty areas with content that matches your photo seamlessly.
You'll get a few variations to choose from.
Use the arrows in the Contextual Task Bar to browse them and pick your favorite.
Easily reframe so your content fits every surface
In this case, I think all three variations look quite similar, so I'm choosing the first one.
Now we'll add text and drag it behind the hiker.
Click on the top layer - the isolated hiker - to select it.
This ensures our text layer will be created directly above it, and that makes it easier to edit it.
Select the Type tool and click on the canvas.
You'll see a placeholder text appear, and you can use the Contextual Task Bar to adjust your font and size if needed, and then type your text.
I'll type Outdoor Travel.
Switch to the Move tool, reposition your text so it overlaps the hiker partially, and then in the Layers panel, drag the text layer below the hiker layer.
Really cool, isn't it?
If you want to use this version, you can save it now using your preferred saving method.
Now, let's say you also need a vertical version for social media.
To easily do this, select the Crop tool again.
In the Options Bar at the top, click the swap arrows to switch from 16 : 9 to 9 : 16.
Drag the handles outward to expand the canvas.
Again, Photoshop shows empty areas.
Click Generative Expand and then Generate.
Firefly - Adobe's generative AI model - fills it in again, matching the environment beautifully.
You might want to reposition or resize your text to better suit the vertical layout.
You can make it larger or place the words underneath each other.
So that's it.
You've now resized and reframed one photo into two different versions.
Now give it a try yourself.
Again, I'm Rob de Winter, and I'm looking forward to seeing you in the next video.


