Make photos appear sharper with the Unsharp Mask.
Explore unsharp masking in Adobe Photoshop and learn how to make images clearer and more dramatic by increasing contrast and reducing noise.
Achieve crisper-looking photos.
The Unsharp Mask filter is an effect in Adobe Photoshop that allows users to achieve great image sharpening results by adjusting a few sliders.
This effect originates from traditional film photography and is rooted in a darkroom technique where a copy of the original image is intentionally blurred or “unsharpened” and then applied to the original image as a contrast mask — essentially a sheet of film placed with the negative during printing. By layering the original with the blurred version, specific low frequencies are cancelled out during the printing process and the resulting image appears clearer.
A blurred image in-camera will always be blurry — no amount of sharpening will change that. While Photoshop can’t improve your image quality, it can add clarity and improve contrast in specific areas of an image to make it clearer.
Sharpen photos with the Unsharp Mask.
“The Unsharp Mask is designed to enhance the details in an image,” says Photoshop expert Jesús Ramirez. “Photoshop is not creating the details, it’s just creating the illusion that there is more detail. And it is doing so by creating contrast on the image.”
The Unsharp Mask increases the image contrast along the edges of objects in a photo. The effect doesn’t actually detect edges, but it can identify pixel values that differ from their neighboring pixels by a certain amount. From there, the mask will increase the contrast of the neighboring pixels, making the light pixels lighter and dark pixels darker. This increased contrast makes objects more identifiable and creates an illusion of more detail.
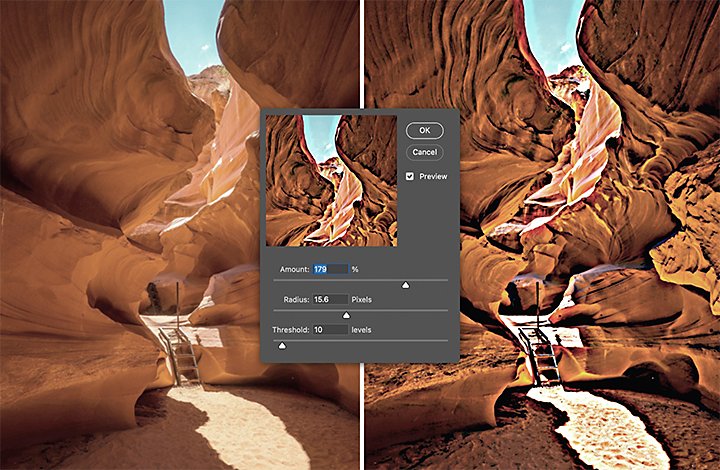
Example of the halo effect created by over-sharpening
Keep in mind, if you overshoot the sharpening, it creates a halo effect around the edges of objects. The amount you sharpen a photo is up to your personal preference and artistic vision, but you can mitigate over-sharpening halos by adjusting sliders and experimenting with the Unsharp Mask settings.
Apply an Unsharp Mask with this step-by-step tutorial.
Follow this quick tutorial to apply the Unsharp Mask to your photo and adjust it for your artistic preferences.
1. Convert the image layer.
First, open your digital image in Photoshop and make the image layer a Smart Object. Just click the menu icon in the upper-right corner of the Layers panel and select Convert to Smart Object.
This allows you to apply the Unsharp Mask as a smart filter to the input image, which keeps the sharpening effect editable, in case you need to make changes later. As a smart filter it’s also easier to change the blend mode of the sharpening, which you’ll need later in this sharpening process.
2. Apply and adjust the Unsharp Mask filter.
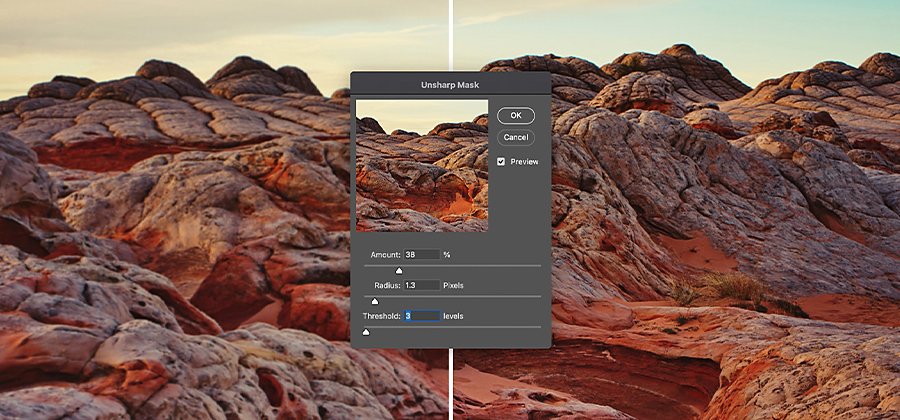
Select the Unsharp Mask filter by going to Filter › Sharpen › Unsharp Mask. Adjust the Amount, Radius and Threshold sliders to increase edge contrast, adjust the edge width and sharpen only the edges.
● Drag the Amount slider to increase the amount of contrast in the pixels. This contrast enhancement creates the illusion of greater sharpness.
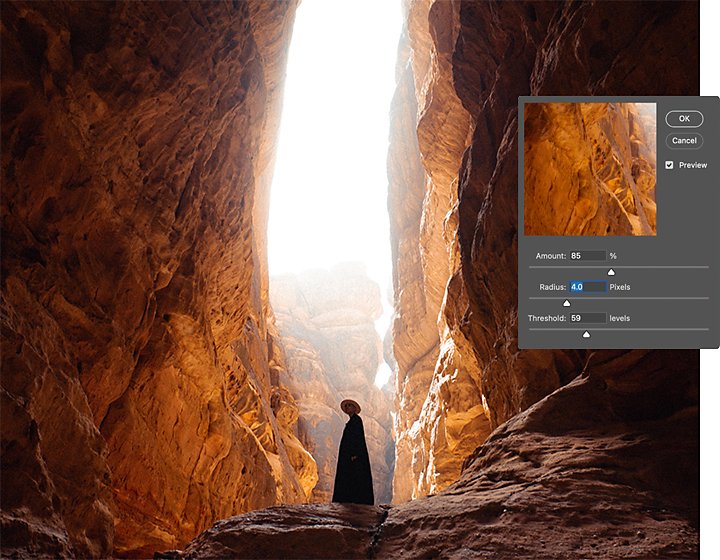
● Adjust the Radius slider to determine the number of pixels neighboring the edge pixels that will affect the sharpening. The greater the radius, the wider the effect and the more obvious the sharpening.
● Use the Threshold setting to indicate how different the sharpened pixels must be from their surrounding pixels before they are considered edge pixels. If they are considered edge pixels, they’ll be adjusted by the sharpening filter. Adjust the Threshold to get different experimental results and see what works best for your image.
3. Prevent colour shifting.
The Unsharp Mask affects the colour of pixels as well as the brightness. In areas of fine detail and complex colour textures, the sharpening can increase some colour values while decreasing others. To prevent this colour shifting, change the blend mode of the Unsharp Mask.
To change the blend mode of the Smart Object filter, double-click the Blending Options icon to the right of the filter’s name. Then in the Blending Options dialogue box, change the blend mode of the filter from Normal to Luminosity. This should preserve the colour values of your original image.
More ways to sharpen in Adobe Photoshop.
The Unsharp Mask is a very effective filter for creating striking, high-contrast images. If you want to use a more subtle sharpening effect, there are more tools to explore in Photoshop.
Try Smart Sharpen.
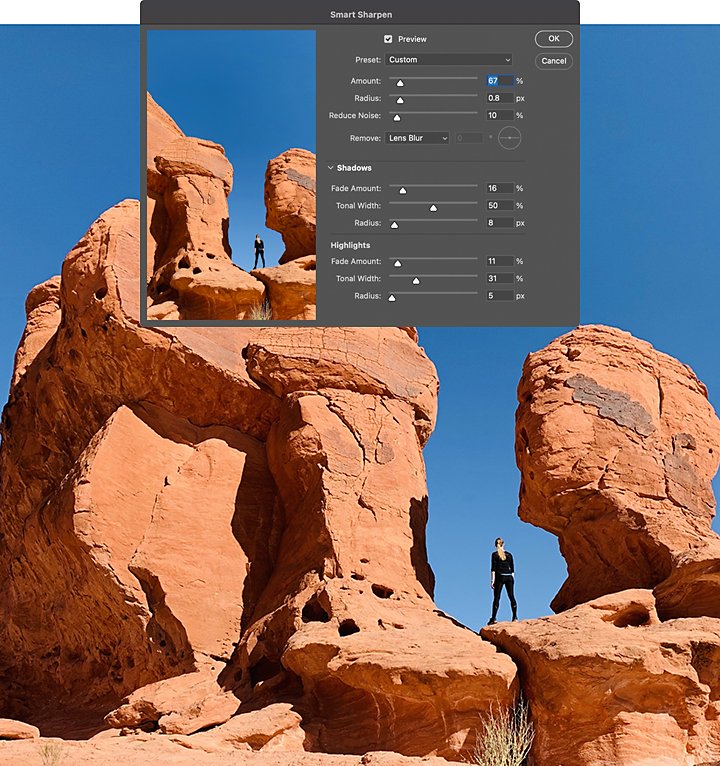
If you want to achieve a specific look with your sharpening, use the Smart Sharpen effect. “You have more control of how the sharpening is applied to the image if you use Smart Sharpen,” says Ramirez. With this tool you can set the sharpening algorithm and control how it affects the light and dark areas of your photo. This lets you subtly reduce noise, remove Gaussian Blur and more.
Explore Camera Raw sharpening.
The Camera Raw preferences offer another way to create sharpened images. “Camera Raw helps you to maintain a realistic look as you sharpen your photos,” says Ramirez. “It’s harder for it to get overblown, especially if you’re a beginner.” The Unsharp Mask is a slightly more advanced tool, while the Camera Raw sharpening is a simpler approach.
This effect lets you subtly adjust the definition of an image by increasing contrast, reducing noise or highlighting image texture. Just remember, an enhanced image won’t have more detail than the original, but the image processing will make it look slightly more clear.
As you explore image enhancement and sharpening, experiment with different tools in Photoshop and see which one works the best for you. You can also try playing with colours, effects and gradients to find some unexpected artistic results.
Contributor
Do more with Adobe Photoshop Lightroom.
Edit photos easily with Lightroom presets, Super Resolution, easily share photos from any device and access your projects anywhere with cloud photo storage management.
You might also be interested in…
How to make motion blur photography.
Learn how to capture movement and add creative flair to your shot with motion blur.
Learn when to use Gaussian blur filters and gain a better understanding of how they work.
Image sharpening in Adobe Photoshop Lightroom.
Learn how to adjust texture, clarity and sharpness to improve image quality.
RAW vs. JPEG: Which format should you shoot in?
Dive into the differences between photographs taken in RAW and JPEG format.
