Una forma fácil de mejorar o transformar las fotos en Lightroom para dispositivos móviles es aprovechar las posibilidades de los ajustes preestablecidos.
Hola, soy Seán Duggan, de Adobe Learn.
Un ajuste preestablecido es una combinación de ajustes de edición guardados que puedes aplicar a una foto en un clic.
Son útiles para aplicar mejoras básicas o explorar distintas interpretaciones creativas que den un cambio de aires a tu imagen.
Toco una foto para abrirla en Editar.
En los iconos de abajo, toco los círculos superpuestos para abrir los ajustes preestablecidos.
Puedo elegir entre tres categorías: Recomendado, Premium y Suyo.
Empecemos con los Premium.
Son una colección de ajustes de gran calidad, algunos creados por profesionales de la fotografía.
Algunos de los ajustes más útiles son los Adaptables, ubicados al principio de la lista.
Se llaman así porque se adaptan de forma inteligente al contenido de la foto y modifican una parte concreta de la escena.
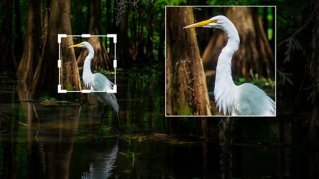
Por ejemplo, en este caso, Adaptable: Retrato permite mejorar la imagen de varias formas.
Voy a probar Textura del cabello para acentuar los detalles del pelo.
Al aplicar un ajuste, verás un regulador en la miniatura.
Tócalo y ajusta la intensidad del efecto aumentándola o reduciéndola.
Para ver el antes y el después, mantén pulsada la imagen y verás la original; cuando sueltes, verás la editada.
Pasemos a otra imagen para probar otros ajustes Adaptables.
Empezaré con Adaptable: Sujeto y aplicaré Pop para aclarar el poste de metal.
Queda muy bien.
Toco Atrás encima de las miniaturas para volver a los ajustes Premium.
Ahora elegiré Adaptable: Desenfocar fondo.
Lightroom puede tardar algo más en analizar la foto y generar las miniaturas porque crear la máscara de desenfoque del fondo es más complejo.
Cuando tengas las miniaturas, puedes probar los ajustes de desenfoque.
Elegiré Fuerte para ver qué hace.
Minimiza muy bien los detalles del fondo para dar protagonismo al sujeto.
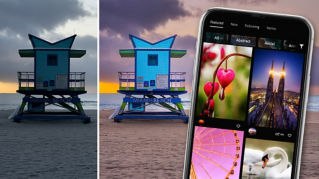
Pasemos a los ajustes Recomendados.
Con ellos, Lightroom analiza la exposición, los colores y el contenido de la imagen y sugiere ajustes de edición empleados en fotos parecidas que se han compartido en la sección Comunidad de Lightroom.
Puedes elegir entre varios grupos de estilo como Sutil, Fuerte, B&N, Cinematográfico, etc.
Si ves uno que te guste y lo quieres encontrar fácilmente más adelante, toca los 3 puntos de la miniatura y elige Guardar en sus ajustes preestablecidos.
Como ya he dicho, estos ajustes son una forma rápida de aplicar parámetros de edición guardados.
Puedes crear los tuyos a partir de una foto que hayas editado.
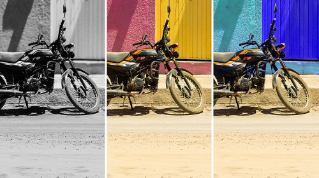
He procesado esta imagen para crear un estilo en blanco y negro con contraste.
Quiero guardarlo como ajuste preestablecido para aplicar el efecto a otras fotos.
Toco Ajustes preestablecidos y abro la sección Suyo.
Ahora toco los tres puntos arriba a la derecha y elijo Crear ajuste preestablecido.
Aquí puedo ponerle nombre y decidir qué parámetros de edición guardar en el ajuste preestablecido.
En este caso, voy a incluirlos todos y a confirmar arriba a la derecha para crear el ajuste.
Si abro Ajustes preestablecidos del usuario, veré el nuevo ajuste que he guardado.
Y si voy a Guardado desde la comunidad, veré el ajuste Recomendado que guardé antes.
Los ajustes preestablecidos te permiten aplicar mejoras de imagen comunes y explorar distintos estilos para una foto.
Pruébalos con tus propias imágenes y descubre cómo pueden ayudarte a procesarlas más rápido.