Breathe life into your videos with color correction and color grading.
Even the most advanced cameras can’t compete with the sensitivity and adaptability of the human eye. Learn to use editing software to achieve realistic colors that subtly shift mood and tone.

Why correct color?
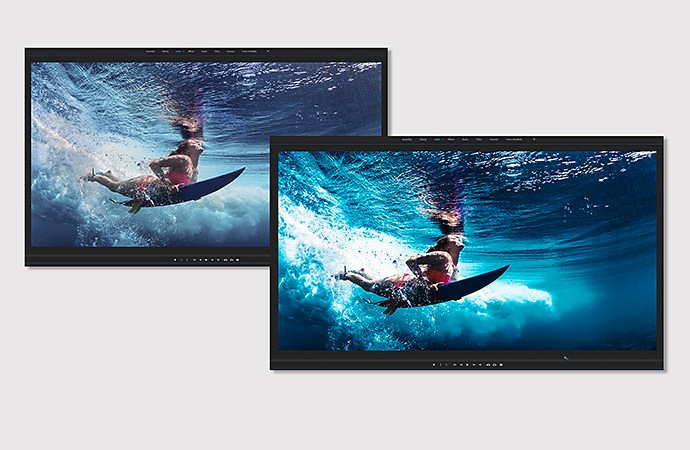
Even if you use the same cameras and lights for every shot of your project, when you get to post-production you might find that your hue, saturation, and brightness have changed drastically from one camera setup to the next. Once you’ve cut your footage, you need to even out those values to bring your video color in line with what your eye perceives.
How to do basic correction.
There’s no single right way to correct the color of your video, but a good place to start is by ensuring that your monitor is calibrated. Once you have an accurate sense of your monitor’s color profile, you’ll know that the colors you’re choosing are the right ones for a natural look. If you don’t calibrate your monitor, be sure to look at your video on a few different devices to ensure it looks good on all of them.
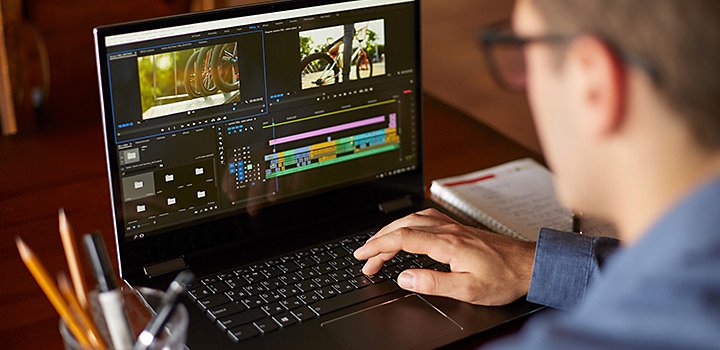
When you’re ready to start correcting in Adobe Premiere Pro CC, begin by opening the Color workspace and clicking the Basic Correction section.
Adjust the white balance.
White balance describes the temperature of the whites in your video. If your whites appear tinted blue or yellow, you can adjust them. Because white is a component in all your other colors, this will help your whole picture look more realistic.
Director and editor Jonathon Pawlowski suggests holding a white card or paper in front of the camera before every shot. “If you want to color balance the image, you can use the Eyedropper to click the white card, and that will tell the computer, ‘This is white.’ The white balance will adjust, and that’s a good place to start.”
Another way to adjust the white balance is to use the Temperature and Tint sliders and gauge the effect on the video clip. Move the Temperature slider left to add blue to your whites and right to add orange. Move the Tint slider left to shift the whites toward green and right to shift them toward magenta.
Tweak the tones.
Under the Tone heading, you can use sliders to adjust Exposure, Contrast, Highlights, Shadows, Whites, Blacks, and Saturation. Skin tone can be the most difficult shade to get right and the easiest to notice when it’s wrong, so pay close attention to the skin tones of your subjects.
One helpful way to gauge skin tone is to look at the Lumetri YUV vectorscope, which measures brightness (the Y value) against color (U and V values). To isolate the skin tone, go to Effect Controls and add a mask. Draw a box around the face of your subject, and then check the vectorscope to see how closely the skin tone falls to the line separating magenta from yellow. This line marks the hue of blood under the skin, so whatever the subject’s ethnicity, their skin tone should sit close to that line.
Once skin and other midtones look natural, check to make sure your highlights and shadow details aren’t lost. Use the Lumetri Color waveform scope and histograms to ensure that the values of your tones aren’t clipped or crushed.

Learn how to use Lumetri Color scopes.
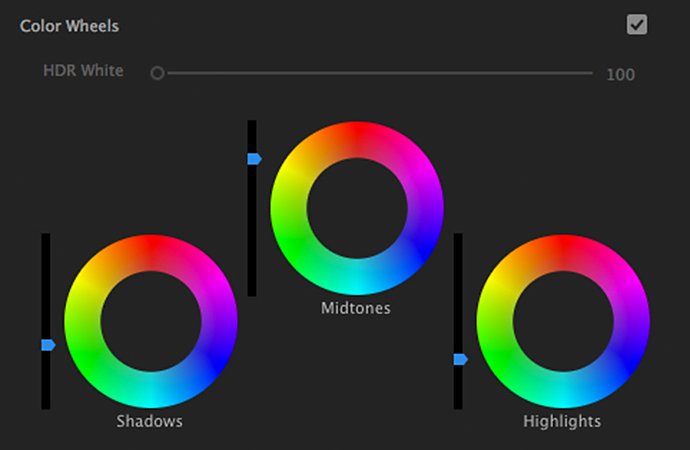
In the Lumetri Color panel, you can find a variety of color correction tools. Use the Curves controls to make precise adjustments to luminance and individual color channels. You might add S curves to add depth. There’s also a hue saturation curve control, so you can boost or cut specific hues, and color wheels that allow you to adjust highlights, shadows, and midtones separately.
After you’ve achieved a color balance that looks right, you can begin replicating that in other sequences.
Professional colorist Gerry Holtz emphasizes the value of a light touch: “One of the biggest mistakes a lot of people make is color correcting too much and having to correct their own problems. If you do a bunch of stuff one way, and then you go into Curves and you don’t like the image, you might be trying to take something out that you put in.” If you find yourself in that position, Holtz suggests saving a still image, resetting, and then trying to recreate that image with fewer adjustments.
Watch an example of color correction at work.
Cinematographer and director Tasha Van Zandt walks you through her process as she slows down and color corrects a video.

Correct color efficiently using Color Match.
Learn how to use the Lumetri Color panel to match the color of one clip to a reference frame. When you click Apply Match, Adobe Sensei’s AI analyzes the reference frame’s color values and applies a similar look to the clip. The match might not be perfect, but you can fine-tune in the Basic Correction tab to make sure you get the color right.
Color grading tips.
Once you’ve corrected the color so your video has an even, unified look, you can use color more artistically. Choose a palette that reflects the mood of each particular section of a piece and experiment with boosting different colors to reflect the emotional tenor. A happy family scene might be done with bright tones of yellow and orange, while another scene in a post-apocalyptic wasteland might be dark and tinted blue.
“Color grading is very similar to mood music,” Holtz says. “You put in dramatic music and the whole scene comes down. You put in the happy music, the whole scene goes up. You can do that same thing in color, but it’s got to be subtle.”
Filmmaker and writer David Andrew Stoler cautions against doing too much. “If there’s a major shift in emotional tone or perspective, then you’ll want to change something,” Stoler says. “But you’re working off a basic palette that you laid down in the beginning. If you want to amplify a certain feeling, just do a little shift.”
A glut of LUTs.
LUTs, or Lookup Tables, are like filters you can drop into your timeline to establish an instant look or mood in your footage. Premiere Pro comes with several options, and you can import third-party LUTs that will give your video the look of a Hollywood blockbuster. “They’re useful tools that can make the whole thing nice and look one specific way,” Stoler says.
But don’t drop LUTs into your footage without doing color correction first. Your eye can determine a natural-looking skin tone and focus the viewer’s eye on a certain part of the image. A LUT can’t do either. “The key is to play with your color controls and learn what they do and how they affect things,” Stoler says.
Holtz stresses the importance of color correcting before grading, and of doing so with delicacy. “If, after you’ve color corrected, you want to give it a warm tone, do it in a way that it feels warmer without it feeling like it’s yellow all of a sudden. The real trick is finding that balance. For me, it never looks good when it’s got a color wash over it.”
Work with color in Adobe Premiere Rush.
If you’re shooting and editing video while you travel, you can correct and color grade your footage on the go using Premiere Rush. For basic color correction, open the Color panel and adjust intensity, exposure, contrast, highlights, shadows, temperature, and more. Try color grading your footage with preset filters.
Whether you’re using Premiere Pro or Premiere Rush, you can correct the color of your video to make it look natural and realistic and then grade the color for a moody and cinematic feel. Experiment until you find the looks you want. The more you practice, the more intuitively you’ll know what adjustments to make and when.
Contributors
You might also be interested in…

Introduction to video editing.
Learn the principles of video editing and practical tips for both big and small screens.
Learn about the dynamic range of your camera and how to manipulate it to create the images you want.

Establishing shots are crucial because they tell us where, and often when, the action is happening.

See how this technique can help bring a stylized and evocative effect to your work.