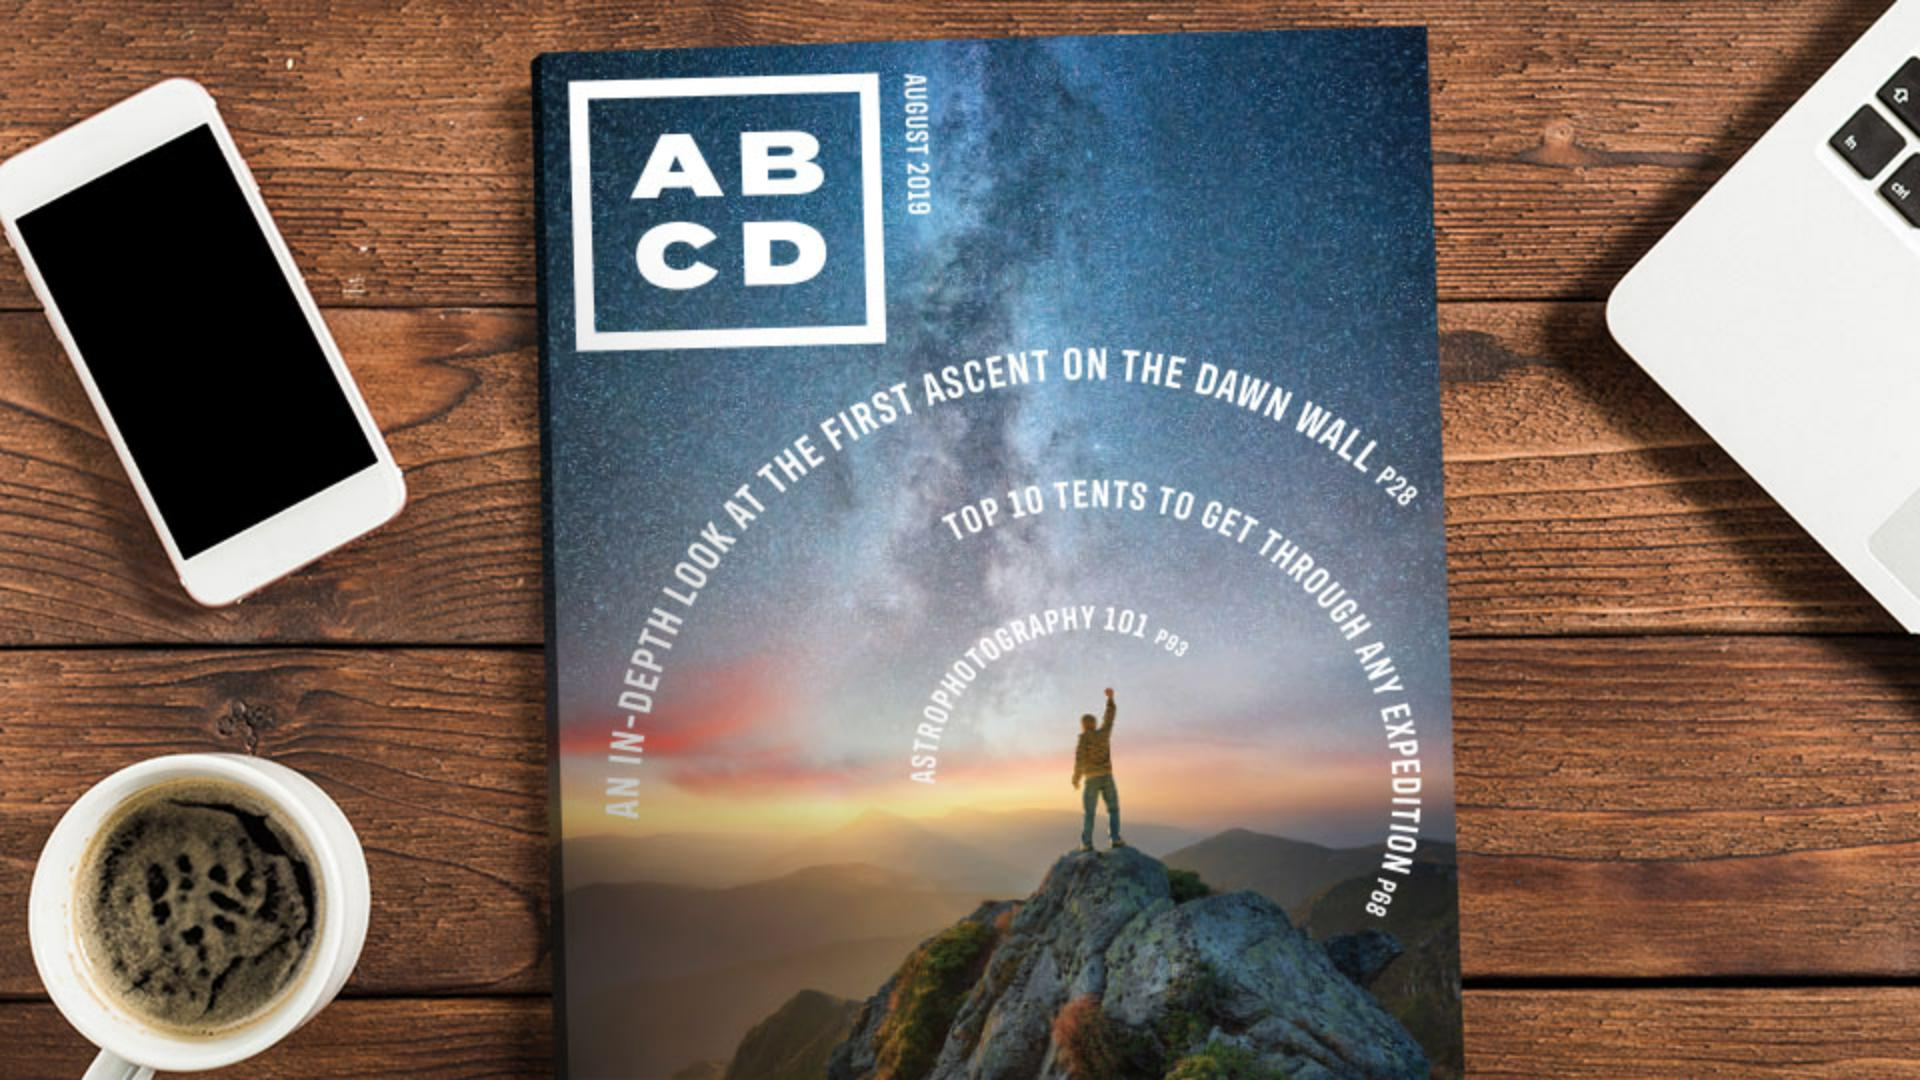
In Adobe InDesign, type can be used as a design element in a lot of different ways.
In this tutorial, you'll see how to add, and format text along a path like you see here, to finish your magazine cover.
Now after opening this document, you'll probably see the Missing Fonts dialog box.
That means the font was used in a document that isn't active on your system.
Now to fix this, with Adobe Fonts enabled, you can activate the Adobe font.
So, with this font selected, click Activate.
If Adobe Fonts are not enabled, you can click, Find Fonts... down here, in the dialogue that opens, you can select a missing font and choose a replacement.
Once the font is activated, click Close.
You'll start by creating a few ellipses, and you'll add some text around the outside of each.
So, to get started, press and hold on the Rectangle Frame Tool and select the Ellipse Frame Tool.
Come out here, press and drag to make an ellipse, that's about this size.
Now you're going to make a few of these, so, you want to make a few copies of this shape, choose Edit, Copy, and then choose Edit, Paste in Place to paste one copy directly on top of the original.
Now you'll drag, to make this copy a little bit smaller.
So, select the Selection Tool, press Shift Option on Mac OS or Shift Alt on Windows, and drag a corner toward the center.
Those keys will maintain the proportions and resize from the center.
When it's roughly this size, release the Mouse button first, and then the keys.
Let's make one more copy, and then we'll make that copy smaller yet.
So, choose Edit, Copy and then choose Edit, Paste in Place again.
To make it smaller, press Shift Option on Mac OS or Shift Alt on Windows, drag a corner toward the center, and when it's roughly this size, release the Mouse button and then the keys.
With three ellipses, now you'll add text to each using a special type tool called the Type on a Path Tool To select it, press and hold on the Type Tool, and select the Type on a Path Tool.
You'll start by adding text to the largest ellipse, so move the pointer over the edge of the shape where you want to start typing, somewhere down here, and when the pointer shows a + next to it, click to make it so you can add text around the outside of this ellipse.
Then type, AN IN-DEPTH LOOK AT THE FIRST ASCENT ON THE DAWN WALL P38.
Now to make the text larger and choose a different font, select it by clicking directly on it three times.
First, change the font Size to 30 in the Properties panel.
You can click the up arrow here as many times as you need.
Now to change the color, click the Fill color, and choose (Paper) which you can use for white.
Now to try something different for the font, like the font you activated in the beginning of this tutorial, click the Font Family menu here.
You could choose a font you have from this list, or with Adobe Fonts enabled, click Show Activated Fonts here and choose the font from the list.
Now the text needs to be rotated on the ellipse.
An easy way to start text at a different point is to simply rotate the ellipse, so select a Selection Tool and move the pointer over a corner.
When you see the rotate arrows, press and hold for a second, then drag to rotate the text, by waiting a second or two before you drag you see a live preview, of the rotation.
With one line of text on a path in place, you'll add more text to the other ellipses.
So, select the Type on a Path Tool again, come out to the second largest ellipse, and click here, to add text.
Type, TOP 10 TENTS TO GET THROUGH ANY EXPEDITION P68.
Come to the edge of the smallest circle, and click here, then type ASTROPHOTOGRAPHY 101 P92.
Notice that the formatting from the original text wasn't kept on these two.
To apply the same formatting.
You'll save the formatting from this text as a style, then apply it to the other text.
So, click back in the first bit of text here, to save the formatting over in the Properties panel, click the New Paragraph Style button.
You can now name the style, then press Return or Enter to accept the name.
To apply that same formatting, click on this text, then choose the new style name from the menu.
Do the same, for this text.
Using text as design elements can be really fun and add unique creativity to your designs.
If you want, try repositioning and rotating the text, using the techniques you've learned.


