Licensing
Overview
There are three licensing methodologies: Named user licensing (NUL–recommended), serialized with a physical license key, and feature restricted licensing. For a brief overview, see License types.
Licensing requirements
Some licensing methodologies require access to networked endpoints. For example, NUL requires access to
resources.licenses.adobe.com. See the Online Help as well as Endpoints.NUL is required in most cases. Serial number deployment is deprecated for new installs as of November 2019.
Enable TLS 1.2 on each machine.
Note
TLS 1.0 and 1.1 is end-of-lifed. Microsoft provides instructions for using 1.2 as the default for the Windows 7 product family including Win server 2008 R2.
Terminology
Licensing: Acrobat installs require one of the license types. Licenses must be activated.
Serialization: Licensing with a serial key (license key). This legacy method is gradually being replaced by named user licensing.
Named user licensing (NUL): Licensing with an Adobe ID, federated ID, or enterprise ID. The preferred method as it supports user and group management via the Admin Console.
Feature restricted licensing: A new licensing method which is used in environments where users cannot validate online.
Activation: Activation validates your software license to prevent fraud and abuse of Adobe products and services.
Provisioning: Same as “activation” and “licensing”. When an active/valid license is detected, the product is provisioned with the appropriate features (e.g. certain services).
Registration: Registration is a way to prove product ownership. It remains relevant in serialized settings, but in NUL settings, user sign in is a defacto registration.
Deactivation: Deactivation disconnects an application from a valid user license.
Named user deployment
This document provides steps for new deployments. For details about migrating a license key install to NUL, see Migrating to Named User Licensing.
Named user licensing
Named user licensing (NUL) is the preferred activation method.
DC products support NUL and user management via the Admin Console. The Console supports managing single user and group entitlements for all Adobe products as well as Single Sign-On. It also provides tools for managing software, users, and devices and support multiple ID types. With NUL, end users simply “activate” Acrobat by logging in to any VM or machine. License-related data is saved in the <user>/AppData/Roaming/Adobe/ folder which is synced to the VM on login.
Note
Trial installs and the Classic track do not support named user licensing.
Image-based deployment
Set up profile redirection. User profile data in
<user>/AppData/Roaming/Adobe/as well as the HKCU hive must sync to the VM instance on which the user logs in. Admins should ensure that such data is saved on user logout or disconnect. Some systems provide VM tools; for example, Citrix (Citrix Profile Management) and VMware Horizon (View Personal Management). At a minimum, sync the following:
File: C:\Users\<User>\AppData\Roaming\Adobe\AdobeUserInfo
Folders
C:\Users\<User>\AppData\Roaming\Adobe\OOBE
C:\Users\<User>\AppData\Roaming\Adobe\SLData
HKCU\Software\ registries:
Adobe
Microsoft\Internet Explorer\Toolbar\WebBrowser\{47833539-D0C5-4125-9FA8-0819E2EAAC93}
Microsoft\Internet Explorer\MenuExt
Wow6432Node\Google\Chrome\Extensions\efaidnbmnnnibpcajpcglclefindmkaj
Wow6432Node\Google\Chrome\NativeMessagingHosts\com.adobe.acrobat.chrome_webcapture
Log in to the master image.
(Optional) Customize the installer with the Customization Wizard.
Install Acrobat on the master image by calling the default exe or the one you modified with the Wizard. Use the following command:
Setup.exe /sALL /msi ROAMIDENTITY=1 ROAMLICENSING=1
Verify the following registry keys are present and the string
(REG_SZ)values are 1 on the master image. If not, create the key and set the value as 1.
[HKEY_LOCAL_MACHINE\SOFTWARE\Adobe\Licensing\UserSpecificLicensing]"Enabled"="1" (REG_SZ)
[HKEY_LOCAL_MACHINE\SOFTWARE\Adobe\Identity\UserSpecificIdentity]"Enabled"="1" (REG_SZ)
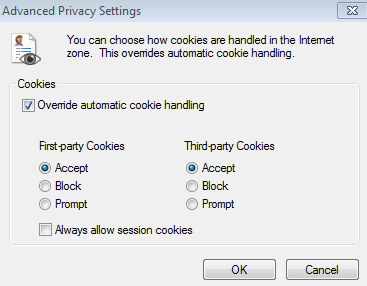
If you are using a Federated ID or connectors (like Dropbox), enable third party cookies:
Choose Internet Explorer > Settings > Internet Options > Privacy > Advanced.
For First-party cookies, choose Accept.
For Third-party cookies, choose Accept.
Shut down the master image.
Take a snapshot of the master image.
Update all VM desktops with the new snapshot.
Note
Unlike serialized deployments, do not launch Acrobat on the master image.
Migrating to NUL
Feature restricted licensing
The December, 2018 release introduced a new deployment method: Feature restricted Licensing (FRL). FRL provides an alternative to serialized (license key) and named user deployment which can be set up and managed via the Admin Console. Enterprise can use FRL to control data flow in restricted network environments. Use FRL when end users either don’t have access to the internet or are not allowed to use online services. Note the following:
FRL restricts access to certain Adobe apps and services.
Continuous and Classic track.
You can create a new FRL package as well as move existing installs to FRL.
You can create a new FRL package as well as move existing installs to FRL. See https://helpx.adobe.com/enterprise/using/create-frl-packages.html.
Serialized deployment
End of Life for serial numbers
Note
With the October 2018 update, versions of Creative Cloud and Document Cloud are only available if deployed via named user licensing. On November 30, 2019, many customers will also be affected by expiring serial numbers. To avoid interruption and to access the latest versions of the apps, customers must migrate to named user licensing. For more detail, see the announcement.
Enterprise customers with Acrobat serials expiring in 2019 need to either move to NUL (required in most cases) or re-license Acrobat. In addition to the description here, there is a separate serial to NUL migration guide.
Migrating your serial number
Serial numbers have a finite lifespan, and a number of serials are expiring through the end of 2019. While most customers can and should migrate from serial numbers to named user licensing, re-serialization is possible for those needing to remain with traditional serialization.
Migrate your serial number as follows:
Verify you have the required downloads:
Optional: If you need to check whether or not your license is expiring, download the Serial Number Expiration Check tool.
Required: Provisioning Tool (it’s included in the PRTK). Tip : A typical path the the adobe_prtk.exe is
C:\Program Files (x86)\Common Files\Adobe\OOBE\PDApp\CCP\utilities\APTEE. You may have to show hidden files.Required: Your current product identifier (LEID). Help identifing your product.
Continuous Track: V7{}AcrobatCont-12-Win-GM
Classic Track 2017: V7{}AcrobatESR-17-Win-GM
Classic Track 2015: V7{}AcrobatESR-12-Win-GM
Classic Track 2020: V7{}AcrobatESR-20-Win-GM
Deserialize your existing installation.
adobe_prtk --tool=UnSerialize --leid=<Product LEID> --deactivate --force
Create a prov.xml file with your new serial number. Note that you can reuse the prov.xml file for other installs using the same new seial number.
adobe_prtk.exe --tool=VolumeSerialize --generate --serial=xxxx-xxxx --leid=V7{}AcrobatESR-17-Win-GM --regsuppress=ss --eulasuppress
Re-serialize the existing install using the prov.xml file and the new serial.
adobe_prtk --tool=VolumeSerialize [--provfile=<Absolute path to prov.xml>] --stream
Note
If your target machines are offline, produce a license file on an online machine and then move it and the adobe_prtk to the offline machines for licensing. Successful operations return code 0.
Optional: Use the Serial Number Expiration Check tool to confirm the new expiration date.
Online requirement
Online product activation is required as described in the policy details at https://www.adobe.com/products/activation/. There is a 30 day grace period for online activation.
As described below, in settings where machines are permanently or temporarily offline, admins activate the installer prior to deployment and grant an offline exception to the activation requirement for subsequent installs. You can do this via the Wizard or APTEE.
Note
30-day grace for online activation is not available in Acrobat Classic 2020. For permanent offline machines, admins should grant an offline exception via the Customization Wizard or APTEE.
Serializing an imaged OS
To image a machine with Acrobat, first generate a prov.xml file on an online machine and then create a permanent offline exception that is not machine specific. Note the following:
This method can only be used with volume licenses.
Acrobat need not be installed to run this command.
The machine on which this command is run must be online.
It is highly recommended to suppress registration.
Steps:
Connect to the internet.
Download the latest Adobe Provisioning Toolkit Enterprise Edition.
Open an elevated prompt (run as administrator).
Generate a prov.xml file on any machine connected to the internet using the following APTEE tool command line with the following options:
serial: The serial numberregsuppress=ss: Optional; suppresses registrationeulasuppress: Optional; suppresses the EULA promptlocales: Optional; specify from the limited list of locales in the formal xx_XX or ALLprovfile: Optional; path of the folder where prov.xml is created. If this parameter is not specified, prov.xml is created in the folder in which APTEE resides.
adobe_prtk --tool=VolumeSerialize --generate --serial=<serialnum> --leid=<LEID of product> [--regsuppress=ss] [--eulasuppress]
[--locales=list of locales in xx_XX format or ALL>] [--provfilepath=<Absolute path to prov.xml>]
Install Acrobat on the master image.
On the master image, copy the prov.xml file created above.
For Acrobat Classic 2020 deployments, create and set
IsAMTEnforcedto 1.
[HKEY_LOCAL_MACHINE\SOFTWARE\WOW6432Node\Adobe\Adobe Acrobat\2020\Activation]"IsAMTEnforced"=dword:00000001
Serialize and activate Acrobat using the following APTEE tool command line:
adobe_prtk --tool=VolumeSerialize [--provfile=<Absolute path to prov.xml>] --stream
For Acrobat Classic 2020 deployments, create and set
IsAMTEnforcedto 1.
[HKEY_LOCAL_MACHINE\SOFTWARE\WOW6432Node\Adobe\Adobe Acrobat\2020\Activation]"IsAMTEnforced"=dword:00000001
Launch Acrobat once for about a minute and close.
Note
Granting an offline exception to activation using the Customization Wizard for an imaged OS deployment method is not supported.
Serializing via the Wizard
If you are using the Wizard to configure the application prior to deployment, enter the license information in the user interface as described in the user documentation. Doing so writes the serial number information to the abcpy.ini file. This file needs to be placed in the same directory as the MSI used at installation time.
Serializing via an .msi
Installations that use MSI files sometimes require that the Abcpy.ini file contain the serial number information for the application. If you have not used the Wizard, set this up manually as follows:
Open Abcpy.ini in a text editor.
Find ISX_SERIALNUMBER.
Add the serial number.
Save and close the file.
Verify abcpy.ini is located in the same directory as the MSI prior to installation.
;***************************************************************
;OEM Installation Options
;***************************************************************
[OEM Install]
ISX_SERIALNUMBER=
USERNAME=
COMPANYNAME=
INSTALLDIR=
Serializing an .exe (bootstrapper)
Deployments that use EXE files require that the Setup.ini file contain the serial number information for the application. For example, during a bootstrapper Setup.exe deployment, the EXE file reads Setup.ini to get the needed information. You can set this up manually as follows:
Open Setup.ini in a text editor.
Find ISX_SERIALNUMBER.
Add the serial number.
Save and close the file.
Verify Setup.exe located in the same directory as the EXE prior to installation.
Serializing via the command line
The license key can be entered on the command line during deployment by using the ISX_SERIALNUMBER property.
To run the installer by using setup.exe, enter:
Setup.exe ISX_SERIALNUMBER="<your valid Acrobat serial number>" /sAll
To run the installer by using the msiexec program, enter:
msiexec.exe /qn /i "<full path to the .msi file>.msi" ISX_SERIALNUMBER=
"<your valid Acrobat serial number>"
Serialization via the APTEE
Acrobat products support the use the Adobe Provisioning Toolkit Enterprise Edition (APTEE) command line tool for both Windows and Macintosh. You can use it with both the standalone product and that bundled with the Creative Cloud. Except for providing activation exceptions on an imaged OS, you can use the Wizard to do most of the things the APTEE tool does, and the Wizard is the preferred method for setting such features.
To get started:
Download and install the latest APTEE (Available from the Licensing Web Site and also installed with the Wizard).
Navigate to the APTEE folder.
Open a command prompt and run the command below with administrator privileges.
adobe_prtk --tool=Serialize --leid=<LEID> --serial=<serialNum> --adobeid=<AdobeID>
Activation exceptions
Use activation exceptions when target machines do not have internet access.
Activation exception 1
This method is machine-specific and is typically used by end users. However, it can be used with both retail and volume licenses.
Generate a request code:
adobe_prtk --tool=Type1Exception --generate --serial=<serialNum>
Go online from any machine to www.adobe.com/go/getactivated.
Generate a response code.
Validate the response code:
adobe_prtk --tool=Type1Exception --accept --serial=<serialNum> --responsecode=responseCode --leid=DriverLEID
The product is now ready to use.
Activation exception 2
You can create an activated production package and serialize post deployment using APTEE. This method is used when user machines are not going to be online. To do so,
Run APTEE on an online machine to generate the prov.xml file.
Deploy the product on each machine.
Run APTEE with the prov.xml file on each machine.
Activation behind proxys
For users behind an authenticating proxy, registering the product via the default HTML screens is not possible, thereby blocking trial and subscription workflows that require entering an Adobe ID. Customers who are installing trials or subscriptions should authenticate using Flex-based screens which must be enabled manually. The process involves creating an override file and using the Wizard to install it in a specific location.
To enable the Flex screen:
Create a file named application.xml.override. The name must be exact and not have a .txt extension.
Copy and paste the following lines in to the file:
<?xml version="1.0" encoding="utf-8" ?>
<Configuration>
   <Payload adobeCode="{AC76BA86-1033-FFFF-7760-000000000006}">
      <Data key="ENABLE_EEP_SIGNIN">1</Data>
   </Payload>
</Configuration>
Download and install Adobe Customization Wizard.
Download the Acrobat installer to a location which is writable by non-privileged users.
Open the AcroPro.msi with the Wizard.
In the left-hand pane, choose Files and Folders. The screen changes to a screen with a Modify and Summary tab.
Choose Modify.
In the lower left window for the Destination Computer, choose ProgramFileFolder > Adobe > (Acrobat Version) > Acrobat > AMT. The lower right rectangle will show three files: aul.xml, application.xml, and SlConfig.xml.
Drag and drop the application.xml.override file into this rectangle.
Choose Save.
Exit the Wizard.
Install Acrobat using the customized installer.
Once complete, the installer processes the override file and always displays the Flex screens when needed.
Licensing a trial
7 day trial installs do not require licensing. Installing the product without a license automatically results in a trial install. Download the trial installers here.
The trial version includes all desktop features of Acrobat Pro, plus a limited set of Document Cloud services including the ability to fill, sign, and send forms on a tablet device, store and share files online, and access recently viewed files across devices.
If you’re trial version is expiring you can upgrade your installs without a reinstall as follows:
Obtain a license.
Run:
adobe_prtk --tool=ReplaceSN --serialize=LEID --serial=<serial number>
Note
products provide a seamless trial to perpetual conversion experience for end users which is built into the product. See https://helpx.adobe.com/acrobat/kb/convert-from-trial-to-classic.html.