Take control with sound equalisers in Adobe Audition.
Learn how to use graphic and parametric audio equalisers to balance your audio tracks.

Sound equalisation basics.
Music producers and sound editors use sound equalisers to adjust the amplitude or energy, of the frequencies that make up an audio signal. The right settings are different for every song, podcast and audiobook — and certain settings work better for headphones than for 3D surround sound. But it’s important to know that small adjustments of one or two decibels (degrees of loudness) can go a long way.
Whether you use a graphic or parametric equaliser depends on which user interface you prefer and how precise you want to be in changing your sound settings. Graphic equalisers allow you to make adjustments across the frequency range (from low bass to high treble), but even a 30-band EQ will boost or cut a range of frequencies around the one you’re targeting.
Parametric equalisers allow you to pinpoint the audio frequencies you’d like to boost or cut. They also allow you to control exactly how much the neighboring frequencies are affected by your cut.

How to use the graphic equaliser.
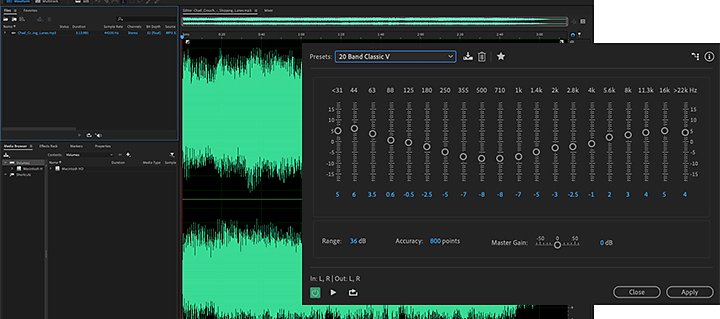
Audiophiles looking to make slight adjustments to a mix can start with the graphic equaliser. In Adobe Audition, it’s in the Effects drop-down menu under the Filter and EQ tab. For quick equalisation, choose the number of decibels (dB) you’d like to boost or cut from preset frequency bands. Audition allows you to choose from three equaliser settings: bands at intervals of one octave (10 bands), one-half octave (20 bands) and one-third octave (30 bands). With 30 bands, you can be precise in your adjustments across the entire frequency spectrum, but each move you make affects a narrow band of frequencies.
Slide for gain adjustments.
Just move the sliders up or down each band to boost or cut it. The Master Gain slider adjusts the overall dB level.
Find your range.
The Range field allows you to determine the range of your slider controls. Drag the arrows right if you’re making big changes and left if you’re making small ones.
Balance accuracy with processing.
The Accuracy field determines just that. Higher accuracy levels give better frequency response at the low end, but they require more processing time. If you equalise only higher frequencies, you can use lower accuracy levels.
Try the presets.
For the quickest adjustments, pick a preset in the upper left corner of the Effect window. You may find the sound you’re looking for without having to move each slider yourself. Among many options, try the sound of 1965 in the 10-band equaliser or Cymbal Shimmer or Vocal Magic in the 20-band. Do some Generic Mud Removal or choose Destination - Home Theatre in the 30-band. When you find a preset that works, customise it to get it just right.

How to use the parametric equaliser.
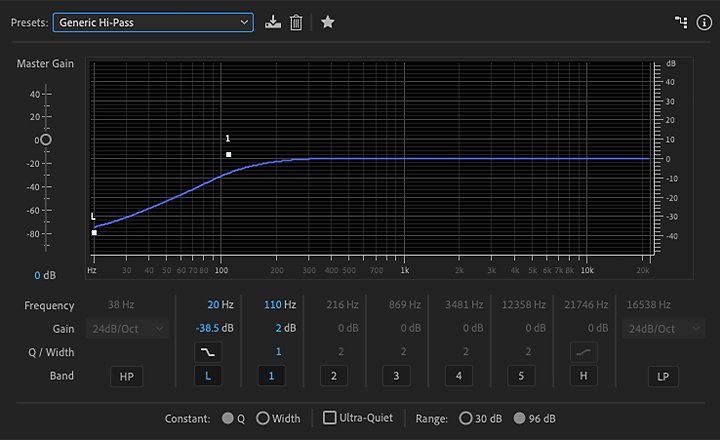
You can find the Parametric Equaliser effect in the same tab as the Graphic Equaliser. Audio engineers like using parametric equalisers because they offer maximum control over tonal equalisation. In Audition the equaliser appears as a horizontal line on a graph, with frequency running along the horizontal ruler or x-axis from 0Hz to 10kHz in evenly spaced octaves. Amplitude runs along the vertical ruler or y-axis, from -15dB to 15dB or from -48 to 48.
Make adjustments by moving the dots on the graph where you want them or typing your desired frequency and gain in the fields below the graph. The curve of the line will bend around that dot.
Adjust exactly the frequencies you want.
Adjust the Q/Width to determine the effect your boost or cut has on surrounding frequencies. The wider the Q, the more gradual the slope and more natural-sounding the cut. A very narrow Q will result in a steep slope and a more manipulated sound. If the overall volume level is too loud or too soft after you adjust the EQ settings, move the Master Gain slider for volume control.
Try the presets.
With selections including Beefy Snare, Old Time Radio or Vocal Enhancer, you might find just what you need. Then customise it to perfect and optimise your sound.
Use high-pass and low-pass filters.
A high-pass filter cuts low frequencies and lets high frequencies pass through, while a low-pass filter cuts high frequencies. You can find presets for both in the Graphic Equaliser and Parametric Equaliser in Audition. Most people can’t hear much below 100Hz, so producers often set a high-pass filter there without changing the listening experience. Set a low-pass filter for the same reason, but avoid setting it below 4000Hz and cutting some clarity from people’s voices.
Learn more about editing audio in Audition.
Check out these helpful tutorials to build your audio mixing and mastering skills
Make selections for editing.
Get familiar with the Time Selection, Marquee Selection and Lasso Selection tools so you can edit audio precisely and add effects.
Clean up audio with Spectral Frequency Display.
It’s easy to find troubling noise in your mix with the Spectral Frequency Display. Quickly spot hisses, beeps and other noise with this clear user interface and cut those frequencies to improve sound quality.
Try multitrack audio editing.
Learn about multitrack editing and mixing, including customisable track and clip colours, sound removal, loudness metering and more.
However you choose to equalise your audio, remember to start with subtle adjustments. Don’t worry about the shape your sliders make or the uniformity of your parametric curve. If you like how the track sounds, you’re doing it right.
Saca más partido a Adobe Audition
Tu estación de trabajo profesional para grabar y mezclar audio, crear podcasts y diseñar efectos de sonido.
You might also be interested in…
Eleva el coeficiente de tu ecualizador: manual sobre los ecualizadores gráficos.
Aprende a usar un ecualizador gráfico para alterar el sonido incrementando o recortando ciertas bandas de frecuencia.
Finding the best DAW for your audio needs.
Learn how to select a music or podcast mixing platform to meet.
Los mejores tipos de archivo de formato de audio.
¿Con o sin pérdida de datos? ¿Comprimido o sin comprimir? Encuentra el formato de audio que encaja con tus necesidades.
Setting up a home recording studio.
Explore the basics of creating a space at home to capture high-quality audio.
Consigue Adobe Audition.
Crea, mezcla y diseña efectos de sonido con el mejor software de edición de audio digital del sector.
7 días gratis, luego Ar$ 13.491,50 al mes.


