Adobe Acrobat permet d'afficher, de modifier et de partager des PDF, au bureau comme en déplacement.
Bonjour !
Je suis Angelo Montilla, du site www.montilladesign.com.
Je suis designer, formateur certifié par Adobe et créateur de contenu YouTube.
Grâce à cette vidéo, vous allez mieux comprendre l'espace de travail et les outils d'Acrobat sur ordinateur.
Vous apprendrez aussi à créer un PDF depuis un document d'un autre format et à insérer des commentaires dans un PDF.
Plongeons au cœur d'Acrobat pour en savoir plus sur ses fonctionnalités.
Ce tutoriel utilise Acrobat pour ordinateur, mais Acrobat est aussi accessible dans un navigateur web ou une application mobile.
Au lancement de l'application, l'espace de travail présente trois vues : la page d'accueil, la vue Tous les outils et la vue Document.
La page d'accueil actuellement à l'écran est celle qui s'affiche quand aucun document n'est ouvert.
Elle permet aussi d'accéder aux fichiers récents, aux fichiers favoris et aux documents stockés dans le cloud Adobe.
Pour ouvrir la vue Tous les outils depuis la page d'accueil, je clique sur Voir tous les outils.
Dans cette vue, tous les outils d'Acrobat sont présentés par catégories.
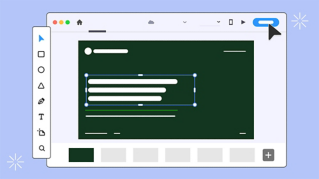
Comme la vue Document s'appréhende mieux par l'exemple, je vais créer un PDF à partir d'une présentation PowerPoint.
Je place le pointeur au-dessus du bouton Créer et je clique sur Créer un PDF.
Je choisis Sélectionner un fichier et je clique sur la présentation à convertir, puis sur Ouvrir.
Je peux aussi faire glisser le fichier de la présentation dans l'espace de travail pour le convertir en PDF.
Une fois la conversion effectuée, je me retrouve dans la vue Document.
Le panneau Tous les outils est affiché sur la gauche.
Pour le fermer et le rouvrir, je clique sur Tous les outils.
J'avance rapidement dans le document en cliquant sur l'icône Page suivante et je reviens en arrière avec l'icône Page précédente.
Le panneau des vignettes des pages permet aussi de parcourir le PDF ou d'atteindre directement une page.
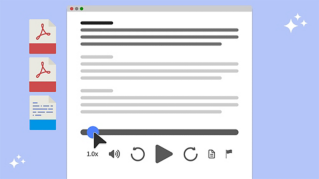
Voyons maintenant comment annoter un PDF.
Il s'agit d'une pratique courante lorsqu'un document est partagé pour vérification et révision.
Dans la barre d'outils flottante, je clique sur l'icône Commentaire et je choisis Ajouter un commentaire.
Je clique ensuite sur une image pour insérer une icône de commentaire avec un champ où saisir le commentaire.
J'agrandis ce champ et je saisis mon commentaire, puis je clique sur Publier.
Je vais en ajouter un autre.
Toujours avec l'outil Ajouter un commentaire, je choisis Remplacer le texte sélectionné.
Je sélectionne le mot « CHIEF » dans « CHIEF OF MARKETING » pour le remplacer par « DIRECTOR », puis je clique sur Publier.
Ce commentaire s'affichera dans le panneau Commentaires, sur la droite.
Si je place le pointeur au-dessus du premier commentaire, l'icône s'anime dans le document pour m'aider à repérer où le commentaire se situe sur la page.
L'autre icône réagit de la même façon quand je survole ce commentaire.
Je mets en évidence le texte en cliquant sur Surligner le texte sélectionné, puis sur Surbrillance.
Imaginons que « Rosedale » soit mal orthographié et que le nom correct soit « Rossdale ».
Je le mets en surbrillance et je clique une fois pour ajouter mon commentaire.
J'agrandis le champ, j'indique que l'orthographe du nom doit être corrigée, puis je clique sur Publier.
De retour dans le panneau Commentaires, je peux aussi ajouter des réponses.
Prenons le premier.
Je clique sur Répondre pour indiquer que je m'en occupe, puis je clique sur Publier.
Cela crée une chaîne depuis le commentaire initial jusqu'à la réponse.
Il reste à attribuer l'état Terminé au commentaire initial.
Je clique sur les trois points pour accéder aux options supplémentaires et je choisis Définir l'état, puis Terminé.
Une coche verte s'affiche pour indiquer que le commentaire est résolu.
J'apprécie à quel point Acrobat simplifie la création d'un PDF à partir de fichiers de différents formats.
Maintenant que l'espace de travail et les outils vous sont plus familiers, utilisez-les pour vos propres projets.
C'était Angelo Montilla et je vous retrouve dans ma prochaine vidéo.