Macintosh Deployments
Installation scenarios
The Acrobat installer for Apple platforms can leverage either the command-line (CLI) or graphical (GUI) interfaces provided by the Apple installer. Support for Apple’s installer format and conventions allow customers to install the product to managed systems via their preferred methods, including:
CLI: Supports any custom installation solutions required in the enterprise. Acrobat products support the Apple Remote Desktop (ARD) which provides built-in support for pushing Apple installer packages to groups of machines. For ARD details, see https://www.apple.com/remotedesktop/.
GUI: User interface installations manage the install on a per user basis. These are seldom used in enterprise settings.
Installer details
Product versioning
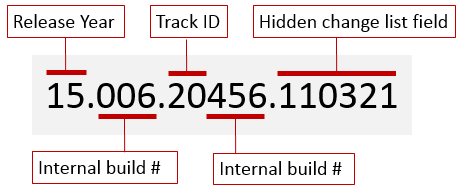
Track release schedules and their respective versions will be different, but both the Continuous and Classic tracks share an identical methodology. The new strategy is designed to provide better granularity, support more frequent releases, and aid in troubleshooting by providing build information. In its generic form, the version number will appear as major.minor.minor_minor.
Version |
Range |
Notes |
|---|---|---|
major |
1-255 |
The last two digits of the release year.* |
minor |
1-255 |
An internal number indicating when code moves from Trunk to Beta. |
minor_minor |
1-65535 |
The first two digits indicate the track. 20 = Continuous. 30 = Classic. |
Hidden 4th field |
Changelist number |
Only visible if the user clicks on the version number in the About box. |
* The year-based version number is not the same as the Classic track name. While the Classic track versions begins with 15|17|20 and the current track version is 2015|2017|2020|2020, the track name only changes at each major release–not every year. The version number increments every year.
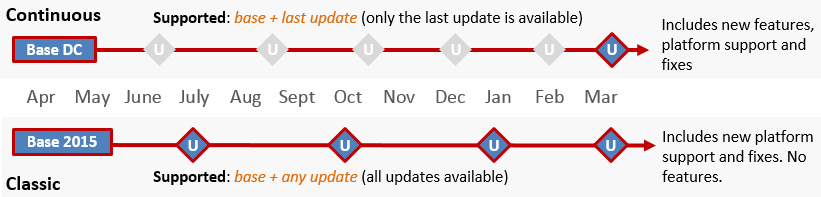
Two tracks
The Acrobat product family provides two tracks for both Acrobat and Reader:
The Continuous track provides service-based tools as well as new features, security and platform enhancements, and bug fixes as part of frequent (and most often) silent updates. Over time, the Continuous track’s update cadence will be more frequent than the Classic track. Classic license program customers do not have access to this track for Acrobat.
The Classic track is similar to the 11.x model and provides few (if any) new features in updates. Free services are available, but optional. Like previous releases, a quarterly update cadence delivers security and platform enhancements as well as bug fixes.
Note
For up-to-date details about new features on the Continuous track, see https://helpx.adobe.com/acrobat/using/whats-new.html.
Example release schedules:
Acrobat tracks
Feature |
Continuous |
Classic |
|---|---|---|
Updates |
Frequent |
Planned quarterlies |
Update order |
Base + last update |
Base + last update |
Update UI |
Auto or off |
Auto or off |
Update registry controls |
Auto or off |
Auto or off |
Services integration |
All tools enabled |
Free tools only |
Upsell enabled? |
Standard only |
N/A |
Languages |
MUI only: licenses are language specific |
MUI only: licenses are language specific |
File and preference paths |
Versionless: always under |
Versioned: Under major version, 2015|2017|2020, etc. |
Mac installer |
|
|
Mac install paths |
|
|
Mac plist paths |
|
|
Mac application data path |
|
|
* What services are visible in the user interface varies by the purchased track and license type. Use the Customization Wizard or registry/plist configuration to remove unwanted items from the user interface.
For the Continuous track, all services are visible and functional. Note that some features, such as Create PDF and Export PDF, are part of the desktop offering and don’t use a Document Cloud service.
For the Classic track, paid-for service-based tools are unavailable. Features such as Export PDF are part of the desktop product and don’t require a service to function. Free services which don’t duplicate existing functionality are on by default.
Feature |
Continuous |
Classic |
|---|---|---|
Updates |
frequent; often silent |
Planned quarterlies |
Update order |
Base + last update |
Base + last update |
Update UI |
None (no UI but registry settings can still be used) |
Auto or off |
Update registry controls |
Auto or off |
Auto or off |
Services integration |
All tools visible |
Free tools visible |
Upsell enabled? |
On by default |
On by default |
Spelling pack |
Add on |
Add on |
Font pack |
Add on |
Add on |
Languages |
Mac: MUI only |
MUI only |
File and preference paths |
Versionless: always under |
Versioned: Under major version, 2015|2017|2020, etc. |
Mac installer |
|
|
Mac install paths |
|
|
Mac plist paths |
|
|
Mac application data path |
|
|
* What services are visible in the user interface varies by the purchased track and license type. Use the Customization Wizard or registry/plist configuration to remove unwanted items from the user interface.
For the Continuous track, all services are visible. Free services are functional by default, and paid-for services require an upgrade or purchase to access.
For the Classic track, most service-based tools are hidden. Basic, paid-for services such as Create PDF and Export PDF are visible but must be enabled with a purchase.
Behavior for existing installations
When installing the application on a system where it already exists in the installation location, several factors may affect the installation workflow:
Installing over an earlier version (Reader only): When an earlier version already exists in the target install location, then:
For GUI installations, a prompt informs the user that the product already exists and asks whether the installation should proceed. If YES, the existing
<application>.appis moved to Trash and the new Reader is installed. If NO, then the existing Reader is not touched and the installer returns with an error.For CLI installations, then the installer silently moves
application.appto Trash and installs the newer one without further input. The old application is moved to Trash so that if the installation fails then the user can restore the old application.
Installing over the same base version: If the existing application has the same base version as the new one, then both GUI and CLI installations proceed as normal upgrades.
Installing over a new version: If the existing application has a higher version than the installed one, then the installation fails.
For GUI installations, an alert informs the user that a new version is already present.
For CLI installations, a log entry in the system’s installer log (
/var/log/install.log) indicates that a new version is already present.
Install locations
Default GUI installations of Acrobat and Reader options are as follows:
Acrobat:
/Applications/Adobe Acrobat (version) Pro/Adobe Acrobat (track name).appReader:
/Applications/Adobe Reader.app(Not customizable)
Note
Customization is not supported in OSX 10.5 and the application installs in the default location at /Applications/Adobe Acrobat <version> Pro.
Installing special fonts
Acrobat products ship with a number of fonts. However, you can install certain fonts manually or customize the installer. For example, non-Japanese Reader installers do not come with Japanese fonts, but such fonts can be included at installation time.
Note
Acrobat ships with font packs and a spelling dictionary. Acrobat Reader requires a separate download. Adobe provides both Asian and Extended Language font packs as well as a spelling dictionary as downloads:
https://ardownload2.adobe.com/pub/adobe/reader/mac/AcrobatDC/misc/AcroRdrSD1900820071_all_DC.dmg
https://ardownload2.adobe.com/pub/adobe/reader/mac/Acrobat2017/misc/AcroRdrSD1700830051_all_2017.dmg
https://ardownload2.adobe.com/pub/adobe/reader/mac/Acrobat2020/misc/AcroRdrSD2000130002_all_2020.dmg
To enable the application to render non-default fonts do the following (this example uses the Japanese font pack):
Install the application.
Download the requisite font pack installers. For example, the Japanese package identifier is com.adobe.Reader.fontpack.10.ja_JP.pkg.
Run the installer via the GUI or command line:
sudo installer -pkg <installer filename>.pkg -target /
Components
Adobe’s Mac installer is a flat package installer. The .pkg can be expanded using the system’s pkgutil command so that you can see the distribution file and its constituent components.
Note
The Application check box that allows the selection of specific components does not appear in 10.5 due to an Apple bug.
Component |
Description |
|---|---|
acropreinstall |
Required: Validates if the installation should proceed or not. |
coreapp |
Required: Installs Acrobat.app and Distiller.app. The default location is /Applications/Adobe Acrobat (version) Pro/. |
appsupport |
Required: Installs various support files in the Users/<user name>/Library/Application Support/Adobe/ folder. |
prefs |
Required: Installs files in the Users/<user name>/Library/Preferences area. |
Component |
Description |
|---|---|
coreapp |
Required: Installs Acrobat.app and Distiller.app. The default location is |
appsupport |
Required: Installs various support files in the Users/<user name>/Library/Application Support/Adobe/ folder. |
Language
The system (OS) language determines the product language.
Adobe ships strings, a Read Me, custom installer plugins, and related resources in all locales with the installer. The installer GUI itself is provided by the built-in Mac OS X system installer, with the application localized by Apple and using the current system language. For Adobe files like ReadMes, the Mac OS X system installer simply offers the user to view the Read Me in the system language.
Installer customization
Adobe installers can be deployed over the network using standard deployment tools. As described elsewhere, you can modify the installer via the Wizard and/or manual plist configuration.
Install location
Customize the install location by choosing a custom location during a GUI install or by modifying the installer package manually. The Updater normally determines the application location on its own. If for some reason that search fails, the Updater looks at the AppPath preferences described below. When the Updater is disabled and/or non-default install locations are needed, set the AppPath preferences as follows:
Navigate (or create) to
Users/<user name>/Library/Application Support/Adobe/<product>/(version)/. For example, the Acrobat (version) path would beUsers/<user name>/Library/Application Support/Adobe/Acrobat/(version)/.Create a file called
com.adobe.<Acrobat | Reader>.InstallerOverrides.plistif it doesn’t exist.Add a key called
ReaderAppPathorAcrobatAppPath.
Note
Standalone installers consume only the ReaderAppPath. Updates and patches consume both ReaderAppPath and AcrobatAppPath.
Set the key value to the application’s path. For example, for Reader, it could be
/Applications/MyCustomFolder/Adobe Reader.app(note the missing trailing /).
Location determination for Acrobat and Reader
Updater workflow: When invoked by Help > Check for Updates, the Updater checks its files for an ID, version, and the application’s absolute path.
Installer workflow: The Updater is typically not used in enterprise settings so that IT can manage what versions are installed. When updates are invoked by using the installer command from the command line the installer looks for
InstallerOverrides.plistto see if it exists (see above):
If the file is absent:
The machine searches for all valid applications by OS calls.
The first valid application found is patched.
If no valid application is found, the patch installation fails and provides an appropriate message.
If the file is present:
The installer checks for the presence of an AcrobatAppPath or
ReaderAppPathkey.If no valid path is found, the Updater looks for the key
BreakIfAppPathInvalid.If
BreakIfAppPathInvalidis TRUE, the Updater stops.If FALSE, it again tries to sniff the application path from the OS.
If no valid path can be found, the installation fails with an error.
Choosing components to install
Using the installer command
The installer command allows you to perform a number of installer-related actions. For example, you can select particular components for the install during a command line installation via a choices file. To view a list of what can be installed, run:
installer -package <path/Acrobat (version) installer.pkg> -showChoicesXML -target / | grep -A 1 choiceIdentifier
Note
Every choiceIdentifier maps to one of the choices in the installer. The installer choices for Acrobat products are listed in the distribution file tables above.
Controlling what’s installed
The choices XML file is an array of choiceIdentifiers that toggles the installer to behave the opposite of its default. For example, since everything is installed by default, including any component de-selects that component for the install. For example, to avoid installing the optional Acrobat components, include the two optional components browserplugin and printerworkflow and set their selected attribute to 0.
choices XML
<array>
    <string>browserplugin</string>
</array>
<array>
    <string>printerworkflow</string>
</array>
Verifying what will be installed
To verify which components will be installed, run:
installer -package <path/Acrobat product installer.pkg> -target
/ -showChoicesAfterApplyingChangesXML <path/choices.xml>
Applying choices.xml
To apply the choices.xml file during installation, run:
installer -package "path to Adobe Reader (version) Installer.pkg" -target / -applyChoiceChangesXML <path/choices.xml>
Modifying the distribution file
The Acrobat product installer pkg contains a customizable distribution file you can use to permanently update the installer. To do so:
Expand the flat package distribution file at pkg-path into a new directory specified by dir-path with
--expand pkg-path dir-path. For example:
--expand <path/Acrobat product installer.pkg>
<target install folder>
Note
The target install directory can’t exist on the machine (even in Trash).
Open the distribution file in a text editor.
Navigate to choices-outline and note the list of choices (From the tables above).
Add a start_selected attribute to each choice node and set it to true or false as desired:
<choice
description="DESCRIPTION_BROWSER"
id="browserplugin"
start_selected="false"
title=""AcroBrowserPlugIn">
Note
For additional distribution file details, see https://developer.apple.com/library/mac/documentation/DeveloperTools/Reference/DistributionDefinitionRef/DistributionDefinitionRef.pdf.
Save the distribution file.
Flatten the expanded package:
pkgutil --flatten <path/expanded folder>
<path/Acrobat product installer.pkg>
You can now deploy the new package via your preferred method.
Chained installs (12.x and later)
The script and examples here leverage the new installer packaging tools that Apple currently uses. You can also watch the tutorial.
Build cmd line
The build script uses the following properties:
--root: Path to folder containing full/patch installer zip files--scripts: Path to the folder containing postinstall script--identifier:com.adobe.acrobat.chainedInstaller--install-location:/private/tmp/chained installer package path
pkgbuild --root /Users/labuser/Desktop/ZIPInstallers/ --scripts
/Users/labuser/Desktop/shellscript/ --identifier com.adobe.acrobat.chainedInstaller
--install-location /private/tmp/ /Users/labuser/Desktop/NewInstaller/WinterRelease2016Installer.pkg
Postinstall.sh
Note that the following shell script is slightly different than those provided previously (and from those in previous videos).
#!/bin/bash
function unzipPkg
{
        rm -rf "/private/tmp/Acrobat Installer.pkg"
        unzip "/private/tmp/Acrobat Installer.pkg.zip" -d "/private/tmp";
        rm -f "/private/tmp/Acrobat Installer.pkg.zip"

        rm -rf "/private/tmp/AcrobatDCUpd1501020056.pkg"
        unzip "/private/tmp/AcrobatDCUpd1501020056.pkg.zip" -d "/private/tmp";
        rm -f "/private/tmp/AcrobatDCUpd1501020056.pkg.zip"
}

function installAcrobat
{
        installer -pkg "/private/tmp/Acrobat Installer.pkg" -target /
        if (test $? = 0) then
                echo "Acrobat installed."
                rm -rf "/private/tmp/Acrobat Installer.pkg"
        else
                echo "ERROR: Acrobat installation failed."
                rm -rf "/private/tmp/Acrobat Installer.pkg"
                exit 1
        fi
}


function installAcrobatUpd
{
        installer -pkg "/private/tmp/AcrobatDCUpd1501020056.pkg" -target /
        if (test $? = 0) then
                echo "Acrobat Version 2015.010.20056  installed."
                rm -rf "/private/tmp/AcrobatDCUpd1501020056.pkg"
        else
                echo "ERROR: Acrobat Version 2015.010.20056 installation failed."
                rm -rf "/private/tmp/AcrobatDCUpd1501020056.pkg"
                exit 1
        fi
}

unzipPkg
installAcrobat
installAcrobatUpd
Apple Remote Desktop
Administrators can remotely deploy Acrobat/Reader to multiple Macintosh systems running Mac OS 10.13 or later across their network. Using Apple Remote Desktop 3 (commonly referred to as ARD), an administrator can install Acrobat/Reader automatically, without user intervention, to one or more remote computers. ARD copies the package to the computers selected for installation, runs the installer with no visible window or user interaction required, and then erases the installer files on completion.
The Acrobat Macintosh installer will perform initialization work such as the Adobe Application Manager installation as well as components needed for the serialization of the application. While serialization happens at launch time by default, enterprises can pre-serialize with APTEE (Adobe provisioning tool enterprise edition) or the Customization Wizard for Mac.
The locale of the launched installation depends upon the current locale set on the user’s machine. The Installer application picks up strings from within our installation package in the order of locales specified in the system locale preference panel.
Installing with Remote Desktop
These instructions provide only an overview. If you are not familiar with Apple Remote Desktop, refer to Apple’s documentation https://www.apple.com/remotedesktop/.
To deploy the product via ARD:
Open ARD.
Verify Remote Management and Sharing are enabled for every target computer.
Select one or more Macintosh computers on which you want to install Acrobat or Reader.
Choose Install on the top of the Remote Desktop window.
When the Install Packages window appears, choose the + button at the top left of the Install Packages window.
Locate and select the Acrobat or Reader .pkg file.
Choose Open to add it to the Install Packages List.
Choose Install to perform a complete installation of Acrobat or Reader on the selected machines.
Note
Apple Remote Desktop shows a progress bar and task status of the installation for each of the machines selected for the installation.
Deploy the Adobe Provisioning Tool
10.x and later.
The APT is only for Acrobat deployments and does not work with Reader. The tool streamlines enterprise deployment by enabling control of installation workflows such as:
Configuring licenses for 1-N users (pre-serializes the keys).
Suppressing the end user license agreement (EULA).
Suppressing the Adobe ID dialog.
To use the provisioning tool:
Download the provisioning tool.
Open ARD.
Select one or more Macintosh computers on which you want to configure Acrobat products.
Choose Copy.
In the Copy Items screen’s Place Items drop-down list, choose Applications Folder.
Verify the Set Item ownership drop-down list is selected to Inherit from destination folder.
In the Items To Copy list, navigate to the .dmg that you downloaded.
Select the Adobe provisioning tool.
Choose Copy.
Note
Once the Adobe provisioning tool is copied to the client machines, use a UNIX command to configure licensing and to suppress EULA and Adobe ID dialog.
Customizing installs with APT
Acrobat installs can be customized with the APT as follows.
Open ARD.
Select one or more Macintosh computers on which you want to license an Acrobat product.
Choose Manage > Send UNIX Command.
Type the desired command or run the command from a script as follows:
sudo "<path>/adobe_provisioning_tool.app/Contents/MacOS/adobe_provisioning_tool"
<1 or more APT command line(s)>
Run the command as the user “root.”
Choose Send.
Feature |
Command |
|---|---|
Configure enterprise licensing |
|
Suppress the end user license agreement (EULA) |
|
Suppress the Adobe ID (registration) dialog |
|
Uninstalling
Uninstall and deactivate Acrobat via the Mac terminal:
sudo <path to Adobe Acrobat.app>/Contents/Helpers/Acrobat Uninstaller.app/Contents/Library
/LaunchServices/com.adobe.Acrobat.RemoverTool Uninstall <path to Adobe Acrobat.app>