Try these tutorials with InDesign
Design page layouts for print and digital publishing.
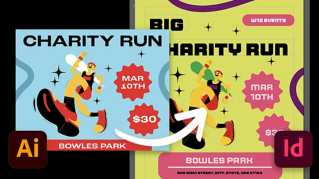
Promote your next event with a flyer that grabs attention with colorful imagery, graphics, and attractive typography using Adobe InDesign.

This sample file is an Adobe Stock asset you can use to practice what you learn in this tutorial. If you want to use the sample file beyond this tutorial, you can purchase a license onAdobe Stock . Check out the ReadMe file in the folder for the terms that apply to your use of this sample file.
After launching InDesign, you’ll see the Home Screen. Click the Create New button to open the New Document window. Alternatively, choose File > New > Document.
Select the Print category at the top and click the Letter preset below. You’ll need to change just a couple of settings in Preset Details on the right: change the units to inches, choose the portrait orientation, and uncheck Facing Pages. Make any changes to the margins, and then click Create.
Tip: See an active Preview of the document you’re building by selecting Preview at the bottom of the New Document window.
Save your new project as an InDesign document (.INDD) so you can return to edit it anytime. Choose File > Save and give it a unique name.

First, you’ll create a round frame, and then add your image inside the frame.
Press and hold the Rectangle Frame tool in the Tools panel and select the Ellipse Frame tool. Press Shift and drag to create a perfect circle.
With the round frame selected, choose File > Place and open any photo on your computer, or use our sample file.
Now you can reposition your image inside the frame. Press the V key to switch to the Selection tool. When you hover over the image, the Content Grabber appears (donut-shaped circle). Drag the Content Grabber to move the image inside the frame. To move the frame on the page, drag it by its edge or square bounding box.
Try clicking one of the Fitting options in the Frame Fitting section of the Properties panel to fit the image to its frame in different ways.

Press the T key to select the Type tool and drag a large text frame for your headline.
Type your headline text. Select your text with the Type tool and choose a font from the Character section of the Properties panel. You can choose a font that’s already installed on your computer or activate new fonts from Adobe Fonts available to Adobe Creative Cloud members.
To continue formatting, specify a font size, leading (vertical spacing between lines of text), and tracking (spacing between characters).
We used Merel from Adobe Fonts in medium and black weights at 18 pt and 36 pt font sizes and increased tracking values to make the headline appear airy.

Try making some text uppercase—select some text, and then click the More Options button (three dots) at the bottom of the Character section. Click the All Caps button.

With the Type tool, drag to create another text box and type your text. Practice formatting the text as shown in the previous step. We set the body copy in Merel Light at 18 pt size and increased the tracking.
You may notice awkward line breaks caused by automatic hyphenation. To create smoother line endings, we clicked the More Options button (three dots) at the bottom of the Paragraph section of the Properties panel and deselected Hyphenate.

Add simple shapes in bright colors and angle your text to liven up the layout.
Press the M key for the Rectangle tool. Draw a box and align it to a margin.
To colorize the shape, you’ll pick a color from your image to tie into your design. With the box selected, press the I key for the Eyedropper tool and click in your image to sample a color and apply it.
To remove the border, select the Stroke Color box in the Toolbar and set it to None.

Next, type some text in a new text frame and format it. When you’re done, press ESC. Move your cursor just off a corner of the bounding box until you see the rotation cursor. Press Shift and rotate the text 90 degrees, and then drag your text box to position it in your composition.

Your modern flyer design is ready.
To save a PDF you can hand off for printing, choose File > Export. Select Adobe PDF (Print), and then click Save. In the Export Adobe PDF window that appears, select the High Quality Print preset at the top and click Export.

Now that you’ve got the hang of it, practice creating design variations. Get inspired by the alternate layouts we created for this project.

All Consent Allowed