Lorsqu'on retouche des photos, appliquer des modifications à des parties précises d'une scène peut vraiment améliorer le rendu.
Lightroom sur mobile propose d'excellents outils de masquage qui permettent de modifier différentes zones avec précision.
Bonjour, je m'appelle Seán Duggan, je fais partie de l'équipe Adobe Learn.
Dans cette vidéo, je vais vous montrer l'un des outils les plus performants de Lightroom sur mobile, qui consiste à créer des masques pour retoucher des parties d'une photo.
Nous verrons ensuite le panneau de masquage.
Commençons par les actions rapides.
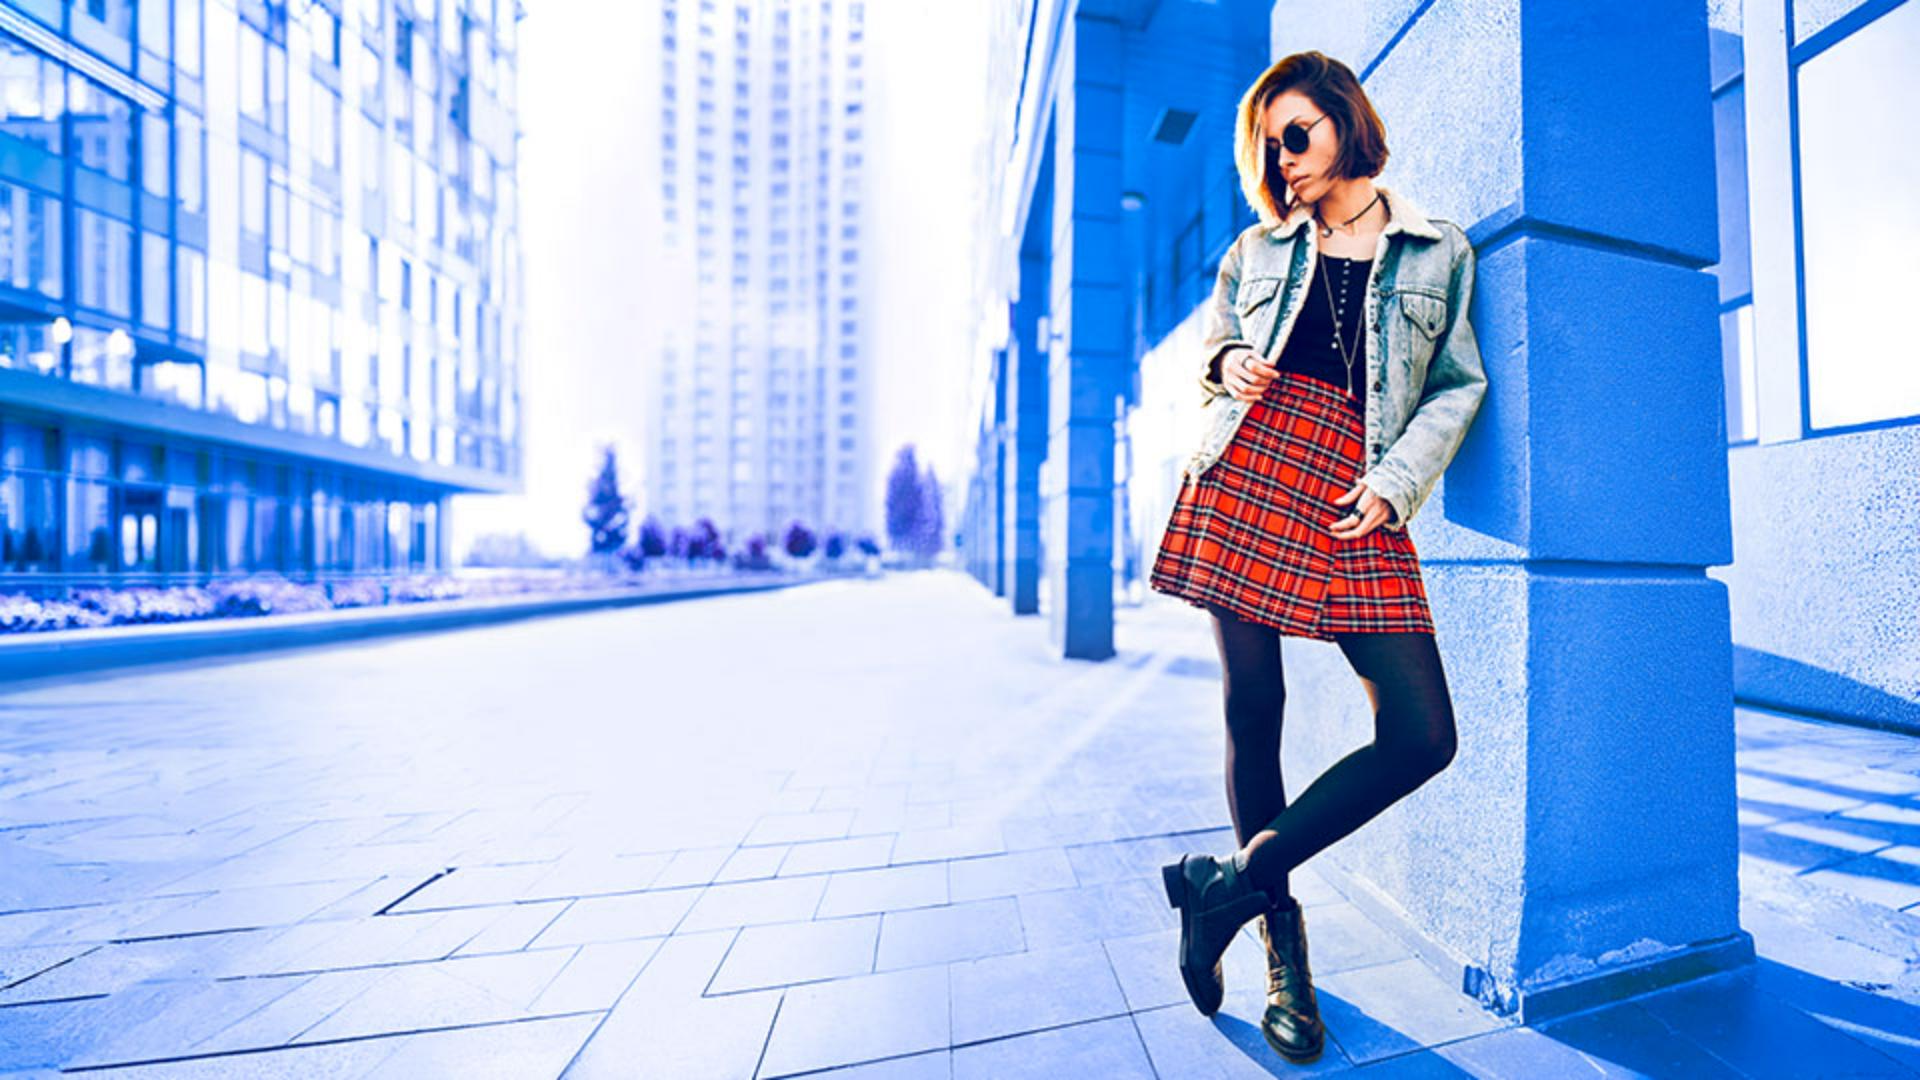
Si j'appuie sur l'outil Baguette magique, Lightroom analyse la scène et me suggère plusieurs actions rapides.
J'appuie sur Sujet, puis sur le paramètre prédéfini Lumière pour éclaircir la zone, et je règle le curseur de façon à accentuer l'effet.
Si j'appuie longuement sur l'image, puis relâche la pression, je peux comparer la version d'origine à celle que j'ai modifiée, avec les actions rapides.
Pour valider mes modifications, j'appuie sur la coche.
Bien que cela n'apparaisse pas à l'écran, Lightroom a créé un masque détaillé pour le sujet.
Voyons cela.
J'appuie sur l'icône de cercle pour ouvrir le panneau Masquage à droite de l'écran.
Vous pouvez y voir le masque créé lorsque j'ai appliqué une action rapide au sujet.
Pour développer ce panneau, je fais glisser cet onglet vers la gauche.
Le symbole situé sous la vignette indique qu'il s'agit d'un masque de sujet généré par l'IA.
En dessous, deux options permettent d'ajouter ou de soustraire un élément.
Pour accéder à davantage d'options, j'appuie sur les trois points.
Pour désactiver la visibilité d'un réglage, j'appuie sur Masquer.
Pour le réactiver, il suffit d'appuyer sur la vignette du masque, puis sur Afficher.
Ici, je vais utiliser le masque créé à l'aide des actions rapides pour effectuer d'autres retouches.
Le point sous l'icône Lumière indique que des paramètres prédéfinis ont été appliqués dans cette section.
J'appuie pour voir les modifications apportées.
J'augmente légèrement la luminosité avec le curseur Exposition, puis j'accentue le contraste.
J'appuie ensuite sur Couleur pour améliorer la saturation.
Ici, les modifications sont uniquement appliquées au masque du sujet.
J'appuie sur la vignette du masque pour revenir au panneau.
Je vais à présent ajouter un autre masque.
Pour cela, j'appuie sur l'icône « + ».
Plusieurs options s'offrent à moi.
Les trois premières correspondent à des masques générés par l'IA pour le sujet, le ciel et l'arrière-plan.
Les outils Pinceau, Dégradé linéaire et Dégradé radial sont manuels.
Plage de couleurs et Plage de luminance permettent de créer des masques en fonction d'une couleur ou d'une luminosité précise de l'image.
Pour accéder aux masques de plage de profondeur, il faut que la photo ait été prise en mode portrait ou profondeur.
Je choisis Sélectionner un arrière-plan pour générer un masque spécifique à cette zone à l'aide de l'IA.
La zone qui apparaît en rouge correspond à la partie retouchée.
Une fois le masque d'arrière-plan actif, j'appuie sur l'outil Lumière.
J'aimerais donner un style plus graphique à l'image en apportant un effet délavé et surexposé à l'arrière-plan.
Pour cela, j'augmente sensiblement l'exposition et le contraste.
J'atténue légèrement les ombres.
C'est un bon début, mais j'aimerais aller un peu plus loin.
Pour ce faire, je vais ajouter des couleurs vives à l'arrière-plan.
J'appuie sur Couleur, puis je joue avec la commande Teinte.
Les possibilités sont nombreuses, mais dans cette image, j'aime beaucoup le contraste entre le bleu de l'arrière-plan et le rouge de la jupe.
Je peaufine ensuite le tout à l'aide des curseurs Saturation, Température et Nuance.
Il n'y a pas vraiment de logique dans l'effet que je recherche.
Ici, je force volontairement le trait pour obtenir un rendu original.
Laissez vous aussi libre cours à votre imagination.
Pour valider mes modifications, j'appuie sur la coche, en bas à droite.
Afin d'avoir un aperçu avant/après, j'appuie sur l'image, puis je relâche.
Pour revenir au masque, en créer un nouveau ou effectuer d'autres retouches, appuyez sur l'icône de masquage.
Toutes vos retouches sont synchronisées dans l'écosystème Lightroom.
Vous pouvez donc ouvrir ce fichier sur ordinateur comme sur le web si vous souhaitez travailler sur un grand écran.
Maintenant que vous savez vous servir des masques dans Lightroom sur mobile, essayez ces fonctionnalités sur vos propres photos.
C'était Seán Duggan de l'équipe Adobe Learn.
Merci de votre attention.