Introduction
In this video you will learn how to correct the brightness of your photos in Lightroom CC.
You can follow along with any photo or you can download the sample file from the Adobe page for this tutorial.
Once you import the sample photo into Lightroom CC you will see it in the photo grid.
Click on it and open the Edit workspace by clicking on the Edit button.
Then click on the Light panel to expand it.
The Light panel gives you powerful control over your images brightness.
It allows you to bring out the hidden detail in your photos.
Starting with auto tone adjustments
If you're new to Lightroom CC a great place to start is with the Auto button.
You can use it as a starting point or a one click solution.
When you click on the Auto button Lightroom CC uses machine learning technology to analyze your photo and it determines the best settings for each slider.
Sometimes you may need to fine tune the auto correction but, in this case, it did a fantastic job.
However, in this video we will not use the Auto button as a starting point.
Instead we will discuss each slider individually
Understanding the light panel sliders
so that you can better understand how they work.
To reset all the sliders, hold Alt on Windows, Option on the Mac.
That turns the Light panel label into a Reset button.
Click on it to return all the sliders to 0.
Photo adjustments are all subjective.
Feel free to make adjustments that look good to your eye.
It's not necessary to use the same values that you see on screen.
The six sliders in the Light panel adjust the brightness of different areas in your photo.
You can hover over any of the slider labels to display a helpful tooltip which contains a description and animation of what the slider controls.
The best way to work in the Light panel is to start on top and work your way down the list.
The Exposure slider controls the overall brightness of your photo.
Adjusting exposure and contrast
Dragging to the left reduces brightness or dragging to the right increases brightness.
This is a strong control and you should only use it if your photo is not exposed properly.
In this case the photo is a little underexposed.
It's a little too dark.
So, I'll move the slider to the right to brighten it up.
The Contrast slider makes bright areas brighter and dark areas darker.
This slider works great with flat images that need a boost in contrast.
But keep in mind that this is also a strong control that affects the entire image.
So, I'll reset the slider by double clicking on it.
Then I'll increase the Contrast just a bit.
Usually a slight increase in contrast is all you need to make your photos pop.
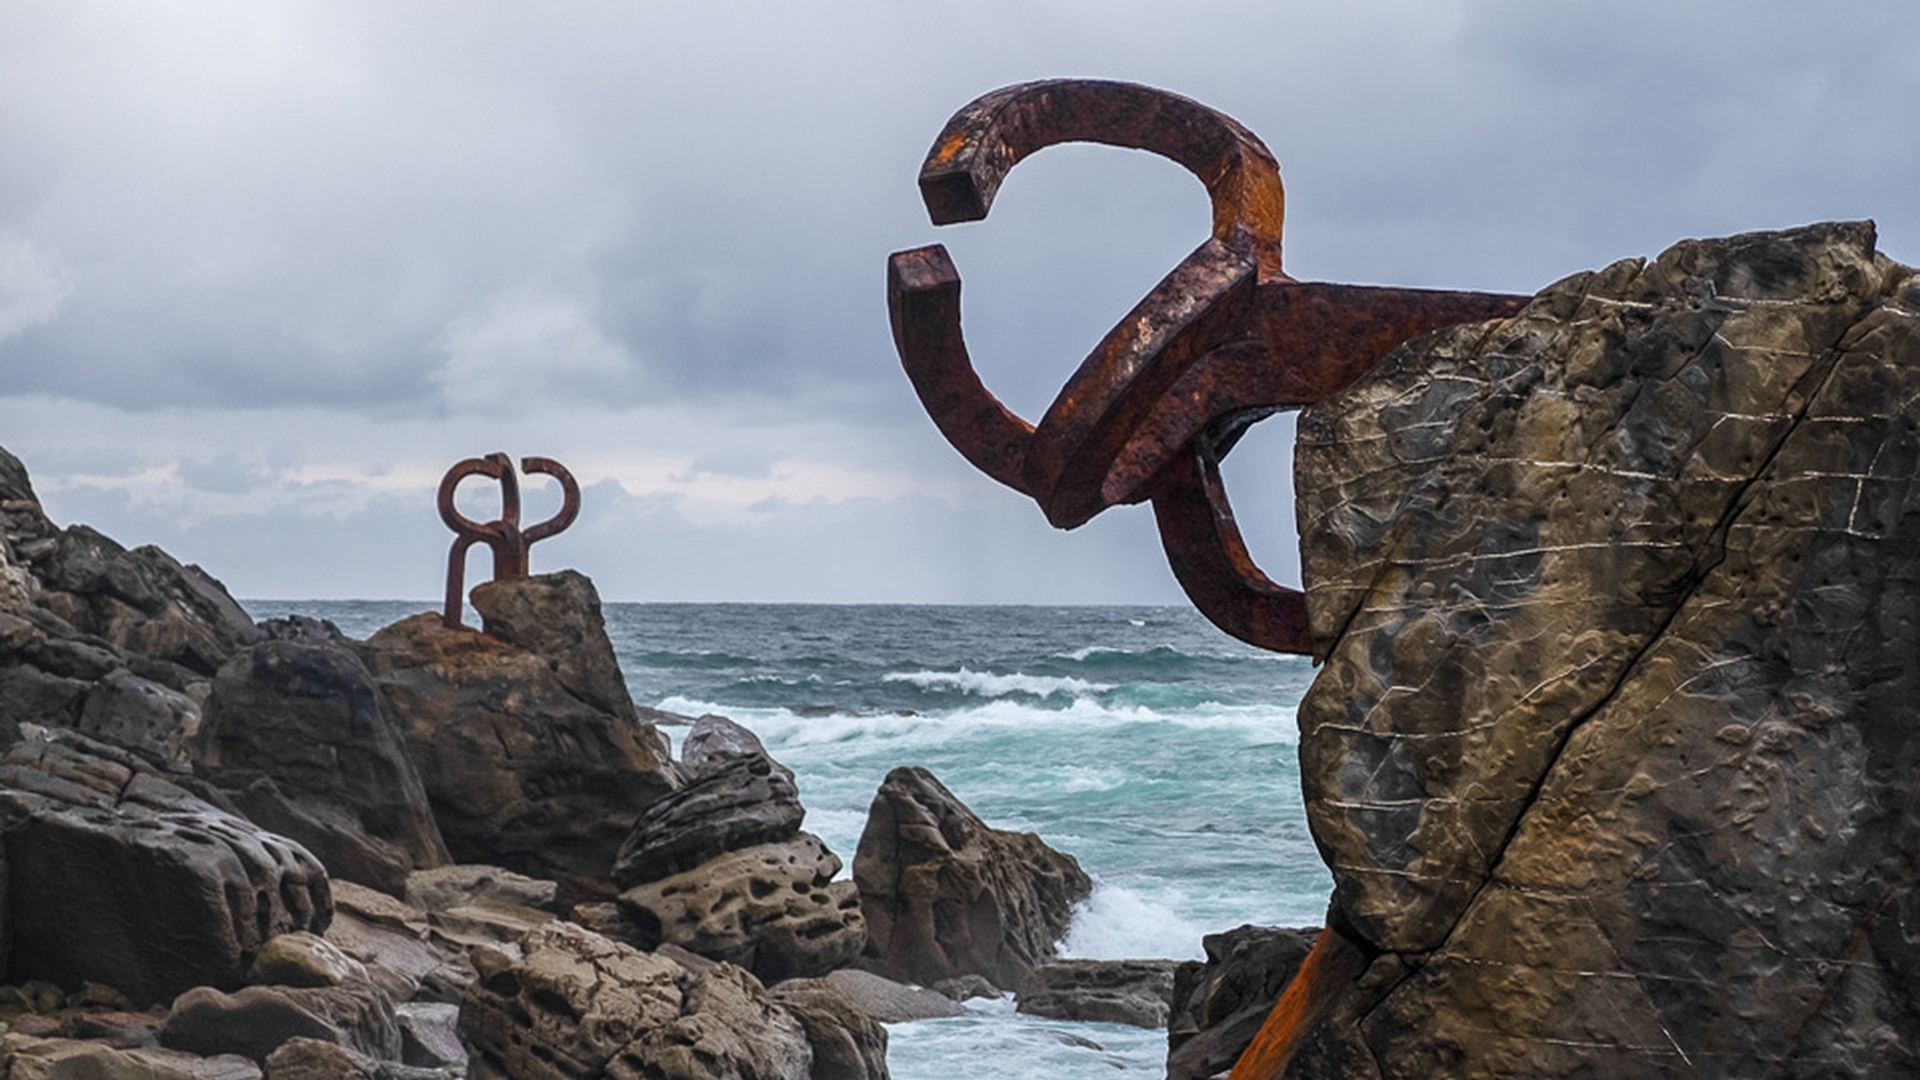
Recovering highlights and shadows
The Highlights slider controls the brightness of the lighter areas in your photo.
You can use the slider to reveal the hidden detail in bright areas.
As I drag to the left you'll see clouds appear in the sky and you will see more detail in the waves.
The Shadows slider controls the brightness of the darker areas in your photo.
This slider is very useful for images that are too dark like this one.
Look at all the hidden detail that appears on the rocks and other dark areas of this image as I drag the slider to the right.
The Whites slider dictates the absolute brightest value of your image.
Setting whites, blacks, and fine-tuning brightness
If your photo was underexposed, you could remove the dullness and that contrast by dragging the slider to the right.
However, it can be difficult to know where to place the slider because if you move it too far to the right it will create areas that are completely white with no detail.
Fortunately, Lightroom CC has a feature that can help you prevent moving the slider too far.
As you drag the Whites slider hold the Alt key on Windows Option on the Mac to apply a black overlay on your image.
When you drag far enough to the right you will start to see some tiny areas of color then white These are the areas that are becoming pure white with no detail.
So, you want to move the slider back up to the point right before they start appearing.
The Blacks slider sets the black point.
The absolute darkest value of your image.
Slide it to the left to give your photo more contrast in a bit of a punch.
Keep in mind that if you push this slider too far to the left you can darken almost all the values in your photo and push the shadow detail into pure black.
After you've gone through all the sliders you may need to go back and continue to fine tune your image.
Although each slider focuses on a specific tonal range they all affect the overall image.
Click on the before and after icon to see the original photo and click on it again to see the adjusted image.
And now you know how you can adjust brightness to bring out the hidden detail in your photos.