I believe that the main reason to why I was so attracted to 3D is that I come from an environment where I am used to prototyping things. Some of my biggest interests since the last 15 years or so are sewing, pattern making, and photography which, even though it’s also partly my occupation, I still do in my leisure time. After graduating university and entering the fashion industry, I quickly realized that it is rarely about that “hands on” approach.
#1E1E1E
https://main--cc--adobecom.aem.live/creativecloud/img/icons/designer.svg | Designer
May 20, 2021, by John-Daniel Isacsson
3D in Fashion as the Digital Reincarnation of Traditional Craftsmanship
John-Daniel Isacsson uses Substance and CLO3D to illustrate his passion for the outdoors.


Generally speaking, and from my own experience, many design processes are surprisingly isolated to a 2D environment and in my opinion quite detached from the physical making of a product. 3D changes all that. It enables me as a designer and creator to get back to the roots and work creatively again, just like I would have done in a sewing studio, a material lab, or during a photoshoot. To me, 3D in the fashion industry constitutes the paradigm shift that offers a reincarnation of traditional craftmanship in a digital manor. It forces us to rethink and reevaluate the way we do things, our systems, methods, and techniques. That’s what I find particularly interesting.
In my job at H&M, I am mainly responsible for education and support of CLO3D as well as the creation process of digital materials. CLO3D is one of the tools that I use on a daily basis. Apart from that, I always tend to have one or two personal projects on the side that I work on as a creative outlet. I am always trying to combine my practical and theoretical knowledge from fashion, photography, and 3D to develop and try out different design methods and workflows.


I came across Substance Painter one and a half years ago, after working with CLO for a couple of years. I found it very enjoyable and intuitive, not too unlike Photoshop. Shortly thereafter, I got interested in the actual making of the materials but truth be told, I was a bit intimidated by the complexity of Substance Designer. After beating around the bushes for a while, looking at many of the Substance Academy tutorials, I eventually I got started with that too. I quickly realized that it is all built on logic, very fun, and not too dissimilar to solving a sudoku.


My Projects
Most of my projects stem from my own curiosity. I tend to gravitate towards trying out new workflows and techniques that I’ve been thinking about. Since I find it very pleasurable to physically design and sew — real-life — technical apparel in my leisure time, many of my 3D artworks often end up revolving around those products.
- The outdoors scene
- Clothes care label
active tab
1
id
projects
The outdoors scene
Because I was interested in showcasing the CLO + Substance integration, I didn’t create this project in the most efficient way. In another context, I would probably use CLO to create assets, Substance Painter to texture and either Blender or 3DSMax to compile the final scene.

Making the tent
I started out in Blender to create the tent poles for the tent.
Just like in reality, the poles are a necessary framework for the tent fabric to stretch over. While still at it in Blender, I went ahead and created a simple ground plane for the tent to rest upon.

Ground Plane
For the ground plane, I added some subdivisions and sculpted some details. Before heading over to CLO, I did some quick UV-unwrapping and exported my assets as OBJ.

Drafting Pattern in 2D
With CLO up and running, I drafted my pattern directly in the 2D pattern window using the polygon tools.
I separated the construction in to two stages, first I made the inner tent, the floor and the guy lines. Before continuing, I applied the freeze function to all pattern pieces and started to draft the outer tent, then sewing everything together and simulating it on top.

Creating things in both 3D and real life
As I previously mentioned, I usually create things in both 3D and real life and this is no exception. The measurements for the tent pattern are copied from a real-life project that I am working on. In practice this means that many of my art projects also serves as prototypes, which I think is pretty neat!

Creating the sleeping bag
Ok great, so we had a finished tent. However, the camping trip could get really chilly and uncomfortable without a mattress and a sleeping bag (I do know that from personal experience). Luckily, I just happened to have exactly those two assets laying around on my hard drive so I decided to use them here. Instead of just popping them in to my CLO scene I wanted to try a different workflow using Substance Painter. This is a little bit of a detour, but follow along with me and I will give you a couple of reasons as to why.
First of all, I opened a separate CLO file containing my sleeping bag and my inflatable mattress.
Here, I took good care to separate all my different pattern pieces and assigning them with different materials. The type of material and color was really of no concern at this stage.

Secondly, I popped open the UV editor and arranged my pattern pieces (i.e UV-islands) in to four separate UV-tiles.
One tile per each material. I use the UDIM workflow mainly to allocate more resolution for each UV-island. Depending on the project, one could definitely be much more space efficient when packing the UVs. Since this was made for explorative and demonstrative purposes mainly, I thought this would be enough get the point across.

Before exiting CLO, I exported everything as a single FBX using the following settings:

I realized that I was missing a zipper slider on the sleeping bag, so before opening up Substance Painter, I jumped over to Blender and opened up my little sports-trim kitbash and grabbed one of my sliders.
I made these assets a while back ago and they are all UV-unwrapped so it was just for me to add a couple of extra tiles to my UDIM (again, not being very space efficient). Here, I want to point out something important to anyone trying this out: do not try alter the native UVs of the CLO mesh, it will irreversibly mess up the model.


Before exiting Blender, I used the following FBX export settings.

The next step in this little detour was to open up Substance Painter and setting up a new project.
Here, I used the PBR-metal-rough shader together with my exported sleeping bag FBX mesh. Here, I want to highlight that I used the legacy workflow mainly for demonstrative purposes. Since I grouped my pattern pieces by material back in CLO and I had no intention of painting across tiles, it made more sense to do it this way. To me, it also makes much more sense from a real-life perspective since it is more similar to how you would cut your pattern pieces from a single roll of fabric. That said, it will of course ultimately depend on what your texturing intentions are and both options works just as well.

Finally, I ended up in Substance Painter.
Here, I’m doing the regular setup by first baking my mesh map and specifying the size of my texture sets.

In Painter, I simply just applied one of my ripstop materials and added a dirt generator to introduce a bit of wear effect to the crevasses of the quilted sections.
I could of course have spent some more time giving the model a little bit more love, but since this asset wasn’t intended to be the main focus of the scene, I thought that this level of detail would be sufficient for my purposes.

Lastly, I created an output template for CLO containing the maps I needed and exported my painted textures as bitmaps.

Back to the tent!
Here, I opened up my tent scene again. I imported my sleeping bag mesh and plugged in my painted textures. I decided to use CLO’s internal silk shader to get the correct shine of the fabric. At first, I tried using the FBX mesh that I exported from Blender but I realized that CLO only seems capable of handling one FBX file at the time. To solve this, I just went back to Substance painter and exported the mesh as OBJ.

Workflow
As I mentioned earlier, I had a couple reasons to why I wanted to try this workflow out.
1. Optimization
After working with CLO on a daily basis for a couple of years, I’ve noticed some quite substantial performance gains when using OBJs instead of garment files. I am not sure why that is, but my guess is that you get rid of a lot of caches that would otherwise weight down the performance. Of course, this only makes sense for objects that are supposed to remain static and also only if one is building larger scenes with a lot of objects that would otherwise max out on either performance or rendering time.
2. Visuals
When applying textures in CLO things look really neat and fresh, but sometimes you want that little extra detail or grunge that only a Substance paint-job can offer.
3. Flexibility
For the sake of this exploration, I chose to import the asset back in to CLO, but the asset itself is now prepared to be used in any software of my liking.
Building My Scene
Okay, so with the detour out of the way I continued building my scene.
Now focusing on texturing the tent using the new Substance integration. I am using a mix of both my own materials that I made in Substance Designer as well as materials from Substance Source. I am a huge fan of the Substance Source library and the extreme variety it offers. One key feature that I use a lot is the possibility to download the SBS files. This is of course a great learning opportunity when starting out with Substance Designer; it is also a huge time saver when you know the software.
If you need something similar to what is available on Substance Source, you can simply download the .SBS file and start tweaking the graph. This way, you get a good head start on many projects and you avoid reinventing the wheel.
Invisible Zipper
In this project, I spent a just a couple of minutes in Substance Designer reworking the graph of the Invisible zipper from Substance Source and turned it in to a reversed coil zipper instead, which was exactly what I needed.


Inner Tent
For the inner tent I used the Synthetic mesh non-woven from substance source which worked flawlessly without any tweaks. The outer tent was a bit trickier since a wanted a very specific kind of light scattering effect on the surface of the fabric. To achieve the desired effect, I used one of my own ripstop materials and exported the bitmaps from substance designer and set up the material with the SSS skin shader in CLO.


More Props
As a final step I populated the scene with some more props, I also imported a second scene with a climber to contextualize things a bit. That scene was created using a similar workflow to the one I showcased for the sleeping bag.
In the end the complete scene became fairly large both in terms of polycount and texture resolution but due to some variations in the workflow I was pleasantly surprised over both the performance and the overall quality of the final result.


Clothes care label
This might sound a bit cliché but a bunch of years ago when I was still in university I got the opportunity to do a design internship at Adidas. I ended up with this amazing mentor who was really in to the technical bits of the design process. This person really pushed me and thought me the importance of becoming good at the digital craft. At one point, when working on a big rugby project they explained to me how the key to a successful design is “the devil is the details”. For some reason that idiom really stuck with me. To me the little care/brand label is something that is often overlooked when creating digital garments and, in a way, I think this seemingly insignificant detail can be the thing that makes it or breaks it. For me, it’s about pushing the level of intricacy to evolve the field and encourage fellow creators by sharing this material and giving back to the community.

Breakdown
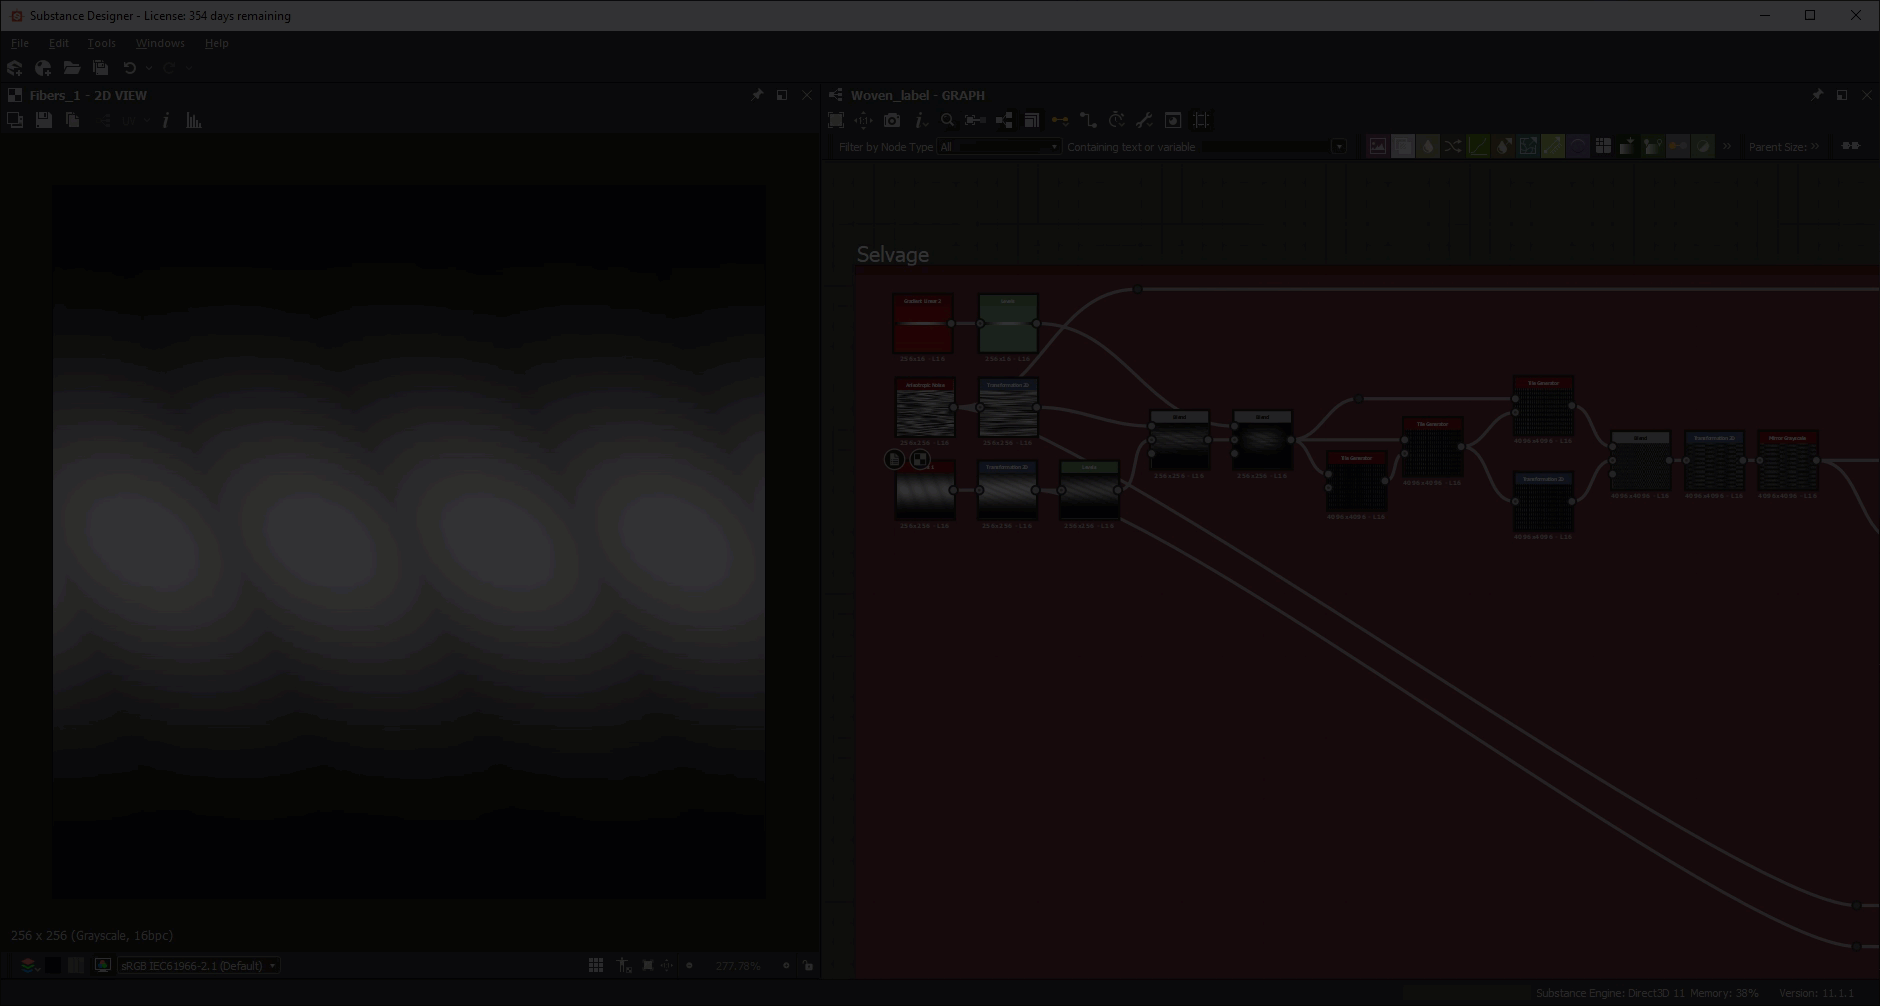
Usually, I don’t work in a linear fashion in Substance Designer, so this breakdown should be seen as an explanation of how the graph works rather than the logic I used to build it. The graph contains a lot of functions, exposed parameters and custom nodes; the main focus of this design was to make it as user friendly and versatile as possible. Let’s go!

The selvage
First of all, for those who are not familiar with textile terminology: a selvage (or selvedge) is the self-finished edge of a fabric that (in case of a woven fabric) runs along the warp threads. This prevents the fabric from unraveling or fraying. On some woven labels, this is a fairly distinct detail.
In this part of the graph, I started out by creating the base fiber using some directional noise to add some detail. Then, I blended this with a gradient to round off the shape. After that, I used three separate tile generators to create an uneven repeat of the fibers, which are then also blended together to form a seamless repeat.
In the last part of this node group, I used the levels node to tighten down the black and white values so that I could mask out the contour of the selvage warp threads. Within these masking nodes, there are a bunch of small functions cross-referencing different parameters across the entire graph so that the exposed parameters will work correctly.
The custom alpha input
This node group is the part of the graph that I consider to be the beginning. Here, I added a custom grayscale input intended for the user to be able to add their own imagery. The input is then fed through a custom auto-crop node that I built so that that a non-square image input will be displayed correctly. There is also an invert grayscale node that has an exposed parameter. I added this in case a user would accidentally create their input with inverted black and white values. It is there just to save people the hassle of re-exporting their images.
After that, I added some transform parameters and a histogram scan node that serves as a threshold adjustement. Here in this node-group, there is also a node called “wash symbols”. That is a custom node that I built with the main purpose to output care label symbols.

This is how I set up the autocrop node.

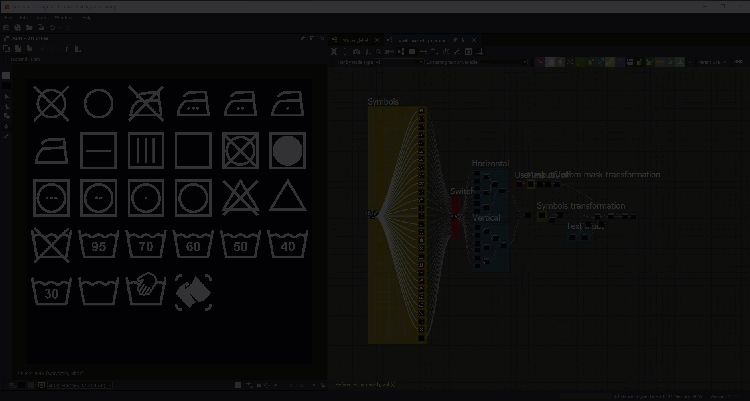
The wash symbols
The sole purpose of this node is to generate the ISO standard wash icons that you can find on the care label in most garments.
Since I’d always had a hard time figuring out masking and blending modes in different software, I saw this as an opportunity to practice. I decided that I wanted to create 28 different icons, and off I went on a masking adventure! It was hard and took some time but I eventually made it.
Later, I read an interesting Substance magazine article featuring Guilherme Marconi on pattern creation with Illustrator and Substance Designer. This made me realize my insanity and I decided to learn from Guilherme’s example since it was quicker to do, more accurate, and much cleaner. So instead of my tangled up mess of masks, I ended up creating my icons in Adobe Illustrator and using a single SVG node in Designer.

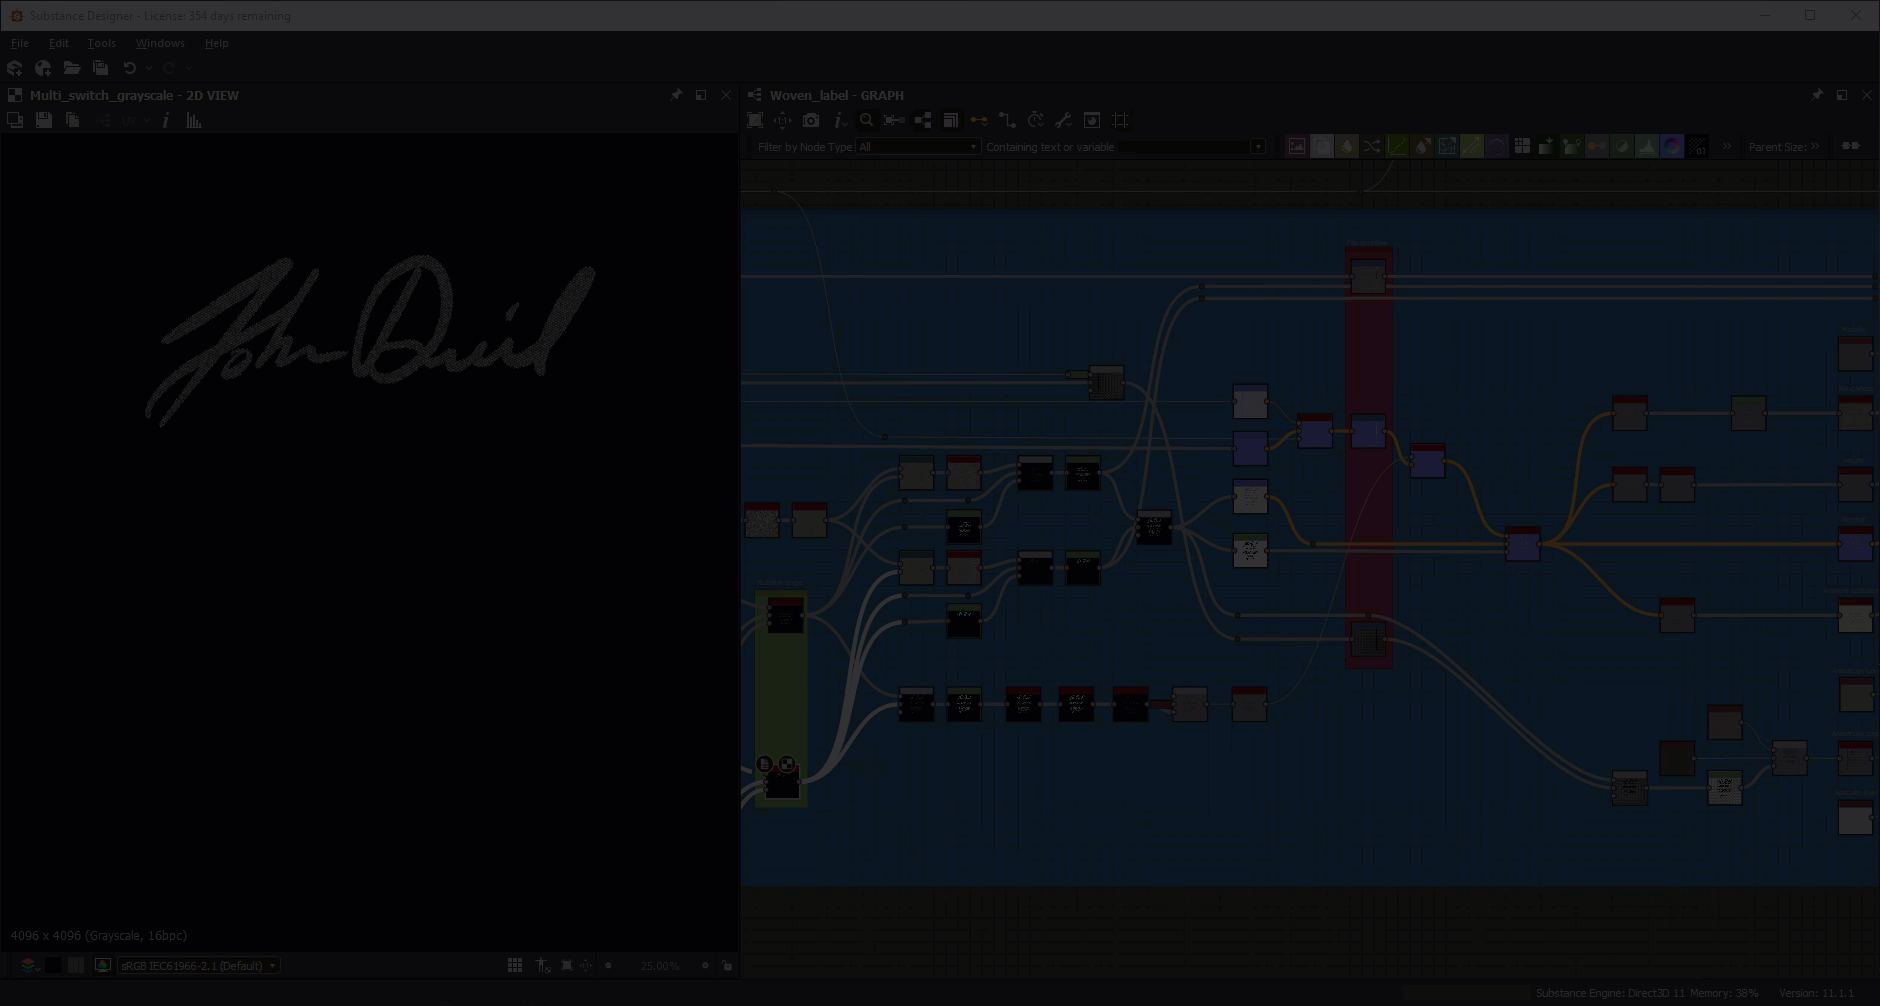
As in Guilherme Marconi’s graph, I connected my SVG node to a bunch of crop nodes to separate the individual icons. In the following part of this graph, I modified a multi-switch grayscale and added six outputs, one for each icon slot.
I then connected each output of the switch to a small tree of transform 2D nodes that generates a horizontal and a vertical layout for the icons. The last section of this graph mainly contains transform nodes with exposed parameters as well as two separate text nodes for user defined text fields. Here, I also created grayscale mask inputs just in case I would need it later (spoiler alert, i didn’t need it).
The woven jacquard
Let’s look back in the main graph at a big node group called Woven jacquard. Jacquard is an advanced type of weaving technique often used in brand labels and similar products.
First, I created the base material by building a new fiber, which I fed through two separate tile generators. The output of the tile generators has several destinations, one of them to blend with the output from the selvage, creating the base for one of the color masks that we will get more familiar with later.
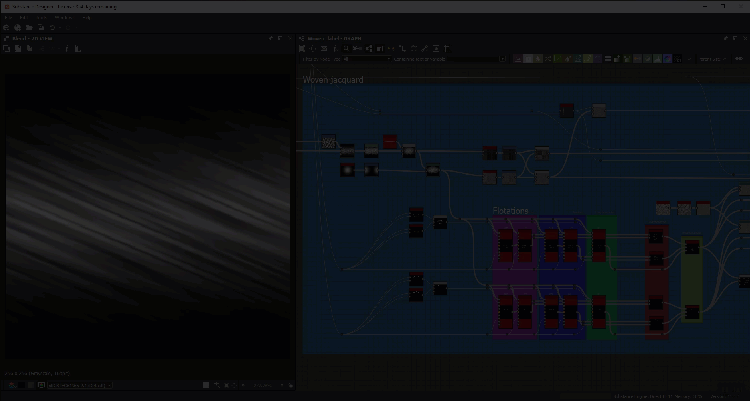
Below the base material, I built the flotations. Simply put, a flotation is a length of yarn on the surface of a woven fabric between two consecutive intersections, here used to create the pattern on the surface of my material.
At this stage, I already knew that I wanted to be able to colorize the wash symbols and the input mask separately. To achieve that, I had to create two separate sets of tile samplers. Each tile sampler uses the same fiber as the base material as a pattern input: for the scale map input, I blended together two non-uniform blur nodes set to contrasting angles. The mask map input of the tile sampler uses the alpha mask and wash symbol outputs. I’m creating three different flotation types in two different angles, so a total of 6 variations.
All the tile samplers are then fed through a set of switches that are linked to an integer dropdown parameter in the case of the flotation type. For the flotation angle, there is a boolean switch.
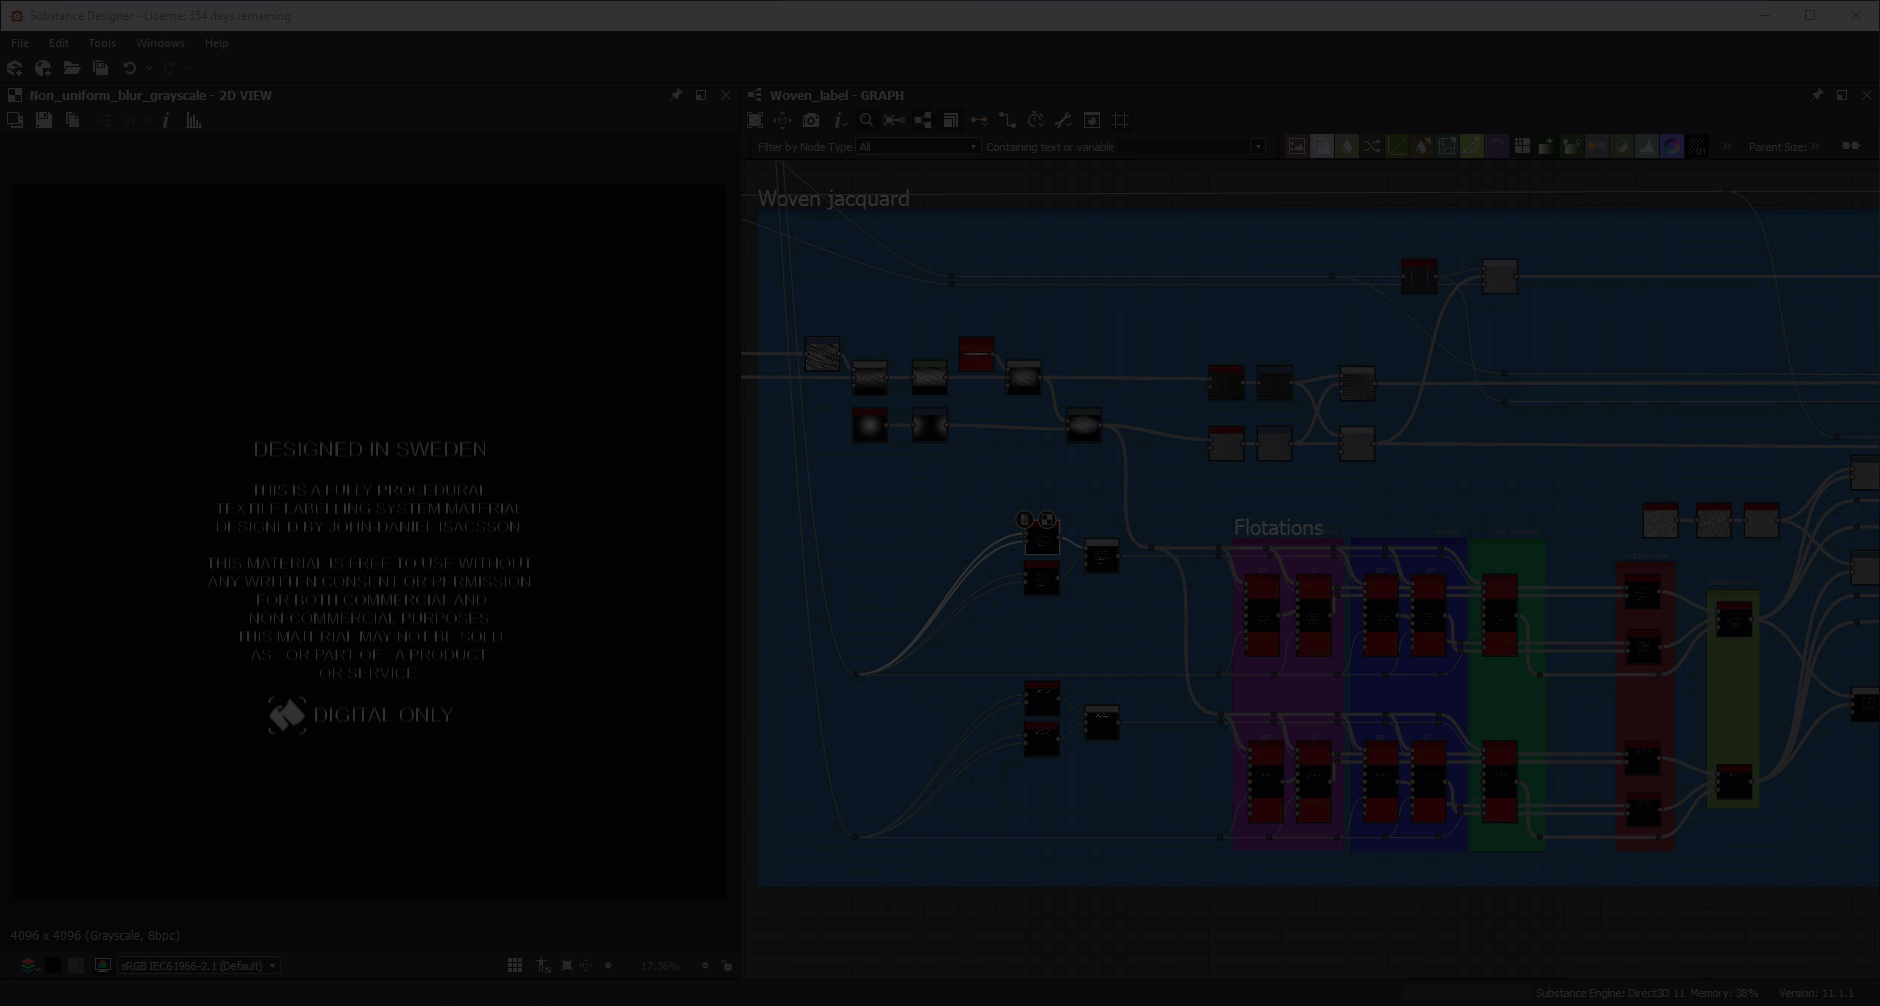
In the second half of the jacquard node group, I blended my masked flotations with some directional scratches to add some extra detail.
The following setup for the normal was a bit tricky to figure out: I wanted to expose a parameter so that the user would be ale to flip the grain-line (orientation of the weft and warp threads) of the base material separately from the masked flotations. To achieve this, I needed to separate all elements, add transformation nodes in between, and then bring everything together again. Here, I also took the opportunity to use the height normal blend node to add a little crevasse between the base material and the masked flotations.
After that, I extracted most of the maps from my normal and fed them through a bunch of histogram ranges so that I could calibrate this material preset from within.
Printed wash label
Another type of label that you can find in most garments are the printed wash label. These are often made with a satin or satin-like type of weave: if you look inside your t-shirt you will find it.
The printed satin node group aims to mimic this kind of label. This node setup was quite quick to do and follows the same logic as the woven jacquard. As with the woven jacquard setup, it begins with creating a new fiber which is then tiled and blended with the selvage to create the base material; this output is later used as a color mask. In this setup, I created a sublimation print effect by blending the base material with a dirt noise, which I then fed my input mask and wash symbols through. Also, in this case, and for the same reason as with the woven jacquard, I separated the elements when creating the normal.

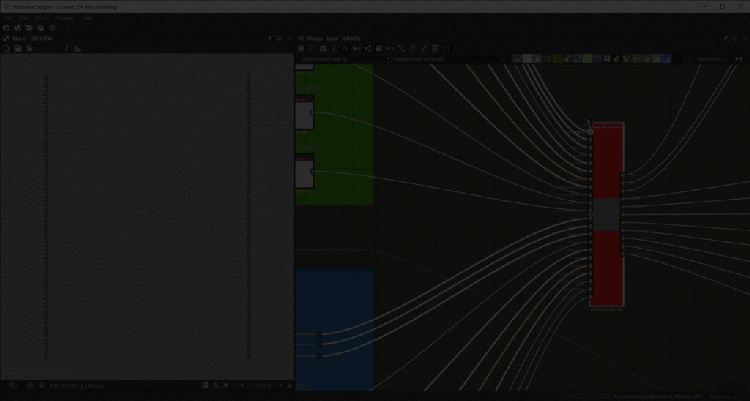
Custom grayscale material switch
To be able to switch between my two material presets, the woven jacquard and the printed satin, while still maintaining separate color masks for the base material, the input mask and the wash symbols, I had to create a custom grayscale material switch where I added inputs and outputs for 3 different masks. Since I had created outputs for the anisotropy level and anisotropy angle in both material presets, I added those channels to the switch as well.
This is how I set up the custom grayscale material switch:

Color input channel
Since the focus of this entire material is to be as versatile as possible, I did not want to limit the user to only input an alpha mask. That is why I also added a color input channel.
This node group is set up in a similar manor as the custom alpha input, with my autocrop node, a transformation node and a boolean switch to toggle the visibility. When enabling the custom color input channel the alpha input acts as a mask for the color input.

Switch linked to the material switch parameter
The custom color input travels the distance across the whole graph with only one stop where it blends with the print node group in the printed satin material. At this stop, I also added a switch that is linked to the material switch parameter.

Enabling user to colorize all elements individually
The final destination of the color input channel was without a doubt the trickiest part of the graph. In this area of the graph, I connected outputs from the custom material switch (i.e color masks for the base material, custom alpha, and wash symbols) to a tree of blend nodes and switches that enables the user to colorize all elements individually.

Label transform group
The last nodegroup that I want to cover in this walkthrough is the Label transform group.
These nodes output the opacity channel of the material; the parameters exposed here (as the comments in the graph indicates) control the overall transformation of the label. The Shape node (label size) is also linked back to the selvage nodes for all the masks to align correctly.

There is more to this graph than meets the eye. As I mentioned in the beginning of this walktrough, I do not work in a linear fashion. For this graph to work, as I intended to, it is literally packed with functions that span and reference different values across the graph.
It is all more or less simple math but it gets you a long way when building a material like this. This feature is in my personal opinion what makes Substance Designer so powerful; it is also why I think working in Substance is like solving a sudoku.

Here are some of the presets:
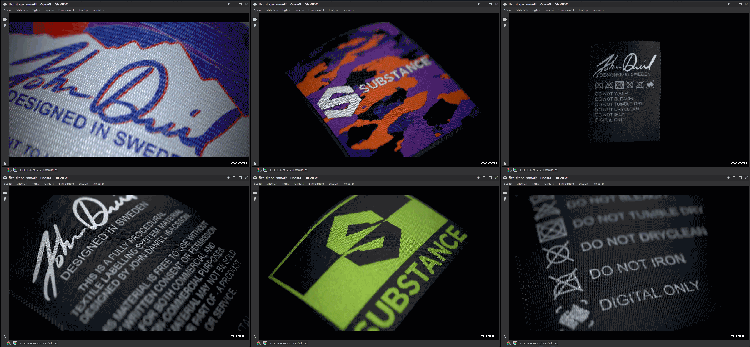
And here’s a short demo of the material inside Substance Painter:
And here is the material in Clo!
Where can we find your work/portfolio?
ContentType
Article
CardImage

CardImageAltText
Digital Design of Traditional Craftsmanship
Details
May. 20 2021, by John-Daniel Isacsson
Title
Digital Design of Traditional Craftsmanship
Description
John-Daniel Isacsson uses Substance 3D and CLO3D to illustrate his passion for the outdoors, combined with a love of 3D clothing design.