You can find many additional sample source files that install with Flash 8 in the Samples folder on your hard disk.
- In Windows, browse to boot drive\Program Files\Macromedia\Flash 8\Samples and Tutorials\Samples\
- On the Macintosh, browse to Macintosh HD/Applications/Macromedia Flash 8/Samples and Tutorials/Samples/
Alpha-enabled Video
This sample illustrates how simple it is to create an alpha channel effect with video in Flash. The video alpha channel allows you to make part of each video frame transparent, so that other items on the Flash Stage can be seen behind the video.
To use a video file to create the alpha effect in Flash, the video file must contain an alpha channel.
In general, the video file must meet the following requirements:
- 32-bit video with million+ colors
- Includes a color-key background
- Is encoded to enable the alpha channel
Download the alpha video sample files. The sample directory also contains a ClearExternalNoVol.swf file, which contains the skin for the video playback component, and the alpha_vid.flv video file.
This sample FLA file consists of the video file, placed in Layer 1 of the Timeline, and a text symbol placed in Layer 2. Because the video file has been encoded with an alpha channel, the text instance can be seen behind the video. In this case, the video was created with a color-key background, which was then replaced with a transparent alpha channel. This makes the person in the video appear to float on top of the Stage.
Alpha Masking
This sample demonstrates how you can use a graphic with an alpha channel setting as a semi-transparent mask with ActionScript.
In this sample, the mask is a simple oval shape with a blur applied so that its edges are diffuse, similar to a gradient effect. The oval also has an alpha setting of 50% applied to it in the Property inspector. You can see this by selecting the oval shape on the Stage.
After creating the mask, you place it in a layer above the flower image. The gray mask graphic appears to darken the image at first. However, the setMask() method (of the movieClip class) appears in the Actions layer of the Timeline, and puts the mask into effect. When you test the Flash document (Control > Test Movie), the mask graphic now reveals the part of the flower image that appears beneath it and masks the rest of the image.
Because the mask graphic has an alpha value of 50%, the mask is semi-transparent. If the alpha value were 100%, the mask would be completely transparent. You can experiment with different settings in this file at your convenience. Be sure to save the file with a new name if you want to keep your new settings.
Download the alpha mask sample file.
Runtime Bitmap Caching (Flash Professional)
This sample demonstrates how the bitmap caching capability in Flash Professional can dramatically speed up animations that include bitmap data. By caching bitmap data, Flash avoids the complex calculations required to redraw the image data in each new position during an animation.
When you test the document (Control > Test Movie) with the default settings, you will notice that the animation of the ocean background is slow.
To see the increase in animation speed, select Frame 1 in the Timeline and then select movie clip in the background layer. In the Property inspector, select the Use Runtime Bitmap Caching checkbox. Repeat this process for the other keyframe in the animation, found in Frame 30.
When you test the document with the new settings, the animation is much faster.
Download the bitmap caching sample file.
CellRenderer API samples
The CellRenderer API allows you to manipulate and display custom cell content for each row of list-based components (List, DataGrid, Tree, Menu, and ComboBox). This customized cell can contain a prebuilt component, such as a CheckBox component or ComboBox component. For more information about how you can use the CellRenderer API to create your own custom cell content, see the Flash 8 online help (from within Macromedia Flash 8, select Help > Components Language Reference > CellRenderer API).
Multiline CellRenderer class example
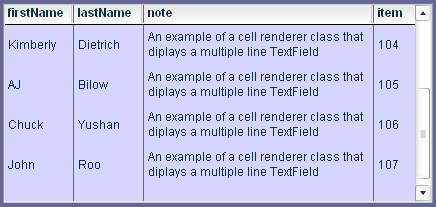
This sample demonstrates an ActionScript 2.0 cell renderer class that displays multiple lines of text in the cells of a DataGrid component. you can access the tutorial documentation for these files in the Flash 8 online help (from within Macromedia Flash 8, select Help > Components Language Reference > CellRenderer API).
The tutorial files include the following finished files: MultiLineCell.as, CellRenderer_tutorial.fla and CellRenderer_tutorial.swf
Download the Multiline cell renderer class example files
CheckBox and ComboBox cell renderer class examples

This sample demonstrates ActionScript 2.0 cell renderer classes that display CheckBox and ComboBox components in the cells of a DataGrid component. This sample also demonstrates how data value changes are updated between the DataGrid component and cell renderer classes that allow data manipulation.
The sample files include: CheckBoxCell.as, ComboBoxCell.as, CellRenderers_sample.fla and CellRenderers_sample.swf
Download the CheckBox and ComboBox CellRenderer example files
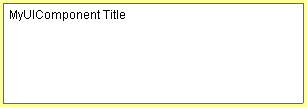
Custom component "quickstart" template
The following quick start sample and its source code demonstrate the basic structure needed to create your own component based on the UIComponent class and the version 2 of the Macromedia Component Architecture. For more information on creating your own custom components, see the Flash 8 online help (from within Macromedia Flash 8, select Help > Using Components> Creating Components).
You can use this sample as a starting point for creating your own components that extend the UIComponent class. This sample contains a MyUIComponent.as class and a MyUIComponent symbol in the library of a Flash document named UIComponent_Quickstart.fla.
To rename the MyUIComponent to the name of your own custom component:
- Right-click (Windows) or Control+Click (Macintosh) MyUIComponent in the library and select Linkage to change the Identifier and Class properties from MyUIComponent to your custom component name.
- Click OK.
- Right-click (Windows) or Control+Click (Macintosh) MyUIComponent in the library and select Component Definition to change the Class Name property from MyUIComponent to your component class name.
- Change the name of the MyUIComponent.as class file and class name in the code to match your component class name.
The MyUIComponent.as class file contains the basic class structure for extending the UIComponent class and should remain in the same relative location as the UIComponent_Quickstart.fla file when you compile your component.