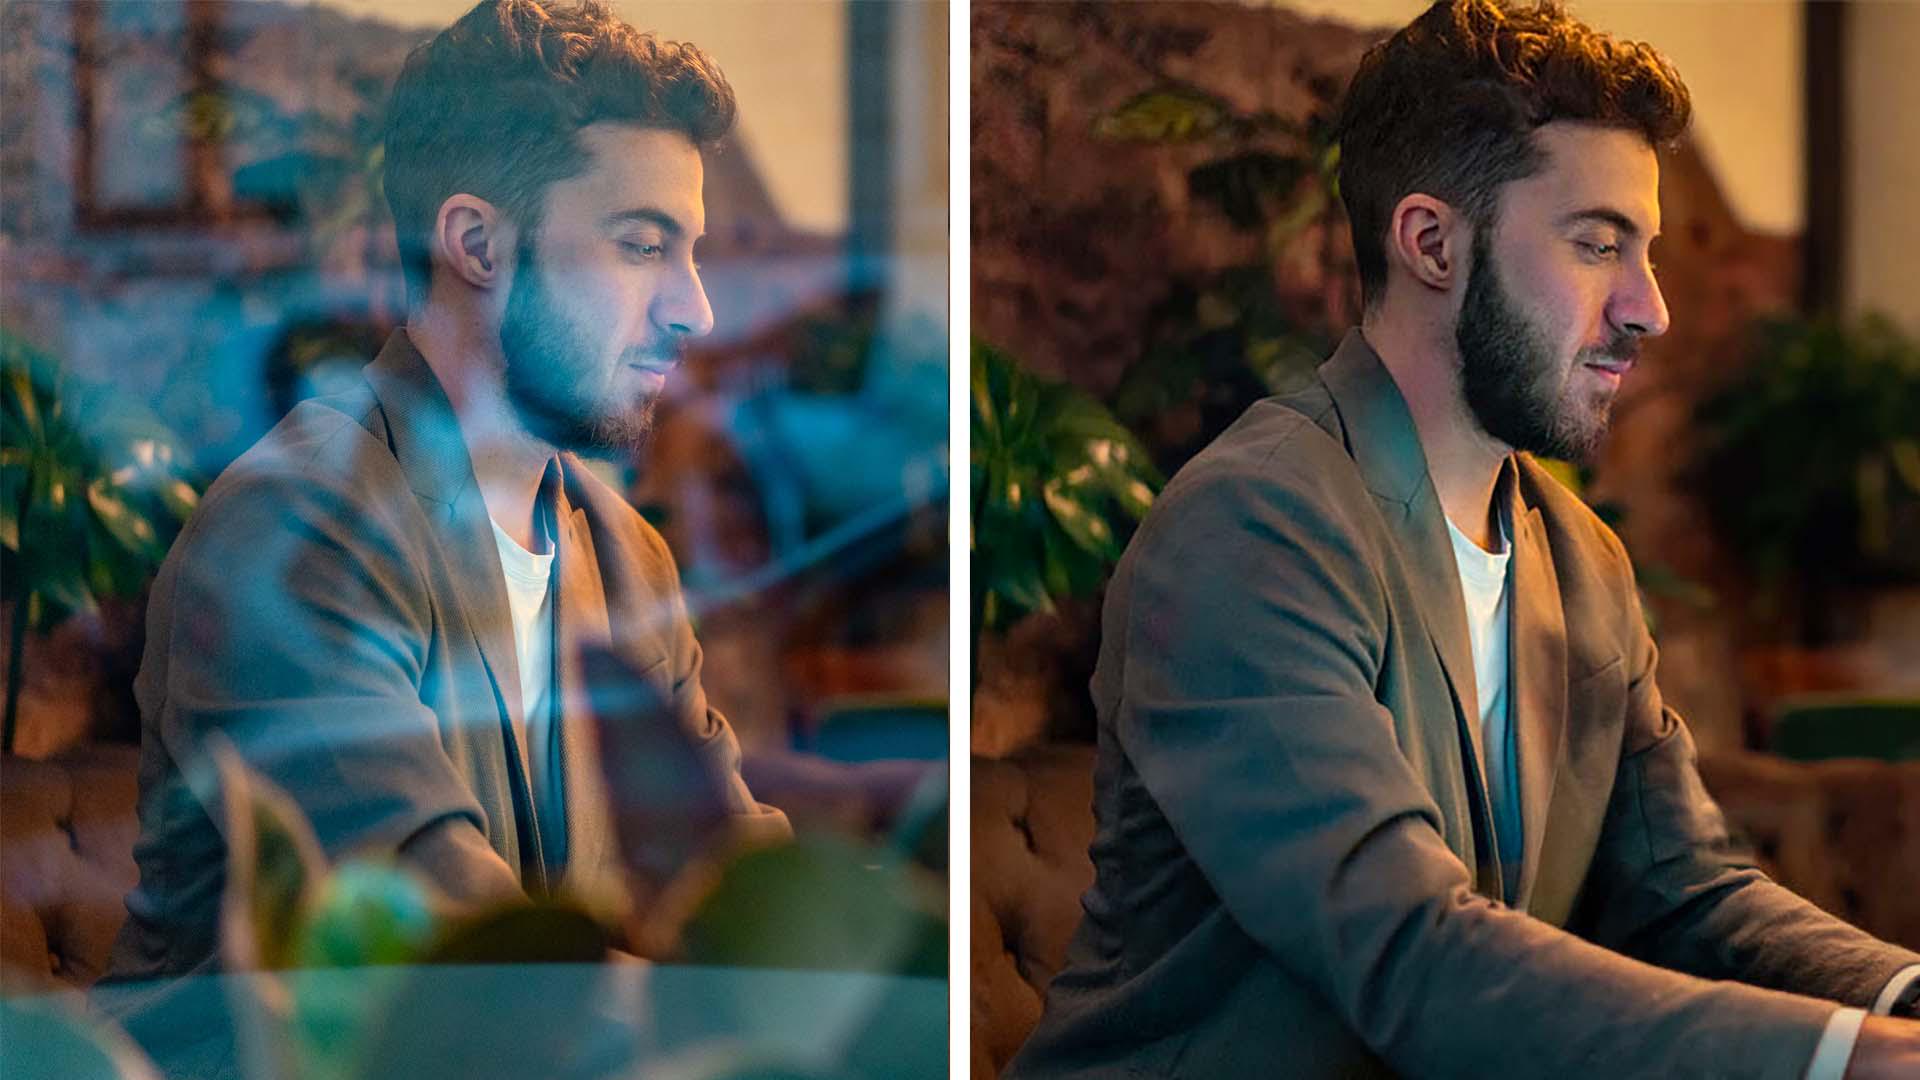
Introduction: Remove a reflection without selections or masking
[Colin Smith]: Ever wish you could remove impossible reflections from photos?
With the GenAI tools in Photoshop that's exactly what you can do.
Hi, I'm Colin Smith, founder of PhotoshopCAFE.com.
In the next few minutes, I'm going to show you how to use the powerful AI Remove Tools in Photoshop to remove reflections, distractions, and manually clean up your photos.
We're going to remove the reflection from this window so that we can see the man working on his laptop.
You might think this is going to be very difficult and time-consuming, but check this out.
If we go to Edit, then we're going to choose Reflection Removal...
Under Quality, we're going to choose Standard because this gives the best trade-off between quality and speed.
In fact, Preview looks a little soft but Standard looks really good.
And then we're going to click OK.
Isn't that amazing?
The reflection is completely gone as if the glass is not there.
What it does, it actually puts it on two layers.
The top layer is the clean layer without the reflection, the layer underneath shows just the reflection.
So if we wanted to make it look like there was a little bit of reflection, so there's still some glass there, we could choose the Reflection layer and lower the Opacity and choose how much reflection we want.
In this case, we're going to turn it up to 100% and have no reflection.
Use General Distractions to find visual clutter and you choose what to clear
If we look, we can see we've still got a lot of distractions, particularly all these leaves in the front.
So we can easily remove those using a tool called General distractions.
Choose the Remove Tool.
Make sure we turn on Create new layer and Sample all layers so this is created on its own layer.
This gives us the flexibility to edit this and work non-destructively, and change things later if we want.
With the Remove Tool selected, we can see Find distractions.
At the very top we have the option that says General distractions.
Click on Find.
General distractions look for objects in the photograph that could be the distractions that we might want to remove.
What it's going to do is it's going to highlight them, and then we can choose if we want those objects removed or if we want to keep them.
And if we look under the options, it sees different types of distractions.
One of them is Personal belongings, which would be the laptop.
We can see Spots and dust, which are just distractions, like these little lines in the room, and in Vegetation.
We could turn off any of these categories and these items would not be removed.
The other thing we can do is we can manually tell it which objects we don't want removed.
In this case, we want to keep the vegetation in the background.
So hold down the Alt key on Windows - that would be Option on Mac - and our cursor becomes a - instead of a +.
And now we can paint away the highlights for the areas we don't want to remove.
Because aesthetically speaking, these plants in the background look quite nice.
Maybe some of the distracting ones on the edges and the corners we can remove because they're not adding anything to the composition.
I'm also going to paint away the top of the laptop, and we're going to keep that.
And we'll get the other little part of the laptop in here.
This just tells Photoshop there's a laptop in here even though you can't see the whole thing.
If you want to add areas to remove, we can simply paint on them.
Let's get rid of these candles because the color makes them stand out and they're a little bit of a distraction to the overall composition.
We want to keep things focused on the man working on the laptop.
Once you've made your modifications, it's time to hit the Checkmark and now General distractions is going to remove all the highlighted distractions.
Regenerate missing content with Generative Fill - Adobe Firefly
So all the plants in the foreground have been removed.
But that laptop is looking a little strange.
Lets use Generative Fill to create a new laptop.
We're going to choose the Selection Brush Tool and let's make a selection all around the area we want to replace and Photoshop will fill that in for us.
It's a little bit there at the bottom, I want to make sure we select that too.
From the Contextual Task Bar, click on Generative Fill.
For the model, we're going to click, we're going to choose Adobe, and we're going to use Firefly Fill & Expand.
This is the best model for inpainting.
Inpainting is when you're changing something with a selection that's already within the image.
Now we're going to type a prompt.
We're going to type: "Change to laptop computer" and then choose Generate.
Generative Fill is going to replace that highlighted area, and it's going to offer us three Variations to choose from.
In the Properties panel we can audition the different variations and choose the one that you like the best.
Let's have a look at the before and the after.
Isn't that amazing?
With all the visual clutter removed, our subject is now clearly the focus of the image and telling the story of a person working on their laptop.
Now that you know how to use the AI Remove Tools to save your photos, give it a try on your own projects.
Again, I'm Colin Smith, thanks for watching.