Introduction
Let's see how to use Photoshop with Lightroom to make a composite of multiple photos.
That's something you'll need to use Photoshop along with Lightroom to do because combining images isn't something you can do directly in Lightroom So we're starting here in Lightroom which you can use to keep track over all the images that you combine in a composite as well as the final result.
I'd like to combine the first two photos here.
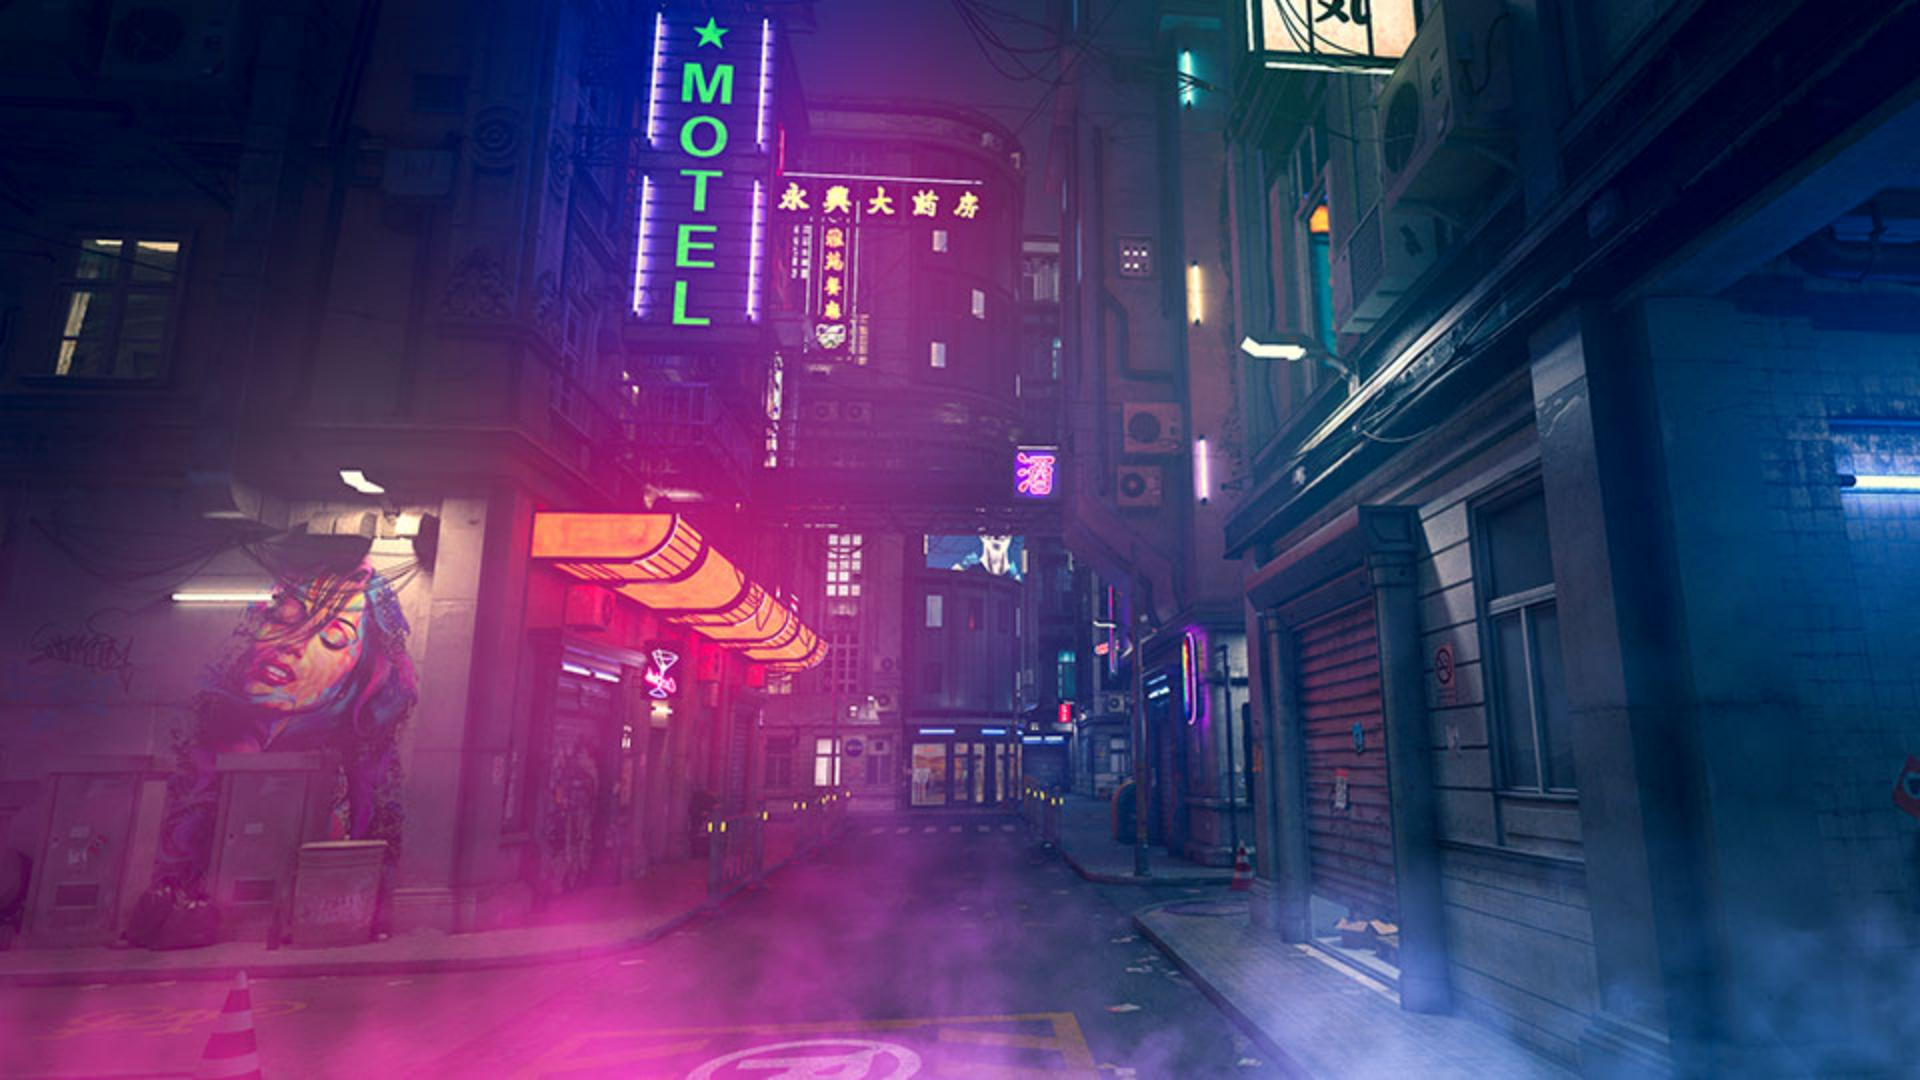
This image of the city and the one next to it, the colored smoke.
But first I'd like to make an adjustment to the photo of the city.
So with that photo selected,
Applying a preset in Lightroom before compositing
I'll go over and click the Editing icon and to keep things simple let's say I just want to add a preset to this photo here in Lightroom I'll go down to the Presets button and in the Presets column I'll go down to the Curve category and I'm going to hover over these Curve presets until I see one I like.
I like the Cross Process the best, so I click on Cross Process to apply that to a photo here in Lightroom.
So now I'm ready to take this photo over into Photoshop to start my composite
Opening images from Lightroom in Photoshop
and the way to do that is to right click on the photo and choose Edit in Photoshop.
That will launch Photoshop if it's not already open.
And open the photo of the city into Photoshop with the preset that we added in Lightroom already applied to it.
Now I want to bring the other photo into Photoshop the colored smoke On a Mac you can switch back to Lightroom by coming down to the Dock and clicking Lightroom there.
So here we are in Lightroom again, I'm going to click the Square Photo Grid icon at the bottom left and here in the grid I'll select the colored smoke image.
I’ll right click that image and I’ll choose Edit in Photoshop to take that photo into Photoshop too.
That switches me over to Photoshop
Combining images with layers and blending modes
where I now have two photos open.
I have this photo of the city with the preset that we added in Lightroom and I have this photo of the colored smoke.
And to move that into the photo of the city.
I'm going to get the Move Tool and I'm going to click on the image of the smoke and drag up and hover over the Document tab for the image of the city.
I'm still holding my mouse down, I haven’t let go and with my mouse down I move into the image of the city and then I release my mouse.
Now if you look in the Layers panel, you'll see that we have two layers - the top layer has the colored smoke.
If I make that invisible by clicking the Eye icon, you'll see the bottom layer has the city.
So I'll turn on the top layer again by clicking that space where its Eye icon goes.
Now to combine these images, there are multiple techniques.
I could use a layer mask.
I could use, advanced blending modes, but I'm just going to keep it simple and I'm going to change the layer blending mode of the layer one.
To do that, I'll go to this menu labeled Normal.
This is the Layer Blending Mode menu and I'll hover over various blending modes until I find one that I think looks good.
I like this one, the Screen blending mode.
What it does is basically hide the very darkest pixels in layer one so we can see down through those to the background layer below.
And with the Move Tool I'm just going to move layer one a little bit until I like the look.
Maybe I'll put it about down here.
So now I'm done in Photoshop.
Saving the composite and managing stacks in Lightroom
In order to get this composite that contains both photos back into Lightroom I need to save this, so I'll go to the File menu I'll choose Save.
And then I'm going to close this composite.
I can do that by clicking this X or going to File, Close.
I'll actually close all these files.
And I'm also going to quit Photoshop.
When Photoshop closes, we can see Lightroom behind it and here notice that there is a space in the grid with a photo and it says 2 on it and that means that this is a stack of two images.
I'm going to click the 2 and down at the bottom of the screen you can see the two images in that stack.
So let's take a look at what we have now.
I'll double click the image on the right.
And that opens larger so that you can see this is the photo of the city and it still has the preset applied that we had applied in Lightroom.
And if I wanted to, I could go back in and pick a different preset or add more adjustments or even reset this photo to its original.
This is not our composite, though the composite is this one.
The other photo in this stack.
This photo has the preset that we added in Lightroom and it also has the edits that we made in Photoshop where we combined another image on top of the city, the image of the colored smoke and then we set the colored smoke image to the Screen blending mode so that we have a composite of the two.
And so that's how you use Photoshop with Lightroom to make a composite of multiple images.