Enhanced Security
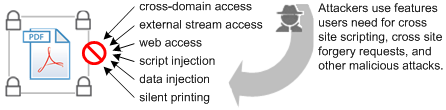
Introduced in version 9.0-8.17 and enabled by default for the 9.3 and 8.2 updates, enhanced security “hardens” your application against risky actions by doing the following for any document not specifically trusted:
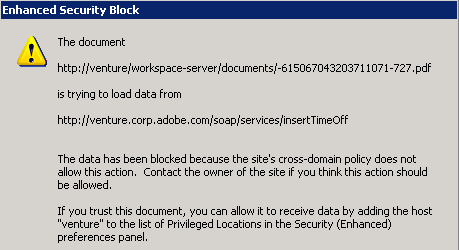
Prevents cross domain access. It forces requests for new content to adhere to a “same-origin” policy and blocks web attacks such as cross site scripting and cross site request forgeries.
Prohibits script and data injection via an FDF, XFDF, and XDP NOT returned as the result of a post from the PDF.
Blocks stream access to XObjects such as external images.
Stops silent printing to a file or hardware printer.
The feature is designed to let you decide what content to trust and help you selectively bypass those restrictions for trusted files, folders, and hosts. These trusted domains–called privileged locations–are exempt from enhanced security rules. There are several other methods for establishing trust, and just as you tune your browser, so should you tune your application so that it operates at a risk level appropriate for your environment.
Enhanced security: effect on workflows
Feature interaction
This feature interacts with other features that also assign trust. When content is trusted as a result of a cross domain policy file, for example, that content is not subject to enhanced security restrictions. It is important to understand the various ways that trust can be assigned prior to configuring applications and setting up workflows. Workflows should be designed for compatibility with enhanced security enabled, so keep in mind that the following features interact with enhanced security:
Internet access permissions: While enhanced security prevents access to different origin locations that try to return data, scripts, or content to the calling PDF, internet access can be set on a per site basis via the Trust Manager. Trust Manager settings may or may not override enhanced security settings depending on your application version and particular workflow.
Import and export of FDF, XFDF (form), and XDP data: Data file behavior is fundamentally altered when this feature is on.
Certified document workflows: Access to a certified document may or may not be allowed depending on whether:
The signing certificate’s fingerprint is in a cross domain policy file, or
The signing certificate is trusted or chains up to a trust anchor that is trusted for privileged networked operations.
Configuration
The following preference rules apply irrespective of the user’s platform:
Windows, Macintosh, and UNIX platforms use similarly named keys.
When configuring paths, use your product (Adobe Acrobat or Acrobat Reader) and version (9.0 or 8.0).
Preferences are usually boolean. True (1) enables the feature. False (0) disables the feature.
Both
cTrustedFoldersandbDisableTrustedFolderscontrol the behavior for folders AND files.Preferences may or may not be visible in the registry by default when the value has been set by the application. It is often the case that the UI must be exercised to actually write the value to the preference file or registry. When configuring preferences, it is usually expedient to toggle all the values and restart the application. Doing so writes the values to the registry and lets you change the preference setting without needing to create the key from scratch.
UI and registry config
To enable enhanced security, do the following:
Choose Edit > Preferences (Windows) or <application name> > Preferences (Macintosh).
Select Security (Enhanced) in the Categories panel.
Check the Enable Enhanced Security checkbox.
Windows only: If your workflows involve cross domain access enabled by accessing a server-based cross domain policy file, check Create log file. This step is typically only need when troubleshooting. Logging is not available on Macintosh.
The UI sets the following
[HKEY_CURRENT_USER\Software\Adobe\<product name>\<version>\TrustManager]
"bEnhancedSecurityStandalone"=dword:00000001
"bEnhancedSecurityInBrowser"=dword:00000001
Note
When viewing a PDF in a browser, users do not have direct access to the application’s Preferences panel. To configure enhanced security while browsing on the fly, right click on the PDF displayed in the browser and choose Page Display Preferences. For versions 9.x and 8.2 and later, enhanced security settings are managed separately for the application running as a standalone application versus in a browser.
Enhanced security panel: Windows

Locking enhanced security
Enhanced security can be locked as enabled or disabled. To do so:
Go to
HKEY_LOCAL_MACHINE\SOFTWARE\Policies\Adobe\<product name>\<version>\FeatureLockDown.Right click and choose New > DWORD Value.
Create
bEnhancedSecurityStandaloneand/orbEnhancedSecurityInBrowser.Right click on the key and choose Modify.
Set the value as follows:
0: Disables enhanced security and locks the feature.
1: Enables enhanced security and locks the feature.
Registry Configuration: Enhanced security locked as enabled
[HKEY_LOCAL_MACHINE\SOFTWARE\Policies\Adobe\<product name>\<version>\FeatureLockDown]
"bEnhancedSecurityStandalone"=dword:00000001
"bEnhancedSecurityInBrowser"=dword:00000001
Macintosh configuration
Enhanced security preferences cannot be locked on Macintosh systems.
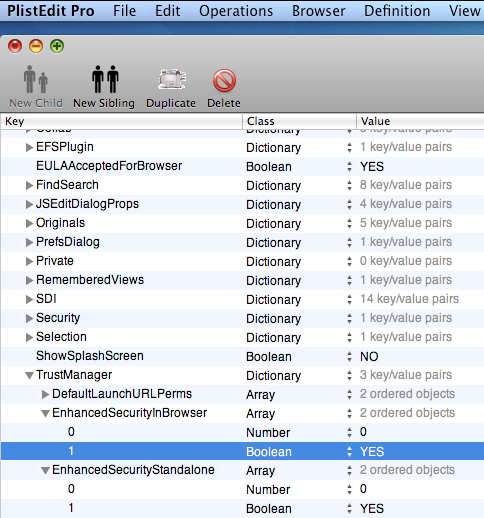
Before continuing, install some plist editor such as PlistEdit Pro. Change the root path to reflect the product (Acrobat or Reader) and version number (9.0 or 8.0) you are using.
To configure the settings:
Navigate to the .plist file:
Mactel: UserLibraryPreferencescom.adobe.Acrobat.Pro_x86_9.0.plist
Mactel: UserLibraryPreferencescom.adobe.Acrobat.Pro_x86_8.0.plist
PowerPC machine: UserLibraryPreferencescom.adobe.Acrobat.Pro_ppc_8.0.plist
PowerPC machine: UserLibraryPreferencescom.adobe.Acrobat.Pro_ppc_9.0.plist
PowerPC machine: UserLibraryPreferencescom.adobe.Reader_ppc_8.0.plist
PowerPC machine: UserLibraryPreferencescom.adobe.Reader_ppc_9.0.plist
Go to TrustManager.
Set
EnhancedSecurityInBrowser(Boolean YES/NO).Set
EnhancedSecurityStandalone(Boolean YES/NO).Exit the editor.
Note
Do not configure Number. For 8.x, only one key (bEnhancedSecurityStandalone) controls behavior for both standalone and browser modes. Do not set EnhancedSecurityInBrowser.
Preferences: Enhanced security settings for UNIX
UNIX configuration
Enhanced security preferences cannot be locked on UNIX systems.
To configure the settings:
Navigate to the .preferences file. For example:
~/.adobe/Acrobat/9.0/Preferences/reader_prefs
~/.adobe/Acrobat/8.0/Preferences/reader_prefs
Navigate to /TrustManager.
Add and set the keys in the file.
Save and exit.
Note
For 8.x, only one key (bEnhancedSecurityStandalone) controls behavior for both standalone and browser modes. Do not set bEnhancedSecurityInBrowser.
Preferences: Enhanced security settings for UNIX
/TrustManager
  [/c <<
    /EnhancedSecurityInBrowser [/b false]
    /EnhancedSecurityStandalone [/b false]
  >>]
Trust overrides
There are several ways to assign trust so that this feature works in a trusted context:
Specifying trusted URLs via Trust Manager
Trusting certificates for privileged network operations
Server side management of cross domain access
Users can trust documents on-the-fly when the PDF opens: When the Yellow Message Bar appears, choose the Options button and then trust the document once or always.
Create a privileged location via the UI for the file, folder, or host.
Create a privileged location via the registry/plist by placing a tID under each cab/dict at:
[HKCU\Software\Adobe\<product name>\<version>\TrustManager\(cTrustedSites or TrustedFolders)\cCrossdomain]
[HKCU\Software\Adobe\<product name>\<version>\TrustManager\(cTrustedSites or TrustedFolders)\cDataInjection]
[HKCU\Software\Adobe\<product name>\<version>\TrustManager\(cTrustedSites or TrustedFolders)\cExternalStream]
[HKCU\Software\Adobe\<product name>\<version>\TrustManager\(cTrustedSites or TrustedFolders)\cScriptInjection]
[HKCU\Software\Adobe\<product name>\<version>\TrustManager\(cTrustedSites or TrustedFolders)\cSilentPrint]
[HKCU\Software\Adobe\<product name>\<version>\TrustManager\(cTrustedSites or TrustedFolders)\cWeblink]
Privileged locations
The most common way to assign trust to files, folders, and hosts is via privileged locations.
Internet Access
There are two ways to control internet access:
The Trust Manager’s Internet Access settings allow you to trust individual web-based files, directories, and specific hosts (wildcards are supported).
Internet access settings in the Trust Manager support both global and granular trust of all or specific URLs.
Certificate trust
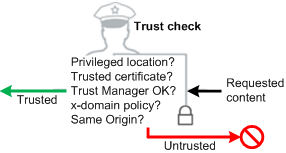
When enhanced security is on, a certified document can bypass its restrictions if the following conditions are true:
The document is certified; that is, the first signature in the document is a certification signature.
The certification signature is valid.
The document recipient has specifically trusted the signer’s certificate for privileged network operations.
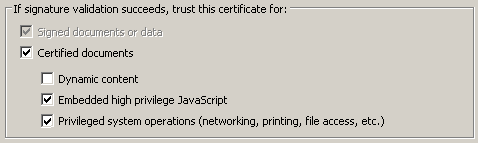
Configure certificate trust as described in Per-certificate trust.
Setting certificate trust
xdomain policy files
Enhanced security’s cross domain restrictions can also be bypassed and managed at the server.
Managing cross domain access at the server
Clients have the capability of automatically detecting and using crossdomain.xml policy files to access content from a different origin. Administrators can configure the policy file as needed so that clients can access trusted content. For more information, see the Cross Domain Policy File Specification.
Enabling cross domain access for specific PDFs
For a PDF that comes from a server, the server has a domain and hence the PDF has a domain; however, a stand-alone PDF residing on a user’s machine has no domain. When such a PDF accesses a server, Acrobat’s default behavior is to consider that communication as cross domain.
To allow a “domain-less,” local PDF to access a server, it must be signed either with a certification signature or a “reader enabled” signature (the hidden signature applied during Reader enablement) and registered in a cross domain policy file. Again, the signature can be one of two types:
A certification signature in a certified document: Best for certified document workflows and when high privileged JavaScript should be permitted.
A Reader enabled signature applied by a LiveCycle ES server: PDFs that are granted additional usage rights are signed by the server. Using this fingerprint allows customers with many Reader extended documents to continue accessing the server after enhanced security is enabled without having to change their forms.
The fingerprint for the certificate that was used for the signing is registered in the cross domain file on the server. In effect, the cross domain file on the server is saying “files signed with this certificate may access this server.” To register the fingerprint, an administrator extracts the SHA-1 hash of the public key from the signing certificate and places it in the cross domain policy file.
User experience
The user experience with enhanced security enabled and there is untrusted content in the workflow is significantly different than when enhanced security is disabled. The feature is specifically designed so that users and admins can preconfigure trust or assign it on the fly so that workflows remain operational even with the extra security and restrictions that enhanced security provides.
FDF, XFDF, and XDP
XFDF, FDF, and XDP files are data files which simplify moving form, certificate, server, and other data from one machine to another. This data transfer usually involves some mechanism such as data injection into a PDF form field, installing files, executing a script, and so on. Because these actions represent a potential security risk, enhanced security restricts this functionality unless the data containing file has been assigned trust in some way. Trust assignment can occur via privileged locations, a trusted certificate, or by cross domain policy files. Rules for opening a PDF via FDF lists the high level rules defining the behavior.
Note
If you distribute forms that request data from a server, the user may find that filled form fields become blank after being asked to trust a document from the Yellow Message Bar. If you find that your workflow is impaired, Adobe recommends that you leave enhanced security enabled and assign trust as needed via one of the available methods prior to sending such a form.
Exceptions
XFDF and XDP files use the same rules as FDF with the following exceptions:
XFDF does not support script injection.
XDP is only affected by these rules if the PDF is externally referenced (not embedded).
Action |
Data file location |
PDF location |
8.x behavior |
9.x behavior |
|---|---|---|---|---|
Opening a target PDF |
local |
local |
PDF opens. No authentication required. |
No change. |
Opening a target PDF |
local |
server |
PDF opens |
Allow via dialog or enable enhanced security and set privileged location. |
Opening a target PDF |
server |
server |
PDF opens. No authentication required. |
No change. |
Opening a target PDF |
https server |
local |
Blocked |
Http hosted FDFs cannot open local files. |
Data injection |
n/a |
n/a |
Allowed |
Allowed if: * Data retuned via a form submit with url#FDF. * FDF has no /F or /UF key. * cross-domain policy permits it. |
Data injection |
server |
browser |
Allowed |
Allowed if: * Link to PDF contains #FDF=url. * FDF has no /F or UF key. * cross domain policy permits it. |
Data injection |
server |
Acrobat/Reader |
Allowed |
Allowed if: * PDF makes EFS POST/GET and FDF sends data in https response to same PDF. * cross domain policy permits it. |
Data injection |
Varied |
Varied |
Allowed |
Allow via dialog or enable enhanced security and set privileged location. |
Script injection |
Any |
Any |
Allowed |
Blocked if enhanced security is on and FDF is not in a privileged location. |
FDF restriction examples
The following are examples of disallowed actions when enhanced security is on:
If the PDF opens in the browser, and the URL to the PDF contains a #FDF=url, then the FDF data specified by that url may be injected into the open PDF if the FDF has no /F key and if the PDF may receive data from the FDF based on the cross domain policy.
If the PDF opens in the Acrobat/Reader standalone application and the FDF data comes back in the https response to a POST/GET initiated by the PDF, then the FDF data may be injected into the open PDF if the PDF specified in the FDF is the PDF that made the POST/GET and if the PDF may receive data from the FDF based on the cross domain policy (i.e.
*in crossdomain.xml).
FDF permissions examples
The following are examples of scenarios where FDF data injection does need a user-authorization dialog when enhanced security is on:
You submit data from a PDF in the browser and the URL has #FDF at the end. The returned FDF has an /F key pointing to a different PDF which needs to get loaded (everything is happening in the browser). The FDF data gets injected into the second PDF.
Same as above, except it all happens in Acrobat rather than in the browser. In this case, the #FDF at the end of the URL is not needed.
The “spontaneous FDF” case: In the browser, an unsolicited FDF arrives (via a link from an HTML page before, and Acrobat is not running yet), and the FDF has an /F key for a PDF that it needs to open and populate.
Opening a link of the form
https://A.com/file.pdf#FDF=https://B.com/getFDF.
Dialogs and warnings
Beginning with the 9.3 and 8.2 updates, a non-intrusive Yellow Message Bar (YMB) that doesn’t block workflows replaces many of the modal dialogs. Depending on how the client is configured, the YMB appears at the top of the document and offers the user to trust the document “once” or “always.”
9.2, 8.1.7, and earlier
Pre 9.3 and 8.2, the application displayed modal dialogs whenever a risky behavior was invoked. The user had to click through the dialog to continue.
Enhanced Security: Data access dialog (pre 9.3 and 8.2)
9.3, 8.2, and later
With 9.3 and 8.2, many warning messages were moved to an unobtrusive Yellow Message Bar at the top of the document. If the administrator has not disabled the feature, users can choose to trust a document once or always for the particular action. A choice of “always” adds the document or host to the privileged locations list. The message and the options button choices varies depending on the type of blocked content.
Note
Workflows where end users or administrators assign trust to files, folders, and hosts avoid the appearance of the YMB and most other modal dialogs.
Yellow Message Bar: Cross domain access

Yellow Message Bar: JavaScript injection

Examples
Most restrictive settings (unlocked)
Users can change these settings from the GUI.
[HKEY_CURRENT_USER\Software\Adobe\<product name>\<version>\TrustManager]
"bTrustOSTrustedSites"=dword:00000001
"bEnhancedSecurityStandalone"=dword:00000001
"bEnhancedSecurityInBrowser"=dword:00000001
Most restrictive settings (locked)
The following examples show the most restrictive settings with the features locked. This results in the following:
All enhanced security protections will be in place.
Only administrators can configure privileged locations.
End users cannot change any of the settings.
Documents and workflows that are subject to these protections will need to have trust assigned by some mechanism that the security model recognizes as a trustworthy way to bypass these restrictions. Possibilities include those listed in Bypassing enhanced security restrictions.
[HKEY_LOCAL_MACHINE\SOFTWARE\Policies\Adobe\<Adobe Acrobat OR Acrobat Reader><version>\FeatureLockDown]
"bEnhancedSecurityStandalone"=dword:00000001
"bEnhancedSecurityInBrowser"=dword:00000001
"bDisableTrustedFolders"=dword:00000001
"bDisableTrustedSites"=dword:00000001
"bDisableOSTrustedSites"=dword:00000001
Least restrictive settings
“Secure by default” is Adobe’s recommended best practice. However, you can disable all the features if you are already operating within a secured environment. The following examples show the least restrictive settings with the features not locked.
[HKEY_CURRENT_USER\Software\Adobe\(Adobe Acrobat or Acrobat Reader)\(9.0 or 10.0)\TrustManager]
"bEnhancedSecurityStandalone"=dword:00000000
"bEnhancedSecurityInBrowser"=dword:00000000
"bTrustOSTrustedSites"=dword:00000001