Cross Domain Configuration
you can configure Acrobat products to allow cross domain access for PDFs in one domain that attempt to access data from another domain. By default, when requested content is not from the same origin as the requesting document, Acrobat and Adobe Reader automatically attempt to load a server-based policy file from that domain to get permission for such access. Default behavior is subject to customization by administrators, IT, workflow stakeholders, and others who need to enable or disable cross domain access.
Cross domain basics
Same-origin policies
As the Acrobat family of products became more powerful over the years (i.e. support for JavaScript and web service interaction), the line between document and application gradually blurred. With the addition of interactive form features, multimedia, and scripting, PDFs became more capable with each release. On the one hand, support for JavaScript and dynamic content within a Web page allows developers to add rich interactivity and behaviors to their content. Yet these features can be abused by attackers, and default configurations for clients that support them make such attacks even more dangerous.
One of the earliest attempts to combat such attacks was Netscape’s same-origin policy introduced with Netscape Navigator 2.0. The policy prevented a document or script loaded from one origin from accessing resources loaded from another origin. To counter the same-origin policy, a wide variety of attack patterns evolved, including cross-site scripting (XSS) and cross-site request forgery (XSRF). These attack patterns have one thing in common: they exploit the trust shared between a user and a website by circumventing its primary protection mechanism (the same-origin policy).
Adobe began addressing this problem several releases ago by implementing a standardized cross-domain security model that has evolved over the years into a robust, secure solution. By providing controls for who may receive data from whom, Adobe clients such as Flash and rich PDF documents are safe and extremely flexible.
Cross domain workflow
A cross-domain policy file is an XML document that grants a web client, such as Adobe Flash Player or Adobe Acrobat permission to handle data across domains. When a client hosts content from a particular source domain and that content makes requests directed towards a domain other than its own, the remote domain needs to host a cross-domain policy file that grants access to the source domain, allowing the client to continue the transaction.
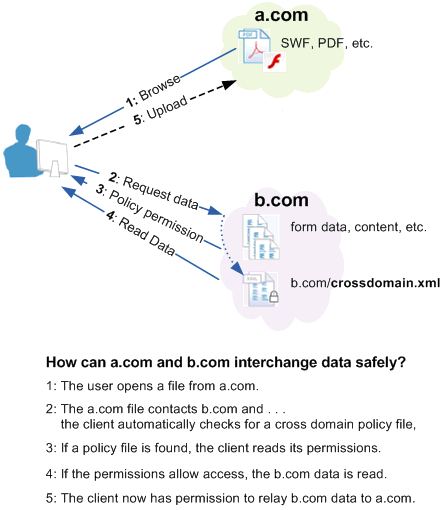
As shown below, b.com hosts a policy file that grants permission for a file on a.com to load data from some or all of the b.com site. The b.com administrator should exercise care because policy files give permission for files from other domains to operate with users’ credentials when accessing b.com.
The user browses to a file on a.com (1). The file from a.com obtains permission from b.com’s policy file (2) to load data from b.com (3). If b.com hosts a policy and requires credentials for access then any documents served from the domains listed in b.com’s policy file gain the right to use those credentials on the user’s behalf. Now that the a.com file has access to data from b.com, the document can upload the b.com data back to its own server at a.com (4)
It is important here to compare a user’s and a.com’s server’s access to b.com. If the user is able to access b.com because both are inside a network firewall or because a required login returned an HTTP cookie, then the user has greater privileges than the a.com server. In this situation, it may be risky to create a policy file on b.com because files from a.com must then be trusted not to disclose data that is private to b.com, the user, or both. Therefore, an administrator should limit the number and location of policy files. It should always be possible to easily audit the current set of permissions and control who can add and modify policy files.
Cross domain workflow
When you need cross domain access
Cross domain access is permitted for Acrobat and Adobe Reader default installations in versions 9.2/8.17 and earlier. You can prevent such access by turning on the enhanced security feature.
Cross domain support is specifically intended for organizations that want the heightened level of security assurance that the enhanced security feature provides but still need to maintain access to data that would otherwise be restricted. While data access permissions may be defined within the client using the “privileged locations” panel provided by the enhanced security preference, Acrobat’s cross domain support becomes important when:
Enhanced security is enabled because uncontrolled cross domain access should not be permitted.
You require selective cross domain access and need to leverage other features such as document fingerprint recognition based on a certificate.
You want to centrally manage cross domain access permissions from a single, server based location.
Workflows include data requests from multiple and even many domains (see above) for returning form data, SOAP requests, references to streaming media such as audio and video, Net.HTTP.request, and so on.
When you don’t need cross domain support
The following cases do not require leveraging Adobe’s cross domain feature:
Enhanced security is turned off.
Enhanced security is turned on, but the document and/or data is in a privileged location.
Data upload; for example, when a form sends data to a server, but no data is sent back into the form.
A form sends and receives data to a server on the same host as the one on which the form is hosted.
A user clicks on a hyperlink: such data requests offer protection via warning dialogs or the Yellow Message Bar.
A user participates in a shared workflow such as a document review using a collaboration server. The dialog presented to the user is considered adequate warning that downloading may occur.
Cross domain access is permitted for users who have already trusted the certificate in a certified document’s certification signature. The signature must be valid and the certificate must be trusted for Privileged network operations.
Web service proxy alternative: When forms are opened in the browser, a web service calls back to the origin serving the document is allowed by default in the cross-domain security policy and therefore does not require configuration of a crossdomain.xml at the site of the Web service. This typical LiveCycle deployment pattern allows developers to employ the Web Service Proxy pattern. In this design pattern, new Web services are authored using LiveCycle at the same origin as the hosted document which then acts as a proxy to call the third-party Web service (similar to Web mash-ups).
Note
Cross-domain restrictions do not apply to data requested by Reader for non-document request operations. For example, if Adobe Reader requests a timestamp from a remote server to validate a digital signature, it is not restricted because the data was not requested by the document.
PDF Location: |
Received data location: |
x-domain required? |
allow-access-from domain examples |
|---|---|---|---|
c:test.pdf |
c:xyz.data |
No |
N/A |
c:test.pdf |
No |
N/A |
|
\smb_servertest.pdf |
No |
N/A |
|
\smb_servertest.pdf |
c:xyz.data |
No |
N/A |
c:test.pdf |
Yes |
Use certificate fingerprint |
|
\smb_servertest.pdf |
Yes |
Use certificate fingerprint |
|
No |
N/A |
||
Yes |
|
||
Yes |
|
||
Yes |
secure=”false” should follow each entry:
* |
||
No |
N/A |
||
No |
N/A |
||
Yes |
|
||
Yes |
|
PDFs in a standalone application vs. the browser
Acrobat and Adobe Reader behave similarly with respect to data access, and their behavior is consistent whether running in the browser or as a standalone application. However, behavior inside and outside of a browser varies because of differences in http(s) request handling:
PDF viewed in a browser: When the application is run from inside the browser, the application behaves similarly to Flash running in the browser: Same domain requests do not require a check, and cross domain checks do.
PDF viewed in a standalone application: When the application runs outside of a browser, such as viewing a document on a local file system or opened as an attachment in e-mail, data requests from an http[s] server are blocked. A check is always required (the server must have a cross-domain policy file containing a wild card, or the local file must be in a privileged location).
Local files: A PDF can be opened directly from a local disk or referenced by a file:URL. Files have no domain when the URL does not begin with http or https and is referenced as follows:
\serverfolderfile.pdf
C:folderfile.pdf.
Note
Access to these files via a cross domain file should be provided by a certificate fingerprint.
User experience
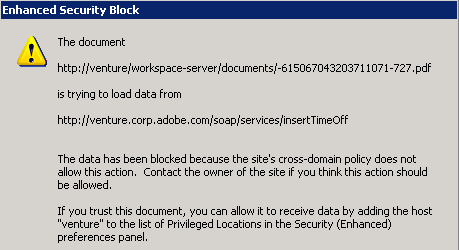
For trusted documents, cross domain access should be secure and transparent. When trust is not assigned, an attempt at cross domain access results in a Yellow Message Bar (YMB) warning the user of such an attempt. The YMB’s appearance varies based on the following:
Enhanced security is enabled and an administrator has disabled the privileged locations feature. In this case, the user sees a warning but is not given any option to trust the action. It is also likely the administrator has enabled and locked enhanced security. Remedies include:
Having the administrator assign trust via a privileged location or cross-domain policy file.
Having the document owner/author sign the document with a certificate you trust for privileged network operations.
Enhanced security is enabled and privileged locations are not locked. Here the warning button appears with an options button. The user is provided with the option to trust the document once or always. Trusting the document “always” results in adding the document as a privileged location.
Yellow message bar: Cross domain access not locked

Yellow message bar: Cross domain access locked

Policy file configuration
A cross-domain policy is simply a user-defined set of permitted data access rules encapsulated in a crossdomain.xml file. It is only viable on servers that communicate via HTTP, HTTPS, or FTP. A cross-domain policy file is an XML document that grants a web client permission to handle data across one or more domains. When a client hosts content from a particular source domain and that content makes requests directed towards a domain other than its own, the remote domain would need to host a cross-domain policy file that grants access to the source domain, allowing the client to continue with the transaction. Policy files grant read access to data as well as permit a client to include custom headers in cross-domain requests.
The cross domain feature introduced with 9.0 allows administrators to:
Create a cross-domain policy based on a specification.
Configure access to a broad range of locations relative to the requestor.
Locate the policy according to a flexible set of rules.
Policy file syntax
An XML policy file contains a single <cross-domain-policy> tag, which contains zero or more <allow-access-from> tags. Each <allow-access-from> tag contains a domain attribute specifying either an exact IP address, an exact domain, or a wildcard domain (an asterisk followed by a suffix which matches only domains that end with the specified suffix).
The full syntax of crossdomain.xml files is beyond the scope of this document, as those details are available in the Cross Domain Policy File Specification DTD and XSDs are available to define the generic policy file schema as well as each different type of policy file (either HTTP, HTTPS, FTP) since policy files hosted in each of those contexts are slightly different.
Note
Because Acrobat and Flash share the same cross domain model, the specification as well as much of the Flash documentation may prove useful.
Policy file best practices
Workflow developers should have a thorough understanding of what is and isn’t allowed when enhanced security is enabled. For example, a cross-domain policy file may be needed if privileged locations are not set. same-origin and cross-domain examples shows examples of combinations of PDF and server locations for both same-origin and cross-domain data requests.
Use same-origin communications exclusively if you can.
Never use a standalone * wildcard to provide unlimited cross domain access. Keep your permissions as granular as possible.
Don’t hard code the hostname of same-origin communications.
Choose one full qualified domain name. Use a redirect for alternate variations.
Use a “www” domain name when you staging and production servers and want cross domain access to work consistently without modification during the development-deployment life cycle.
Use SSL consistently (don’t use cross domain files to help https://example.com and https://example.com communicate with each other. Use secure=”false” if you have to mix and match http and https.
For local files and files referenced by a file URL, provide access via a certificate fingerprint.
Typical policy
Policy files grant read access to data, permit a client to include custom headers in cross-domain requests, and grant permissions for socket-based connections. The most common location for a policy file on a server is in the root directory of a target domain with the filename crossdomain.xml (e.g. https://example.com/crossdomain.xml)—the default location that clients check when a policy file is required. Policy files hosted this way are known as master policy files. allow-access-from: Allowing access to root domains shows a typical URL (i.e. non-socket) master policy file which allows access to the example.com root domain with and without the www subdomain as well as any subdomains.
allow-access-from: Allowing access to root domains
<?xml version="1.0"?>
<!DOCTYPE cross-domain-policy SYSTEM
"https://www.adobe.com/xml/dtds/cross-domain-policy.dtd">
<cross-domain-policy>
   <site-control permitted-cross-domain-policies="master-only"/>
   <allow-access-from domain="*.example.com"/>
   <allow-access-from domain="www.example.com"/>
   <allow-http-request-headers-from domain="*.adobe.com" headers="SOAPAction"/>
</cross-domain-policy>
The site-control element here specifies that only this master policy file should be considered valid on this domain. Below that, the allow-access-from element specifies that content from the example.com requesting domain can access any data within the target domain (the domain in which this policy file has been saved). Finally, the allow-http-request-headers-from element indicates that a SOAPAction header is also allowed to be sent with requests made to the target domain from adobe.com.
Permissive vs. restrictive policies
The following is the least permissive master policy file definition. It enforces a meta-policy that restricts any policy file, including this one, from granting permissions of any type to any requesting domain:
cross-domain-policy: Least permissive policy
<?xml version="1.0"?>
<!DOCTYPE cross-domain-policy SYSTEM
"https://www.adobe.com/xml/dtds/cross-domain-policy.dtd">
<cross-domain-policy>
   <site-control permitted-cross-domain-policies="none"/>
</cross-domain-policy>
The following is the most permissive master policy file definition (strongly not recommended ). It allows any policy file on the target domain to grant permissions, allows access to any of its file, and permits any header to be sent to the server. All of this possible even through HTTPS despite the source being HTTP:
cross-domain-policy: Least restrictive policy
<?xml version="1.0"?>
<!DOCTYPE cross-domain-policy SYSTEM
"https://www.adobe.com/xml/dtds/cross-domain-policy.dtd">
<cross-domain-policy>
   <site-control permitted-cross-domain-policies="all"/>
   <allow-access-from domain="*" secure="false"/>
   <allow-http-request-headers-from domain="*" headers="*" secure="false"/>
</cross-domain-policy>
Meta vs. master policies
While Meta policy: Allowing non-master policy files does not allow data access to this target domain, it does define a meta-policy that allows other policy files within this domain to determine how access is handled. In this case, the client is instructed to look for a policy file other than the master for permissions related to this domain.
Meta policy: Allowing non-master policy files
<?xml version="1.0"?>
<!DOCTYPE cross-domain-policy SYSTEM
"https://www.adobe.com/xml/dtds/cross-domain-policy.dtd">
<cross-domain-policy>
   <site-control permitted-cross-domain-policies="by-content-type"/>
</cross-domain-policy>
Meta policy: allowing only a master policy defines a meta-policy that allows only this master policy file to function for this target domain. It allows access to data on example.com and all of its subdomains:
Meta policy: allowing only a master policy
<?xml version="1.0"?>
<!DOCTYPE cross-domain-policy SYSTEM
"https://www.adobe.com/xml/dtds/cross-domain-policy.dtd">
<cross-domain-policy>
   <site-control permitted-cross-domain-policies="master-only"/>
   <allow-access-from domain="*.example.com"/>
</cross-domain-policy>
HTTP-HTTPS communications
allow-access-from: Most permissive access demonstrates the most permissive use of allow-access-from granting any other domain access to the files on this target domain, even if an HTTP source is accessing data on this domain through HTTPS. It should be obvious that this practice is not recommended.
allow-access-from: Most permissive access
<?xml version="1.0"?>
<!DOCTYPE cross-domain-policy SYSTEM
"https://www.adobe.com/xml/dtds/cross-domain-policy.dtd">
<cross-domain-policy>
   <allow-access-from domain="www.example.com" secure="false"/>
</cross-domain-policy>
Socket permissions
allow-access-from: Socket policy should be served to a client through a socket connection when requested with policy-file-request. It permits access to content from example.com or any of its subdomains through ports 507 and any port between 516 and 523 (including 516 and 523).
allow-access-from: Socket policy
<?xml version="1.0"?>
<!DOCTYPE cross-domain-policy SYSTEM
"https://www.adobe.com/xml/dtds/cross-domain-policy.dtd">
<cross-domain-policy>
   <allow-access-from domain="*.example.com" to-ports="507,516-523"/>
</cross-domain-policy>
Credential-based permissions
allow-access-from-identity: Required configuration
<allow-access-from-identity>
  <signatory>
    <certificate
      fingerprint="01:23:45:67:89:ab:cd:ef:01:23:45:67:89:ab:cd:ef:01:23:45:67"
      fingerprint-algorithm="sha-1"/>
  </signatory>
</allow-access-from-identity>
Friendly names and alias use
Any alias or friendly name can be used as long as your DNS server can resolve these names:
<allow-access-from domain="myalias.com" />
<allow-access-from domain="myfriendlyname" />
IP address
If you specify an IP address, access is granted only to files loaded from that IP address using IP syntax (for example, https://65.57.83.12/document.pdf), not those loaded using domain-name syntax. Acrobat does not perform reverse DNS lookup. The following lines enable access only to 105.216.0.40.
<allow-access-from domain="105.216.0.40" />
Header-based permissions
The following shows how to allow any requesting domain to send the SOAPAction header to this target domain.
allow-http-request-headers-from: Header usage with SOAPAction
<?xml version="1.0"?>
<!DOCTYPE cross-domain-policy SYSTEM
"https://www.adobe.com/xml/dtds/cross-domain-policy.dtd">
<cross-domain-policy>
   <allow-http-request-headers-from domain="*" headers="SOAPAction"/>
</cross-domain-policy>
The following allows the Authorization header and any header beginning with the characters X-Foo from www.example.com to be sent to this target domain. If a request is coming from foo.example.com, only headers beginning with the characters X-Foo are allowed, not Authorization:
allow-http-request-headers-from: Header usage with wildcard
<?xml version="1.0"?>
<!DOCTYPE cross-domain-policy SYSTEM
"https://www.adobe.com/xml/dtds/cross-domain-policy.dtd">
<cross-domain-policy>
   <allow-http-request-headers-from domain="www.example.com" headers="Authorization,X-Foo*"/>
   <allow-http-request-headers-from domain="foo.example.com" headers="X-Foo*"/>
</cross-domain-policy>
Certificate-based permissions
Acrobat and Adobe Reader 9.1 introduces an extension to cross-domain policies that enables cross domain access on a per document basis. You do so by identifying a certified document signed with a specific certificate that should be able to access web servers in another domain. Since these documents contain an embedded and unique public key certificate, a SHA-1 hash of the certificate can be used as an identifier, much like a fingerprint. The fingerprint is extracted from the document and placed in the crossdomain.xml file, thereby providing access.
Two types of certificate fingerprints are supported:
Certificates extracted from a certified document. The signature must be valid. Documents signed with approval (sometimes called “ordinary”) signatures are not supported.
The certificate associated with the digital ID provided to the LiveCycle ES administrator so that the server can Reader enable documents and provide it with additional usage rights.
Note
The signature must be valid and the certificate must be trusted.
Certified documents
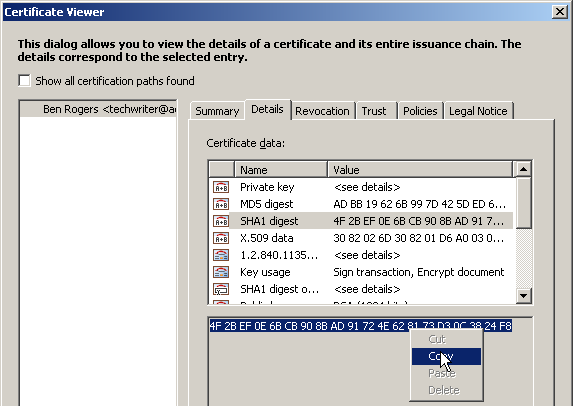
There are several methods for finding the certificate hash. At a high level, the steps involve opening the certificate in the Certificate Viewer and copying the Value data for the SHA1 digest field.
Note
If you are using a certificate hash for documents that are Reader enabled by a LiveCycle ES server, you should use the certificate issued in conjunction with the server. This certificate will be unique to your organization.
To extract a certificate hash from a certified document:
Open the certified document.
View the signature properties by doing one of the following:
Open the signature panel, right click on the signature and choose Show Signature Properties.
If the signature is visible, right click on the signature and choose Show Signature Properties.
Choose the Details tab in the Certificate Viewer to see the list of all data for the selected certificate.
In the Certificate Data pane, select the SHA1 digest field.
In the bottom pane, highlight and copy the hex data fingerprint.
Extracting the SHA1 hash from the certificate
Reader enabled documents
The digital ID delivered with LiveCycle ES so that it can Reader enable documents is a valuable commodity and should be protected. This task should only be undertaken by the LiveCycle ES administrator or someone identified as the certificate owner. It should not be handed off to others for any reason.
Note
Other methods of extracting the certificate hash include using openSSL or importing the ID into the Windows store. Only one method is described here.
To extract a certificate hash:
Open Acrobat.
Do one of the following to open the Digital ID list:
9.x: Choose Advanced > Security Settings.
10.x: Choose Tools > Sign and Certify > More Sign and Certify > Security Settings.
11.x: Choose Edit > Preferences > Signatures > Identities and Trusted Certificates > More.
Highlight Digital IDs in the left-hand tree.
Choose Add ID.
Navigate through the import dialogs.
Select (highlight) a digital ID in the right hand panel.
Choose Certificate Details icon at the top menu bar.
Choose the Details tab in the Certificate Viewer to see the list of all data for the selected certificate.
In the Certificate Data pane, select the SHA1 digest field.
In the bottom pane, highlight and copy the hex data fingerprint.
Note
You should now remove the ID from the machine so that it doesn’t exist outside it’s designated protected location.
Adding a certificate hash to a policy file
Full details appear in the Cross Domain Policy File Specification. At a high level, adding the certificate hash to the cross-domain policy file involves the following steps:
Navigate to the cross-domain policy file on the server.
Open the file and add an <allow-access-from-identity> block.
Add a
<signatory>and<certificate>block as shown inTypical allow-access-from-identity block.The
certificateelement should have the following attributes:fingerprint: A 40 character string (colons and spaces are ignored).
fingerprint-algorithm: sha-1 is the only permitted value.
Save and close the policy file.
Typical allow-access-from-identity block
<allow-access-from-identity>
  <signatory>
    <certificate
      fingerprint="01:23:45:67:89:ab:cd:ef:01:23:45:67:89:ab:cd:ef:01:23:45:67"
      fingerprint-algorithm="sha-1"/>
  </signatory>
</allow-access-from-identity>
Fingerprint usage rules
Multiple signatories require multiple
<allow-access-from-identity>blocks.There must be one and only one
<signatory>block inside an<allow-access-from-identity>.Only
<certificate>is allowed inside a<signatory>. Since<public-key>is not supported for 9.1, <public-key> blocks encountered are skipped.The
fingerprintattribute is required. If it is missing or malformed, the certificate block is skipped. The string must be 40 characters long not counting spaces or colons.The
fingerprint-algorithmattribute is required. If it is missing or malformed, the certificate block is skipped. The string is case insensitive.
Server configuration
Policy files function only on servers that communicate over HTTP, HTTPS, or FTP.
Policy file host basics
When creating and using a policy file, the following rules apply:
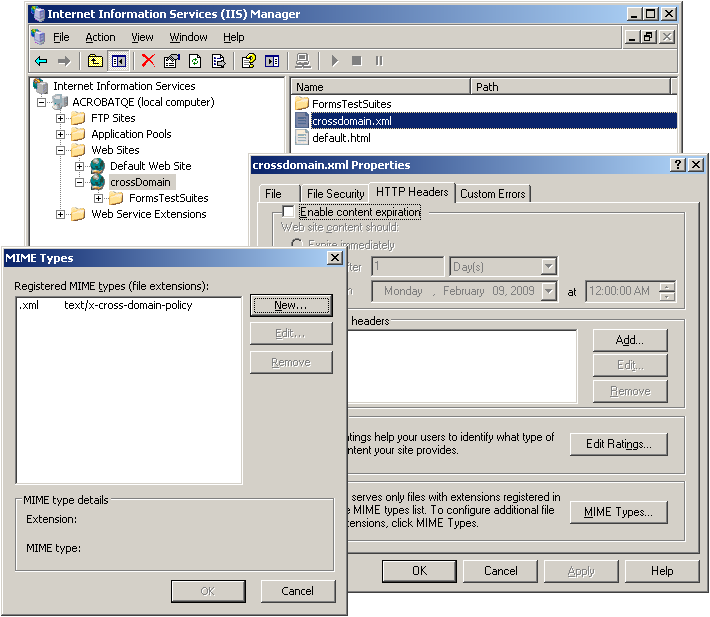
It’s name must be crossdomain.xml.
The file MIME type should be set to
9.2/8.17: text/x-cross-domain-policy
9.3/8.2: Any type supported by the specification.
The file usually resides at the server’s root. However, a master policy file can point to policies in other locations. While a “root” is defined differently by each server, it is always true that you should be able to enter the following in a browser to see the file:
http(s)://myserverroot.com/crossdomain.xml
Non-master policies permit access only to files at or beneath their level in the directory tree. You can avoid the master policy requirement by calling the policy via JavaScript. See
Calling policies via JavaScript.
Differences between Acrobat and Flash
The Acrobat family of products leverages the Flash model. However, there are differences.
For 9.2, Acrobat requires that cross-domain policy files return from the server with the content-type text/cross-domain-policy.
For 9.3, both clients support all of the mime types listed in the specification:
Any content type that starts with “text/”
application/xml
application/xhtml+xml
Note
Acrobat allows these content types with version 9.3
The use of non-master policy files require a site to have a meta-policy of “by-content-type” or “all”. If using “by-content-type”, policy files need to be returned with a Content-Type of text/x-cross-domain-policy. While it’s possible to use the meta-policy “all”, this is risky if your site serves user-generated content. Normally a meta-policy is declared in the master policy file, but for those who can’t write to the root directory, they can also declare a meta-policy using the X-Permitted-Cross-Domain-Policies HTTP response header.
Acrobat does NOT support the Socket usage. However, Flash does support policy files that grant permissions for socket-based connections. For a socket connection, a policy file can be used for both same domain connections as well as connections made across domains.
Server setup examples
Administrators should be familiar with their systems and refer to the documentation provided for their particular server. Details will vary; however, the two high level rules include:
Placing the policy file at the server’s root. While a “root” is defined differently by each server, it is always true that you should be able to enter the following in a browser to see the file:
http(s)://myserverroot.com/crossdomain.xml
Setting the policy file’s MIME type.
JBoss
Copy the policy file to:
...\jboss\server\lc_turnkey\deploy\jboss-web.deployer\ROOT.war\crossdomain.xml
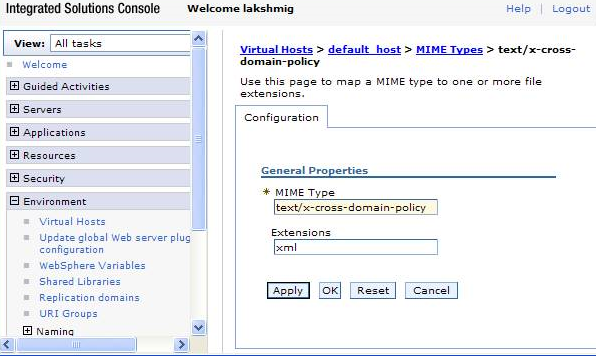
WebSphere
Generate a crossdomain.war application and deploy it to the application server.
Go to the WAS administrator console.
Choose Install New Application.
For the context root enter: /
For Map virtual hosts for Web modules, select your virtual host.
Choose Finish.
Specify the MIME type for the policy file:
In the left hand column, choose Environment > Virtual hosts.
Select the** (host name) > MIME Types**.
- Configure the following:
MIME Type: text/x-cross-domain-policy (or a type supported per the specification).
Extensions: xml
Choose Apply and OK. S
Start the application.
WebSphere: Mime type configuration for policy files
SAP Netweaver 7 and 7.1
Copy the policy file to
C:\usr\sap\<Server ID>\J00(JC00 for Netweaver 7.0)\j2ee\cluster\apps\sap.com\com.sap.eng\crossdomain.xml.Specify the MIME type for the policy file:
For Netweaver 7.0, Netweaver 7.0 EhP1, and Netweaver 2004:
Open the Visual Administrator.
Choose the Properties tab of the HTTP Provider Service running on the server process.
Enter a new MIME type in the list that appears as a value for the MIME property. You must specify the file extension first and then the MIME type, and separate them by a comma. For example:
.xml,text/x-cross-domain-policy.Choose Save Properties.
For Netweaver 7.1 and Netweaver 7.1 EhP1
Open NetWeaver Administrator.
Navigate to Java System Properties: Configuration Management > Infrastructure.
In the Services tab, select HTTP Provider Service. A list of all service properties is displayed on the Extended Details tab page.
Enter a new MIME type in the list that appears as a value for the MIME property. You must specify the file extension first and then the MIME type, and separate them by a comma. For example:
.xml,text/x-cross-domain-policy.Choose Save Changes.
WebLogic
Setting the MIME type and policy file is relatively straightforward.
Navigate to <your WAR file>/web-inf folder.
In the weblogic.xml, set <wls:context-root>/</wls:context-root>.
In the web.xml set the mime-mapping tag:
<mime-mapping>
<extension>xml</extension>
  <mime-type>text/x-cross-domain-policy</mime-type>
</mime-mapping>
Deploy the
earfile as usual.
Calling policies via JavaScript
One exception to the requirement that a master policy file be present is when a document specifies a policy via JavaScript.
When a master file is not used, the following rules are enforced:
Acrobat can load policy files from arbitrary locations via the JavaScript method
app.loadPolicyFile(url); for example:app.loadPolicyFile("https://www.example.com/sub/dir/pf.xml").
Note
There is a single cross domain file cache, so a call such as app.loadPolicyFile(url) will affect other PDFs opened during that client’s session. For details, refer to the JavaScript™ for Acrobat® API Reference .
SWFs can load policies from other locations via the JavaScript method
Security.loadPolicyFile. Refer to the Flex documentation for more information.
Troubleshooting
When cross domain access fails, users will likely see a dialog or the Yellow Message Bar. To troubleshoot the problem, enable logging and try again. The log error messages should indicate what’s wrong.
You can verify the policy file is in the right location by entering the following in a browser to see the file:
http(s)://myserverroot.com/crossdomain.xml
Enhanced Security: Data access dialog (pre 9.3 and 8.2)
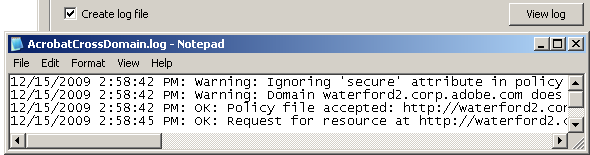
Enabling logging
If you need to debug cross domain access, enable logging.
Note
Logging is not available on Macintosh.
Cross domain logging
Logging: User interface configuration
The 9.3 and 8.2 updates and later allow configuration via the user interface. To do so:
Choose Edit > Preferences (Windows only).
Select Security (Enhanced) in the Categories panel.
Check Create log file.
Enhanced security panel

Logging: Registry configuration
Available for all versions beginning with 9.0.
Open the registry.
Create an AVPrivate key if it does not exist at:
HKDCUSoftwareAdobe<Adobe Acrobat or Acrobat Reader><version>AVPrivate
Right click on AVPrivate and create a new DWORD.
Create a key called bCrossDomainLogging and set its value to 1.
Exit.
Navigate to Acrobat’s user account Application Data. For example:
XP: C:Documents and Settings<user name>Application DataAdobe<application><version>
Windows 7: C:UsersusernameAppDataRoamingAdobeAcrobat9.0
Create an empty file called AcrobatCrossDomain.log.
Note
The log name is identical for Adobe Reader.
General log messages
Request for resource at %s by requestor from %s is permitted due to policy file at %s
A file attempted an operation that requires a policy file permission and the policy was found. The URLs indicate:
The resource requested.
Where the PDF was loaded from.
The policy file granting the permission.
Note
It is possible that multiple policy files would have permitted the operation, but only one of them is mentioned in this type of log message.
Request for resource at %s by requestor from %s is denied due to lack of policy file permissions.
A file has attempted an operation that requires policy file permissions from a policy file, but the file or the required permissions were not found. The URLs in the message indicate:
The resource requested.
Where the PDF was loaded from.
The message may be caused by:
A certificate fingerprint is not used. It must adhere to the rules described in Using certificates for cross domain access.
A web service request was made by allow-http-request-headers-from but did not specify the allowed header type.
No applicable policy file exists to authorize the operation. If you control the server where the resource resides, you may need to add a policy file on that server. Otherwise, you may need to proxy the operation through the file’s own server.
An applicable policy file exists, but the server where both the policy file and the resource are located is unreachable at the moment. Try pinging the server host to see if it appears to be reachable. If the file called allowDomain to load an applicable policy file, this message will generally be preceded by the message “Failed to load policy file from (URL)”.
Note
Flash only: For a socket connection, you should see a message about being unable to reach the server. For any other request, you should see this message.
The policy file does not grant permission for access by the file’s domain. Try adding the domain to an existing policy file, moving the file to a domain authorized by an existing policy file, adding a new policy file, or proxying the request through the SWF file’s own server.
An applicable policy file exists, but it is in a non-default location and can’t be found. Verify the files are correctly pointed to.
A policy file exists but is invalid for some reason. In this case, this message should be preceded by a more specific message that shows the policy file URL and the problem that was found; see messages about failures to load policy files.
OK
No problem exists.
Policy file accepted %s
No problem exists.
Failed to load policy file from %s
There is no policy file or it could not be found. Verify a master policy file resides at the server root and that other files are correctly pointed to.
Warning <some message>
TBD
Error <some message>
TBD
[strict] Ignoring policy file at %s due to missing Content-Type.
The server did not return a content type. Verify it is configured to return text/x-cross-domain-policy.
[strict] Ignoring policy file at %s due to bad Content-Type ‘%s’.”
The server returned a content type not supported by the client. The file MIME type should be set to text/x-cross-domain-policy. Like Flash, Acrobat will soon support these additional content-types:
Any content type that starts with “text/”
application/xml
application/xhtml+xml
HTTP response headers not available on this platform. Strict policy file rules cannot be enforced.
The client made an HTTP request but was not able to see HTTP response headers. As detailed in the section on meta-policies, some of the new, strict policy file rules require that the client be able to access HTTP response headers; for example, so that Content-Type and X-Permitted-Cross-Domain-Policies information from the server is known. Any meta-policy information from servers will be unavailable.
For a list of precise effects and a list of browser configurations where this behavior is expected, see the browser dependency appendix. This warning should not indicate that previously working content will stop working; rather it indicates that the new, stricter rules cannot be enforced, which may result in reduced security for servers and users. The latest versions of most popular browsers enable Flash Player to see HTTP response headers, so upgrading your browser will usually eliminate this message.
The two features that require HTTP response header access are as follows:
Content-Type whitelist: When the client has access to HTTP response headers, it rejects HTTP policy files that have non-textual Content-Type values, as well as those that have no Content-Type at all. With no access, it accepts HTTP policy files regardless of their Content-Type.
HTTP meta-policies: When Flash Player has access to HTTP response headers, it honors the HTTP meta-policies declared in master HTTP policy files and X-Permitted-Cross-Domain-Policies response headers. With no access, all HTTP servers are assumed to have a meta-policy of all.
Browser |
No headers provided |
Headers provided |
|---|---|---|
Internet Explorer (Windows) |
N/A |
5.5 and later |
Moselle Firefox |
2.0.0.3 and earlier |
2.0.0.4 and later |
Safari (Macintosh) |
2.x and earlier |
3.x and later |
[strict] Policy file requested from %s redirected to %s; will use final URL in determining scope.
An HTTP policy file request was redirected to a different location in the same domain.
If you see this warning, check the log to see if requests that depend on this policy file are in fact still succeeding. If they are not, you may need to add a non-redirected policy file at the originally requested URL. You can also put a non-redirected policy file at a different URL, which may require using JavaScript to use the new policy file URL. In any case, you should consider avoiding redirecting policy file requests, since they tend to make policy file debugging more difficult.
Ignoring policy file requested from %s because a cross-domain redirect to %s occurred.
An illegal attempt to retrieve a policy file from the first URL was redirected to a second URL in a different domain. This policy file has been ignored and will not authorize any operations.
Ignoring policy file at %s due to X-Permitted-Cross-Domain-Policies none-this-response
The server returned the HTTP response header X-Permitted-Cross-Domain-Policies: none-this-response thereby indicating that this HTTP response is not permitted to be used as a policy file.
This is usually used to prevent server scripts from generating policy files. This policy file has been ignored and will not authorize any operations. You may need to change your server configuration to avoid generating a none-this-response header.
Meta policy messages
Unrecognized meta-policy in HTTP header from %s %s
An invalid meta-policy was specified in an X-Permitted-Cross-Domain-Policies HTTP header. It has been ignored.
HTTP header from %s specifies meta-policy ‘by-ftp-filename’, which is only applicable to FTP, not HTTP.
A by-ftp-filename meta-policy was found in an X-Permitted-Cross-Domain-Policies HTTP response header, but it is only valid for FTP servers.
The X-Permitted-Cross-Domain-Policies header has been ignored, but any policy file at this URL has not necessarily been ignored (there should be a further error message if it is).
Conflicting meta-policy in HTTP header from %s %s
Multiple conflicting meta-policies were found in one or more X-Permitted-Cross-Domain-Policies HTTP header.
The entire meta-policy string is shown, as received from the server. If multiple X-Permitted-Cross-Domain-Policies headers were provided, they have been coalesced into a single header with semicolon-separated values as is normal for HTTP headers. The client applied the most restrictive meta-policy that was found in this string. It is generally not legal to provide multiple meta-policies in HTTP response headers; the only exception is none-this-response, which may be combined with any other meta-policy, but only affects the individual HTTP response where it is found.
Meta-policy %s in HTTP header from %s conflicts with previously established meta-policy %s
Meta-policies are incorrectly configured. It is likely that a less restrictive meta-policy was found in the HTTP header before a more restrictive policy. The less restrictive meta-policy may have been in effect for some time until the conflict was found later.
Ignoring <site-control> tag in policy file from %s. This tag is only allowed in master policy files.
A meta policy was specified in a non master policy file. The site-control tag is only legal in master policy files (/crossdomain.xml on an HTTP/HTTPS/FTP server, or a socket policy file from port 843).
The meta policy has been ignored, but the policy file has not necessarily been ignored (there should be a further error message if it is).
Ignoring <site-control> tag in policy file from %s. The ‘by-content-type’ meta-policy is only applicable to HTTP sites.
A by-content-type meta policy was incorrectly specified in the policy for an FTP server since it is only valid for HTTP and HTTPS servers.
The meta policy has been ignored, but the policy file has not necessarily been ignored (there should be a further error message if it is).
Ignoring <site-control> tag in policy file from %s. The ‘by-ftp-filename’ meta-policy is only applicable to download sites.
A by-ftp-filename meta policy was incorrectly specified in the policy for an HTTP(S) server.
The X-Permitted-Cross-Domain-Policies header has been ignored, but the policy file has not necessarily been ignored (there should be a further error message if it is).
Ignoring <site-control> tag in policy file from %s. The ‘none-this-response’ meta-policy is only allowed in the X-Permitted-Cross-Domain-Policies HTTP response header.
A none-this-response meta-policy was incorrectly specified. It is only valid in the X-Permitted-Cross-Domain-Policies HTTP response header and is intended as a mechanism by which HTTP servers can prevent server scripts from generating policy files.
The meta-policy has been ignored, but the policy file itself has not necessarily been ignored (there should be a further error message if it is).
Unrecognized meta-policy in policy file from %s %s
An invalid meta-policy was specified in the master policy file.
The meta-policy has been ignored, but the policy file itself has not necessarily been ignored (there should be a further error message if it is).
Meta-policy %s in policy file from %s conflicts with previously established meta-policy %s
Meta-policies are incorrectly configured. It is likely that a less restrictive meta-policy was found in the policy file before a more restrictive policy. The less restrictive meta-policy may have been in effect for some time until the conflict was found later.
Domain %s does not specify a meta-policy. All policy files from this domain will be ignored.
This common message appears when the client obtains a policy file from an HTTP, HTTPS, or FTP server that has not specified a meta-policy.
Domain %s does not specify a meta-policy. Applying default meta-policy ‘all’. This configuration is deprecated.
This common message appears when the client obtains a policy file from an HTTP, HTTPS, or FTP server that has not specified a meta-policy.
Domain %s does not explicitly specify a meta-policy, but Content-Type of policy file %s is ‘text/x-cross-domain-policy’. Applying meta-policy ‘by-content-type’.
The client looked for a meta policy in the HTTP headers and in the master policy file, but did not find it. A policy file was returned with a Content-Type of text/x-cross-domain-policy, which indicates that the administrator deliberately made changes to support meta-policies.
Since the official Content-Type for HTTP policy files is in use, the client assumes a meta-policy of by-content-type for this domain. It is recommended that, for clarity, this server should explicitly declare a meta-policy, rather than relying on this implicit mechanism. This can be done using a <site-control> tag in the master policy file, or using the HTTP response header X-Permitted-Cross-Domain-Policies.
Ignoring policy file at %s due to meta-policy ‘%s’.
A meta-policy found in a site-control in the master policy file or in an X-Permitted-Cross-Domain-Policies HTTP header expressly forbids this file from being valid as a policy file, so this policy file will not authorize any operations.
If you intended for this policy file to be valid, change its Content-Type or its FTP filename or change the meta-policy.
Policy file at %s invalidates its own <allow-access-from> directives by declaring the meta-policy ‘none’.
The policy file specifies a meta-policy of none as well as allow-access-from. Remove allow-access-from.
The declared meta-policy none means that no policy files are permitted on this server and that the master policy file is permitted to exist only to declare the meta-policy and cannot contain allow-access-from.
Policy file parsing/syntax errors
[strict] Ignoring policy file with incorrect syntax %s
The policy file syntax is incorrect. Refer to the Cross Domain Policy File Specification.
Ignoring invalid <allow-access-from> tag for domain ‘%s’ in policy file at %s
The string identifying the domain was not recognized as valid. This particular <allow-access-from> directive will be ignored, although other directives in the same policy file may be valid and accepted.
Ignoring illegal port number specification ‘%s’ in policy file at %s
The to-ports attribute in allow-access-from was not recognized as a valid port range.
Port ranges may include the wildcard *, individual port numbers, port ranges separated by dashes, or comma-separated lists of individual numbers and/or ranges. The allow-access-from is ignored, although other directives in the same policy file may be valid and accepted.
Ignoring ‘secure’ attribute in policy file from %s. The ‘secure’ attribute is only permitted in HTTPS and socket policy files.
A found a policy file contained one or more <allow-access-from> directives that specified the attribute secure=”true|false”, but this is neither an HTTPS policy file nor a socket policy file. Remove the secure attribute from this policy file.
The secure attribute has been ignored, but the <allow-access-from> directive is not necessarily being ignored (there will be a further error message if it is). The secure attribute is only legal in HTTPS policy files and socket policy files. This rule has been enforced since policy files were first introduced. This is because the policy file itself is not being transmitted over a tamper-resistant protocol, so a man-in-the-middle attacker could replace a secure=”true” declaration with secure=”false”, which would then allow a non-HTTPS SWF file to retrieve data from this domain, contrary to the policy expressed in this policy file.
Flash only messages
Theoretically, Acrobat clients should not receive these messages. However, since Acrobat leverages the Flash model, these are provided for informational purposes.
Root-level SWF loaded %s
Only pertinent to Flash.
Found secure=’true’ in policy file from %s, but host %s does not appear to refer to the local machine. This may be insecure.
Only pertinent to Flash and socket policy files.
Request for resource at %s by requestor from %s has failed because the server cannot be reached.
Only pertinent to Flash.
Ignoring socket policy file at %s because it is too large. Socket policy files may not exceed 20 kilobytes.
Only pertinent to Flash and socket policy files.
Policy file from %s will permit SWF from %s to connect to a socket on host %s. This configuration is deprecated.
Only pertinent to Flash and socket policy files.
SWF from %s may not connect to a socket in its own domain without a policy file.
Only pertinent to Flash and socket policy files.
Policy file from %s does not permit SWF from %s to connect to a socket on host %s, due to meta-policy ‘%s’.
Only pertinent to Flash and socket policy files.
SWF from %s will be permitted to connect to a socket in its own domain without a policy file. This configuration is deprecated.
Only pertinent to Flash and socket policy files.
[strict] Requesting socket policy file from %s due to socket connection request from SWF at %s.
Only pertinent to Flash and socket policy files.
Timeout on %s (at 3 seconds) while waiting for socket policy file.
Only pertinent to Flash and socket policy files.
[strict] Local socket connection forbidden to host %s without a socket policy file.
Only pertinent to Flash and socket policy files.