Introduction
Welcome to the Russell Brown show and this special tutorial that's all about working with silhouette photography.
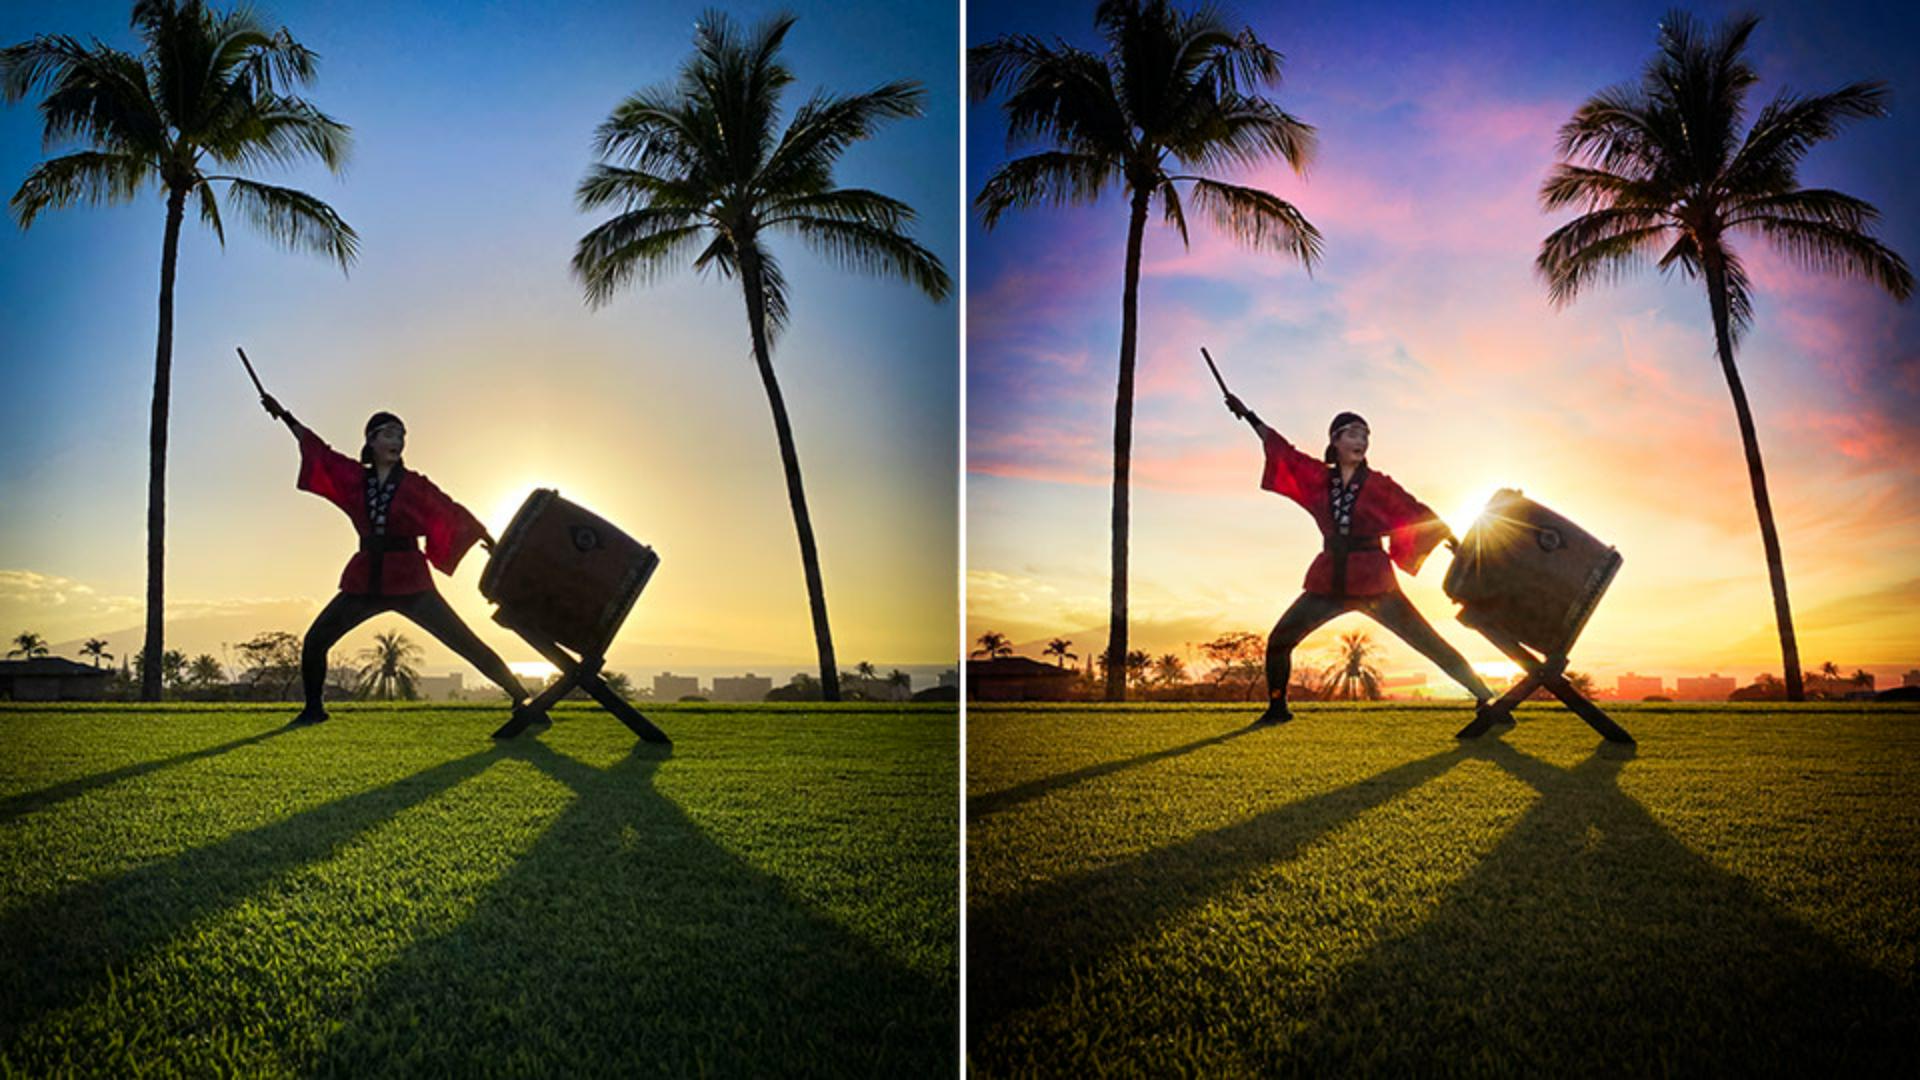
And this image was captured in Maui, Hawaii.
But wait for it.
Here is my original.
What?
That's quite dramatic.
In this project, I'm going to start in Lightroom, and I'm going to finish this project in Adobe Photoshop and I'm going to add that sky.
That's right.
I collect photographs of clouds and skies wherever I go, and I like to combine images together to make really dramatic photos.
Okay, let's get started.
And of course, it begins here in Adobe Lightroom.
Here in Lightroom, I'm going to start with this series of images that I've captured in Maui of Maui Taiko performers.
In this case, I'm going to work with this original image you see here and I'm going to make it look like this.
And these are the settings that I chose here in Lightroom first
Preparing the silhouette image in Lightroom
before I pass it over to Adobe Photoshop.
Here under my Light settings I'm going in and adjusting Shadows and Whites.
I want to open up the Shadows and adjust the Whites to get a bit more contrast.
Next, I'm going to go into my Color settings and adjust Vibrance.
Really bring up the colors within the image here with a little bit of Vibrance adjustments.
Then next, Dehaze and a Vignette.
Dehaze gets rid of a little bit of that soft value to the image, brightens things up, gives me a darker value to my colors, and especially darkens up my sky.
I like the effect, but don't go too far with Dehaze.
Just enough, just a little will always go a long way for any photograph.
And of course, Vignette.
I want to darken the edges of my image.
So, I'm going to do that here with a simple Vignette and adjust the midpoint as well.
Moving on to Detail.
I'm going to adjust the Noise Reduction and Color Noise Reduction.
Don't go too far on Noise Reduction, it will soften your image and start to blur the edges just enough.
Noise Reduction is always right, never too far.
Next, moving on to Optics and down to Remove Chromatic Aberration right here.
In a project like this where I have strong contrasting edges, the area against the sky and the palm trees and my performer and the background, contrasted edges always need to be adjusted and remove chromatic aberration.
So be sure and turn that on.
Now we're ready to export this.
It looks great.
Down here, I'm going to do a right click on my image here from the image gallery.
Sending the image from Lightroom to Photoshop
With a right click, you can then select Edit in Photoshop... right here.
It'll then copy this and transfer it over to Adobe Photoshop, as you see here.
Now we're going to continue my project.
Adding and blending a dramatic sky in Photoshop
Check this out.
Here is the sky that I want to add to my image.
I photographed this one evening, and it was really fantastic.
Always take a photograph of your favorite sunsets or sunrises so you can use them in future projects.
Here also is this starburst.
This starburst is available on the Adobe Stock library collection of the images.
I'm going to combine both of those together and bring them over to my project.
Here I'm going to start with this sky image.
I'm going to select it here, tap and drag it over to my image, right here.
Then I'm going to drop it into position, as you see here.
I'm now going to adjust the Opacity of the image down to 50%.
When it's added to 50% value, I can adjust it and transform it so that it matches my image in the background.
And specifically, I want to go in and match the horizon.
I'm going to zoom in here so you can see how I've done this.
I've drawn a baseline along the horizon and I'm going to move my background so you can see how I've aligned the horizon of my clouds with the horizon here of my image right there.
So now, I can adjust the blend mode.
When I turn on a blend mode of Overlay, this is the result I get.
Wow.
Overlay is an amazing blend mode that will then blend the colors into my background image.
So, you can then change the mood of any photograph by using overlay because it's going to take on the colors - in this case of my background clouds.
Cool.
Now with the horizons lined up, and the images adjusted appropriately, I can get the results as you see here.
Wow.
Wait, there's one more thing to add.
Finishing the composite with a starburst effect
I'm going to add in this starburst, selecting the starburst and dragging it once again over to my second image here, dropping it in, then I can adjust the blend mode to Screen and drop it right into position right there to give it that really nice punch.
You have just seen some amazing capabilities here both in Lightroom and Photoshop to bring multiple images together to give you the results that you see here.
Give these techniques a try when you want to really make a powerful statement with your photography.
And don't forget, every time you see a great sunrise or sunset, take multiple photographs of it, so you too can use it in projects like this.
Give these techniques a try.