[Ashley Kennedy]: Efeitos de vídeo são uma parte divertida de transformar gravações no Premiere.
Mas como ajustar a aparência de uma cena inteira ou várias cenas?
Para editar vários clipes de uma vez, Camadas de ajuste são uma ótima opção.
Vamos conferir.
Esta é uma sequência de água-viva, e quero deixá-la com um ar mais onírico.
Aplicar correções de cores em uma camada de ajuste
Vamos criar um tratamento de cor supersaturado.
Vá até o botão Novo item e escolha Camada de ajuste.
Por padrão, as configurações são as mesmas.
Clique em OK.
Arraste e solte a Camada de ajuste sobre V2 e estenda-a sobre todos os clipes que deverão receber o efeito.
Na minha sequência, adicionei uma música de fundo.
Você pode pesquisar músicas no painel Áudio essencial e arrastá-las até seu projeto.
Mas não é necessário neste caso.
Vamos adicionar um efeito.
Pode ser desde um efeito padrão de vídeo até correção de cores.
Para criar o visual supersaturado, selecione a Camada de ajuste e vá até as ferramentas Lumetri Color.
Faremos ajustes simples em Correção básica.
Aumente a Saturação, a Exposição e o Contraste.
Também vou intensificar os brancos da cena.
Este é o antes e o depois.
Vamos reproduzir um pedaço. [clipe com música tocando] O visual foi aplicado a todos os clipes da sequência.
Isso é conveniente para criar tratamentos, mas também é ótimo na hora de modificá-los.
Digamos que meu cliente queira uma mudança radical, como mudar todos os azuis para um roxo escuro.
Isso pode ser feito com uma Camada de ajuste.
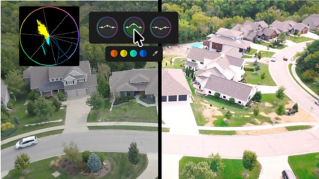
Vá até a categoria Curvas e, em Curvas de Matiz/Saturação, vá até a curva Matiz vs Matiz.
Como toda a água tem a mesma cor, clique no Conta-gotas para extrair uma amostra da porção azul.
Selecione o nó azul e arraste-o para baixo até chegar ao tom de roxo desejado.
Posso deixar rosa ou vermelho ou subir até ficar verde.
Vamos deixar desta cor.
Ao avançar, toda a água está roxa.
Vamos continuar e adicionar outro efeito.
No painel Efeitos,
Adicionar efeitos à camada de ajuste
quero adicionar um efeito de iluminação.
Vá até Efeitos de vídeo e Luzes e desfoques.
Vou experimentar o efeito Raios volumétricos.
Arraste e solte na Camada de ajuste.
No painel Controles de efeito, ao descer, é possível ver o efeito Lumetri Color que adicionei antes, e o efeito Raios volumétricos.
Há vários parâmetros que podem ser ajustados, mas o efeito inclui o botão Surpreenda-me, que ajusta os parâmetros de maneira aleatória.
Clique nele até ter um resultado legal.
Este é interessante.
Vejamos como fica no restante das cenas. [clipe silencioso sendo reproduzido] Há raios saindo da água-viva.
Vamos ver um pedaço. [clipe com música tocando] Nada mal.
No painel Projeto, vou mostrar outra vantagem sobre Camadas de ajuste.
Apresentar mais de uma versão com camadas de ajuste separadas
Digamos que essa seja uma opção de visual.
Vamos criar outra.
Com a mesma Camada de ajuste, arraste-a até V3 e estenda-a.
Vou desativar V2 para criar um tratamento em V3.
Será rápido.
Vá até a categoria Criativo e escolha um visual da lista.
Vou escolher SL Bleach HDR, aumentar um pouco a Intensidade e reproduzir. [clipe com música tocando] Caso o cliente queira ver os visuais criados, posso mostrar a opção um e a opção dois.
Estas são as Camadas de ajuste, uma ótima maneira de alterar vários clipes de uma vez para deixar o trabalho mais flexível, rápido e criativo.