Lightroom para dispositivos móviles incluye herramientas de edición que puedes usar para mejorar fotos de muchas formas.
Te permite controlar las características de luz y color de una escena y mucho más.
Hola, soy Seán Duggan, de Adobe Learn.
Hoy te enseño a usar herramientas de edición esenciales de Lightroom para mejorar tus fotos.
Antes de ver las herramientas, empezaré con una acción rápida para enderezar los ángulos inclinados.
Lightroom detecta que algunos ángulos arquitectónicos están inclinados y permite enderezarlos.
Toco Fijar ángulo.
Mira qué bien queda.
Si mantengo pulsada la foto, puedo ver el antes, y si quito el dedo de la pantalla, aparece el después.
Mucho mejor.
Pasemos a las características de luz de la foto.
En Editar, toco el icono de los tres reguladores para ver las herramientas.
Puedes aplicar ajustes de varias categorías.
Auto es un buen punto de partida y siempre lo pruebo.
Si no te gusta, vuelve a tocarlo para desactivarlo o modifica los ajustes como voy a hacer yo.
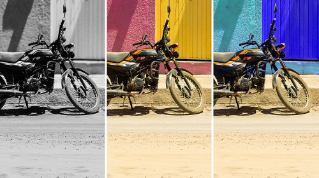
Aquí, Auto ha iluminado las partes más oscuras de la escena, pero se puede hacer mucho más.
Debajo de los iconos de Luz y Color hay un puntito blanco.
Este indica que se han ajustado esas secciones.
Si toco Luz para ver los controles, aparecen los cambios del ajuste Auto.
Voy a aclarar las sombras moviendo el regulador a la derecha y reduciré el brillo de Iluminaciones para homogeneizar el cielo.
También aumentaré el contraste un poco.
Al mover el regulador, se ve el valor exacto del ajuste arriba del todo.
Te enseño un atajo muy útil: en Lightroom para dispositivos móviles, puedes restablecer un regulador tocándolo dos veces.
Vamos a los ajustes de Color.
La foto me parece un poco fría, así que aumentaré el amarillo en Temperatura para aportar calidez.
También ajustaré Matiz para añadir un poco de magenta.
Deslizo hacia arriba en Control y aumento Intensidad para que los colores resalten más.
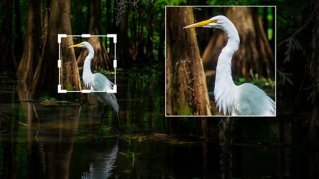
Ahora, toco el icono de Efectos para trabajar con Borrar neblina.
Si deslizo a la izquierda, aumenta la neblina, pero en esta foto quiero mover el regulador a la derecha para reducirla y hacer que el cielo quede más dramático.
Borrar neblina reduce la niebla de la atmósfera, algo que merece la pena probar en las fotos de paisajes.
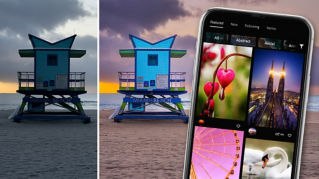
Por último, quiero eliminar el cartel de salida del fondo.
Toco dos veces la imagen para ampliarla y uso dos dedos para ampliar aún más.
En la barra de tareas, elijo Quitar, a la derecha del todo.
Incluye tres herramientas, y si tocas el icono azul, verás Quitar, Corregir y Clonar.
Lo dejo en Quitar, que sirve para eliminar objetos pequeños con detalles poco complejos alrededor, como la pared en torno al cartel.
Con Quitar, también puedes usar IA generativa, que resulta muy útil en algunas situaciones.
Pero para este cartel no la necesito, así que la desactivo.
Al hacerlo, el icono azul de la herramienta cambia.
Ajusto el tamaño del pincel y hago un garabato sobre el cartel para indicarle a Lightroom que quiero borrarlo.
El trazo no tiene que ser muy preciso, ya que Detectar objetos está activado, así que Lightroom verá el objeto, ampliará la zona pintada, eliminará el cartel y rellenará el hueco con detalles circundantes.
Toco la verificación para aplicar el cambio y toco dos veces la foto para alejar.
Comparemos la versión actual y la original.
Mantengo pulsada la pantalla para ver el antes y suelto para ver los ajustes actuales.
Ha mejorado mucho.
En este tutorial hemos usado algunas de las numerosas herramientas de edición y mejora de imágenes de Lightroom para dispositivos móviles.
Explóralas y aprende a usarlas con tus propias fotos.