How to enhance video quality with Adobe Premiere Rush.
Improve video quality by making color corrections and adjusting audio with this easy-to-use video enhancer.

Edit videos with sound and color enhancement.
With Premiere Rush video editor, you can lighten up the shadows in a dark restaurant scene, or tone down the blown-out highlights in a sunny beach video. You can also give all of the clips in your video the same look, adjust the volume, and even add music or sound effects. Edit your videos in Premiere Rush on Windows or Mac, iPhone, iPad, or Android. No need for a video converter: whatever the video format of your clips (MOV, MPEG-4, WMV), you can work with them in Premiere Rush. Then use these video quality enhancer tools to make your project look and sound its best.
Enhance video color.
After you’ve finished merging and editing video clips, you can focus on color correction. There are a couple of ways to do this in Premiere Rush.

Apply built-in presets.
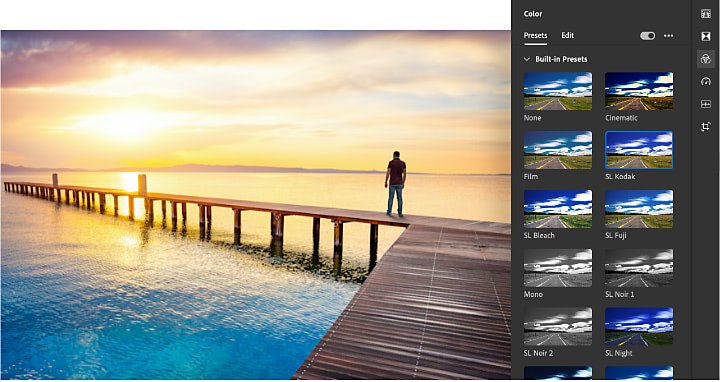
Brighten, darken, or unify all of your video clips by using built-in presets. Options like Cinematic, Night, and Noir are a fast and easy way to enhance color highlights or add effects like sepia tone. Just select the video clip in your timeline, open the Color panel, and select your preset. You can adjust the intensity of the effect with the slider at the bottom of the Presets tab.
Adjust the color sliders.
To make custom edits to a video file, you can enhance the color with sliders. The basic features include everything from Exposure and Contrast to Vibrance and Saturation. Advanced features include special effects like Faded Film, Sharpening, and Vignette. Find them all in the Edit tab, and experiment until you find the right look. To apply your adjustments to multiple clips in your project or timeline, you can save slider settings as a custom preset by selecting Create Preset. Whenever you need it again, you’ll find it in the Your Presets subsection of the Presets tab.
Transform properties.
Resize a clip, rotate it, or crop it in a few quick steps. Just open the Crop & Rotate panel and make basic adjustments to change the position and scale of the clip. You can also make advanced adjustments, like cropping edges, changing the opacity or transparency, or applying an edge feather to soften the edges. If you’re working with a shaky video that makes cropping tricky, video stabilization might be necessary to focus on your subject. You can bring the footage into Adobe Premiere Pro to use the Warp Stabilizer before continuing work in Premiere Rush.
Edit and record audio.
With the three audio tracks available in every Premiere Rush project, you can enhance your video with voice-over, music, and sound effects.

Record a voice-over.
Narrate the action or add commentary by clicking the blue + icon in the left toolbar and select Voiceover. Click the Microphone icon in the audio track on which you want to record. When you’re done recording, the audio clip will appear as a new track in the timeline, and it will be attached to the video clip as you continue to edit.
Add music or sound effects.
To really boost your production values, add prerecorded audio. Just select Media from the left toolbar and browse your files for the right sound effect or music file. To add the entire audio clip, select it and click Add. To add just a part of the clip, click the Large Preview icon to narrow the range you want to play. The audio clip will appear as a new track in the timeline, and it will be attached to the video clip as you continue to edit.
Refine audio.
Make subtle adjustments in the Audio panel with simple controls:
- Increase or decrease the volume of a clip by moving the Clip Volume slider.
- Classify the audio as Voice, Music, or Other, and adjust the controls in the Advanced section of the Audio Panel. Select Auto Volume for consistent sound or Balance Sound to boost quiet sounds and dampen loud sounds. You can also reduce background noise and echo, and enhance speech.
- Automatically lower the volume of music clips when voice clips play over them with Auto Duck.

Add a final touch and share.
When you’re finished adjusting the color and audio of your video, try adding text like animated title sequences or end credits. In Premiere Rush, it’s easy to choose the font size, style, placement, and timing that you want. Then click Share to save it to your device or directly to your social media channels as a high-quality MP4. You can choose your video resolution, frame rate, audio channels, and video quality. With these video editing tools, you can create compelling videos, and share them, from anywhere.
Do more with Adobe Premiere Pro.
Create and edit video from anywhere—phone, tablet, and desktop. Edit and share for social your professional-looking videos.
You might also be interested in…
Introduction to video editing.
Learn the principles of video editing and practical tips for both big and small screens.
Experimenting with video effects.
Dive into popular post-production effects, and explore the moods and styles each can achieve.
Raise your EQ IQ: A primer on graphic equalizers.
Learn how to use a graphic equalizer to alter sound by boosting or cutting certain frequency bands.
How to compress videos to share on social media.
Learn how to use Adobe Premiere Rush to reduce file size and export videos.


