Introduction
Let the fun begin.
So now that we have some experience with the drawing tools in Animate and we have experience and knowledge of what a symbol is,
Creating a classic tween animation
I think we're ready to create something called a Classic Tween.
So I'm going to go here and click on this first keyframe and just press Delete.
Just remember, if I click on the keyframe, it selects the contents of everything within that keyframe.
Therefore, all three boats are now selected.
I'll press Delete and we'll drag a new instance of the boat symbol onto the stage.
It's a little bit big, so we'll go to our Free Transform Tool or press Q and I'll scale it down from the corner while holding the Shift key to constrain proportions.
I move it to the left-hand side of the stage, and I'll name that layer boat.
So now we have one keyframe, every animation will consist of at least two keyframes, one keyframe for the starting point and another keyframe for the ending point.
So let's go ahead and maybe have this ends at about three seconds.
At the three second mark I'll right click and Insert Keyframe.
So now I have two keyframes.
I have the first keyframe standing on the left side of the stage.
And every time I make a new keyframe, it copies what's in the previous keyframe.
So I also have on the second keyframe the same boat at the same size, on the same place of the stage.
So I just click and drag it to the right and maybe holding the Shift key, to keep it along the exact same X axis.
So now I have keyframe number one on the left side of the stage, and keyframe two on the right side of the stage.
Just setting up what I want the boat to do.
Normally that would have something called the in between artists that would now draw all those in between states to make the boat fluidly sail across the stage.
All we have to do is click anywhere between these first two keyframes and right click and select Create Classic Tween.
And now if I scrub the Timeline, I have the boat animating across the stage.
We have a simple animation.
Let's add a little background art,
Adding background and scene elements
so it's not just kind of floating through the air.
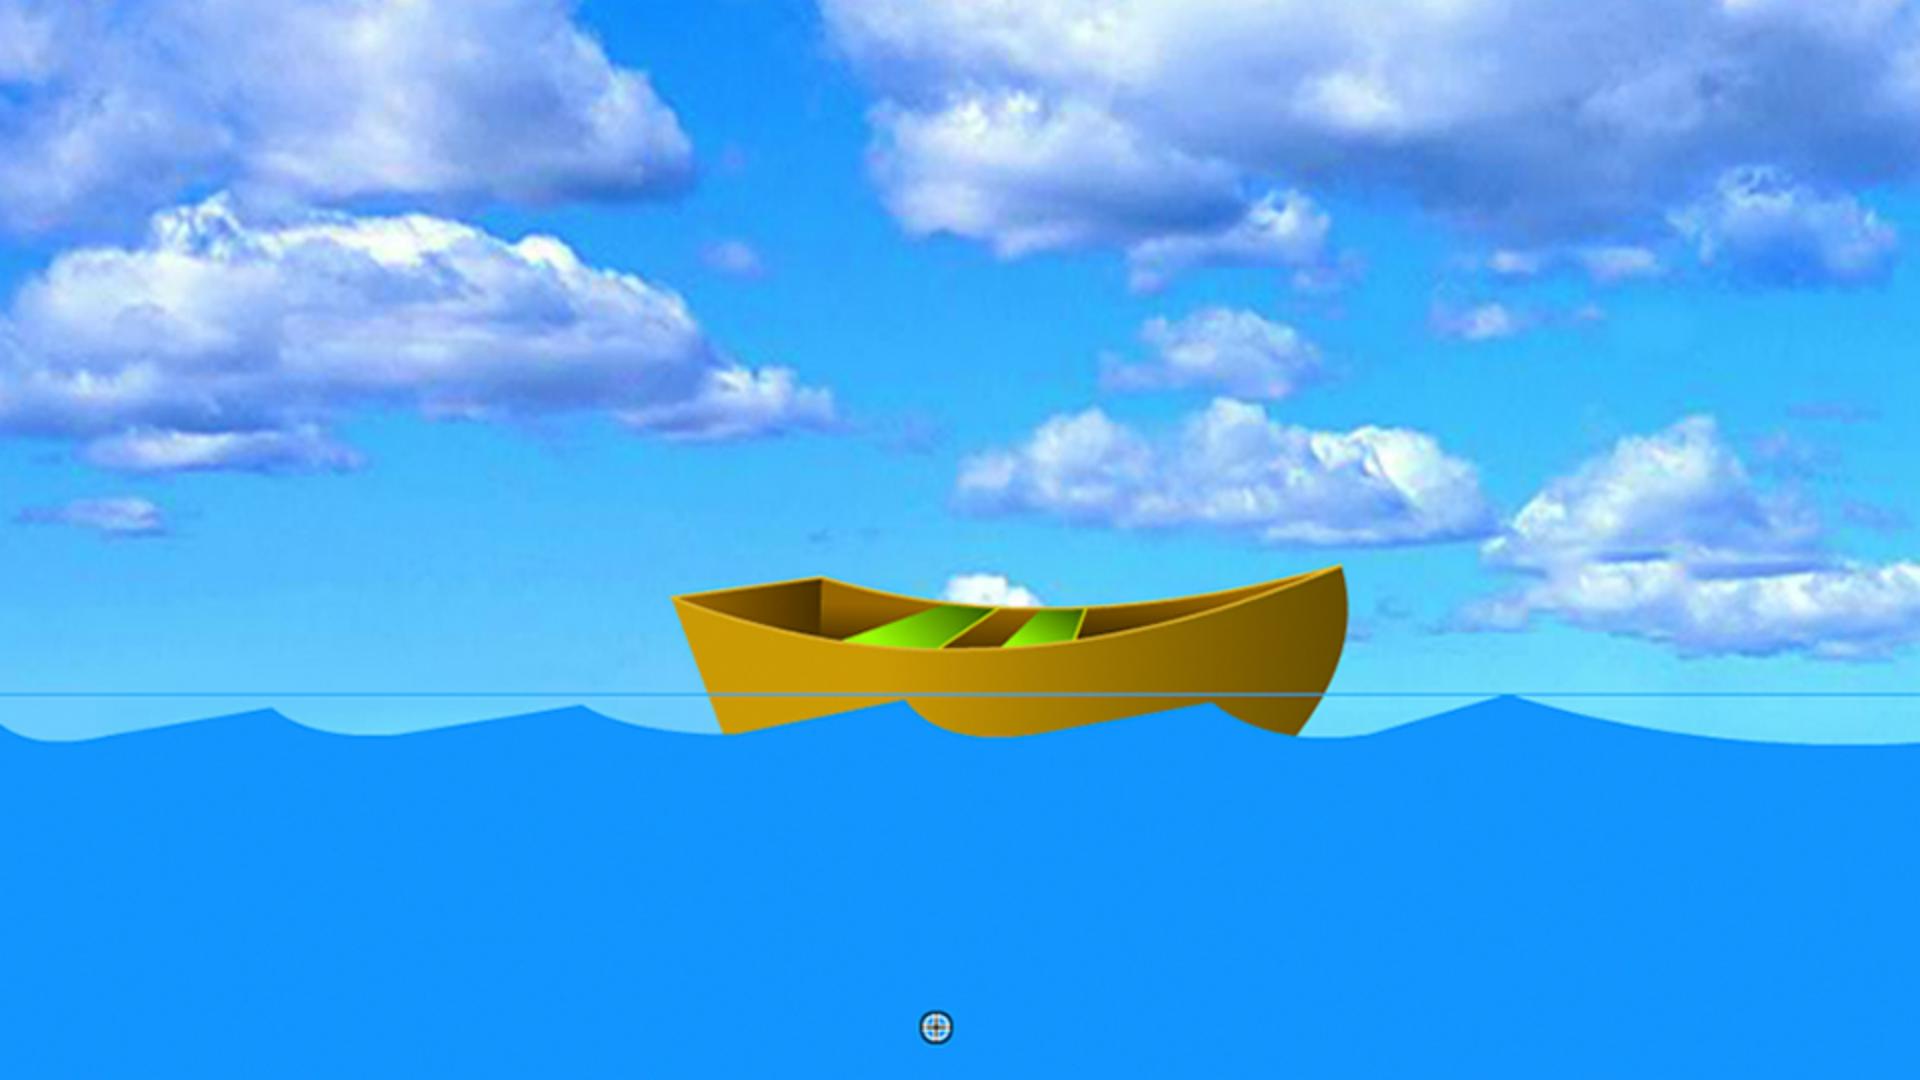
I'll add a new layer, I'll call that Sky, and I've already created a bitmap and I put it in the library called Sky.
We'll just drag that out to the stage.
And I just took an image into Photoshop that I created.
I selected a portion of the sky, I copied it, put it into a new file, made a couple of color adjustments, and then I just dragged it into the Creative Cloud Library, so it was available right here inside of Animate, making it pretty easy.
I'll drag the sky underneath the boat layer, so it's in the background there, and I'll create one more layer, we'll call this water.
Then we can go grab an instance of the water symbol that I created here and drag that out to the stage.
And that's just a simple rectangle with no stroke that I drew.
And holding down the Option key, or the Alt key on a PC, I was able to click and drag and add these little points along the way and then just tweaking the little curve.
Then I clicked on it to select it and placed it into the library by going to Modify, Convert to Symbol.
Now we have the water and the boat and maybe we'll place the boat underneath the water, so I'll grab the boat layer and I'll just sandwich it there between the water and sky.
I'll press Return.
Not bad.
You know, what I think it needs, though, if it's going to be on water, maybe that boat needs a little bit of movement.
So what I could do is select the boat layer
Animating with a motion guide
and right click and add something called a Classic Motion Guide.
This is a way for us to draw a path that the boat can then animate on.
So you'll see it creates a new layer called Guide and has an empty blank keyframe in there.
And I'm just going to click on it, and I grab my Pencil Tool and I'll set that to Smooth and for about the center point here, I'm just going to drag up and across along the waves trying to draw a smooth line.
And if not, I can always tweak it, I can always quick double click it to select the entire thing and use the Smooth Tool down here to smooth out the lines a little bit.
Oh, that looks better.
And then I can just select the boat and lock it on to the guide.
The first frame by default is locked to the guide.
So that's no problem.
Let's click in the second keyframe.
The second keyframe, we see the center point here and we're going to drag it so that it also snaps to the guide there.
And now I see that the boat is going to be showing inside the frame here.
So I want to grab that guide and just kind of pull it out a little bit further.
And then I can select that boat keyframe again and drag it outside the frame.
That way we don't see it within the stage area once we're publishing.
Now, if I drag the Timeline, we see that the boat is going up and down now on the guide, and one of the properties of a guide is it's transparent.
So when we test this movie, it'll be invisible.
One more thing we could do is right now it's going up and down, kind of like a merry go round.
But with one click on the first keyframe, I can go into my Properties panel
Orienting artwork to the motion path
and I can select something called Orient to path.
I'll click that.
Now my boat is going to orient itself to the path.
Oh, isn't that neat looking?
And if it looks a little bit like the sailor or the boat is drunk, you have to make sure that the first keyframe of the boat is oriented to the path.
So you see how the path is going up at an angle.
I'm going to click on the boat and the Quick Transform Tool, bring my cursor outside of the corners to get this little Rotation Tool showing up here.
And then I'll just tweak it so that the boat's orientation is the same as the path.
And I'll make sure that's done on the first keyframe ends on the second keyframe.
That's pretty good, it's kind of straight.
Another way is to just straighten the line and then move the boat to snap on that.
And now if I scrub the Timeline, then I see the boat going across the water oriented to the path of a motion guide.
So now we can preview the animation
Previewing and testing the animation
by doing a Control, Test Movie or pressing Command Return on the keyboard.
And then we have a motion tween of the boat on a motion guide.
In the next movie, we'll learn about another type of symbol called the Movie Clip.
Stay tuned.