Introduction
Adobe Dimension CC makes it easy for Photoshop CC users to truly visualize their creation.
You'll see how adding assets you create in Adobe Photoshop CC, including a logo and texture to branded collateral in Adobe Dimension CC, allows you to visualize what it will look like in real life making 3D designs simple.
Preparing Photoshop assets and opening the Dimension starter file
In Adobe Photoshop CC, I've created a few versions of a logo, each on a separate artboard.
As well as a texture with a pattern, both will be used as artwork for the brand collateral pieces.
Back in Adobe Dimension CC, you can open this starter file from the practice files if you want to follow along.
You can see there are a series of 3D models already on the canvas: a coffee cup, a bag, and others.
Some with logos and other artwork on them.
You'll add another model to the scene.
Adding and transforming 3D models in the scene
From the Starter Assets panel on the left - where you can see a lot of assets that come with Dimension CC - scroll down and drag this bag into your design placing it here.
Now to resize the bag, select the Scale tool on the left.
You can press the letter S to access this tool.
Pressing the Shift key, drag here to make it smaller.
Now to rotate it, select the Rotate tool on the left.
You can also press the letter R to access the tool.
And drag the green or Y value here.
Now if you look in the Scene panel on the right, you'll see a layering of all the content in the scene including the new bag.
In the Scene panel, you can hide and show as well as lock content.
Now come out to the artwork, and double click right on the bag to see the properties for it such as the material on the right.
To change the color of the bag, click the Property swatch.
And with Color selected, select the black.
Applying materials, textures, and Photoshop artwork
Now instead of applying a color to the bag, you can also apply content from Photoshop CC as a material.
Select Image.
Then click this Folder icon and navigate to this Texture_small.psd file from the downloadable assets.
Click Open, and the texture is applied.
You'll see a series of options like Position and Rotation you can now set for this material.
Click away from the menu to hide it, and the bag is also deselected.
Next, you'll add the Photoshop CC logo to the bag.
You can do this by copying and pasting content directly from Photoshop CC onto a selected model or importing a file.
Double click the bag to edit the properties again.
Then click Place Graphic On Model in the Actions section here.
In the dialog box that opens, select the Logo.psd file from the practice files you downloaded to embed it in the document.
Then click Open.
Once the logo is on the bag, you can drag in the middle of the logo to move it.
You can rotate it by dragging here.
Now to scale it, press the Shift key and drag any of these points.
Because this was imported as a Photoshop CC file, you can select which logo to use by choosing the correct artboard from the Photoshop CC file right here in Dimension CC.
In the Properties panel, to try one of the alternate logos, click the Image swatch to see the logo.
Try choosing another version from the Artboard menu.
Make sure you wind up with this version before you move on.
Now to make a change to the logo artwork in Photoshop CC, double click the logo thumbnail to open it in Photoshop CC.
In Photoshop CC, you can see the layer content and make any changes necessary.
I'll simply drag the logo up then save the file.
Returning to Dimension CC, you should be able to see the changes.
Adding background images and matching perspective and lighting
Next, you'll add an image to the background of the scene.
There are a number of ways to add images from Photoshop CC including dragging in an image file, including PSD, dragging content saved in a Creative Cloud Library by choosing Libraries here on the left.
You can also go to Photoshop CC and simply copy image content right into Dimension CC.
In the Starter Assets panel on the left, scroll down to see the default images.
Drag this table image into the background to add it to the scene.
Now to instantly align and light the scene using info from this background image, click the Match Image button on the right.
To make some overall lighting adjustments to the scene, you can click Environment in the Scene panel on the right if it isn't already selected.
You can then make some adjustments in the Properties panel to adjust the lighting, and maybe click the arrow to show the options for Sunlight, if they aren't already showing.
And make a few more adjustments.
Rendering the scene and refining the final image in Photoshop
With the scene ready, you can render or create the final image.
Click Render in the upper left corner to switch to Render mode.
In the Render settings on the right, you can configure your final rendered file.
You can select which views to render.
In this case, the current view will work fine.
You can change the filename.
You can change the Quality.
Low (Fast) takes less time to render but doesn't look as good.
You can choose a location to save the file and finally choose the format.
I'll make sure PSD (16 Bits/Channel) is chosen because Dimension CC will give us a layered PSD file which we can then further edit in Photoshop CC.
Click Render.
And know that depending on the design content and render settings, the time it takes to render may vary.
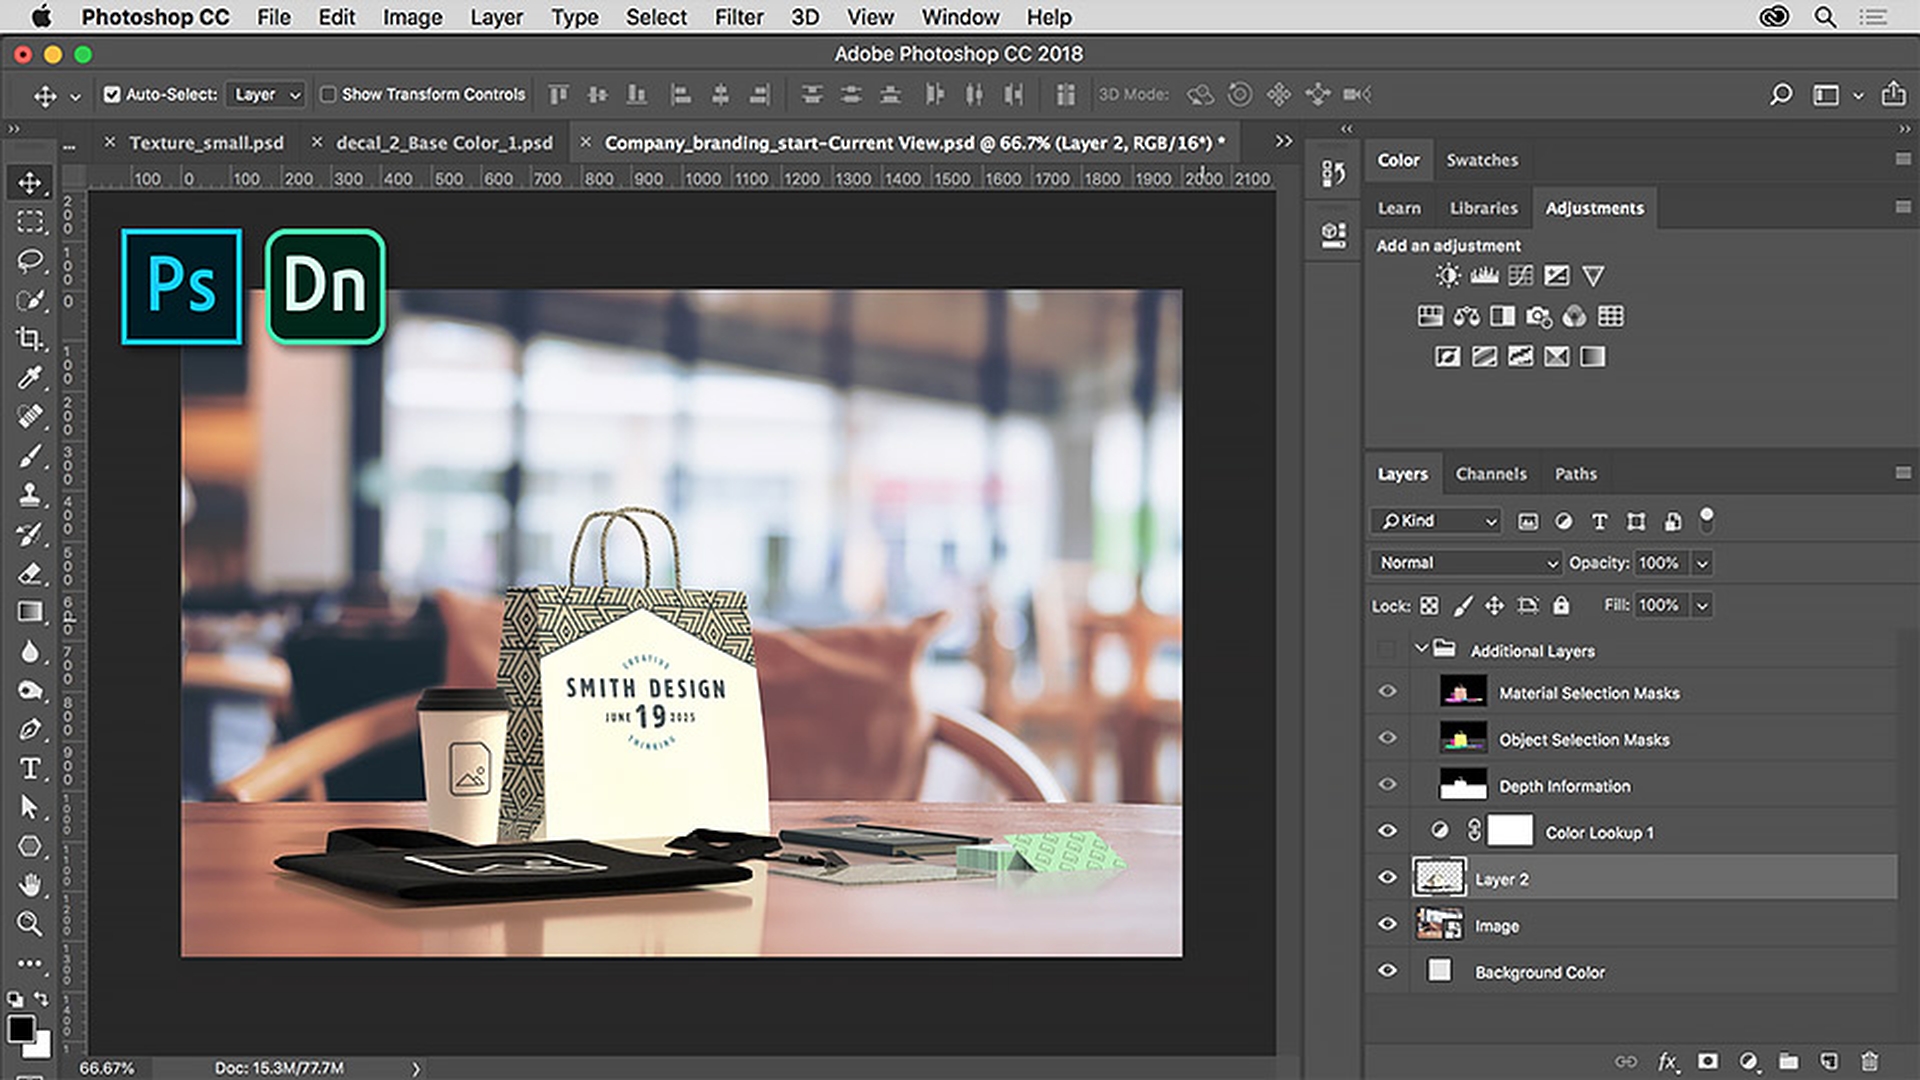
After the file is rendered, you can open the PSD in Photoshop CC here.
With the file open in Photoshop CC, if you look at the Layers panel, you can see a series of masks that were generated by Dimension CC.
You can also see the content here and the background image here.
I'll make a few final adjustments by selecting this model content layer and applying a Color Lookup to give the overall image a specific look.
With the content layer selected, I'll drag the model content a little bit more into the center of the table.
There we go.
Thanks to the ease of its editing capabilities, Adobe Dimension CC gives Photoshop CC users the ability to visualize product shots, branding collateral, and unique digital images.
Adobe Dimension CC makes 3D design simple.
Give Dimension CC a try today.


