Introduction
Photoshop on iPhone makes it easy to start your photo compositions on the go with images, selections, masks, adjustment layers, and much more.
I'm Howard Pinsky.
In this video, we're going to build out a fun composition using Photoshop on iPhone.
Creating a new canvas for social media
Here I am on the home screen, and I'm going to start by creating a new canvas.
Specifically, an Instagram story, which is 1080 x 1920.
To do that, I'll tap New blank canvas and then under Social, I'll choose Instagram story.
This way my image will be the perfect size for my social media post right from the beginning.
Adding and transforming a background image
With our canvas ready to go, let's start with a background.
Tapping on the Add button, I'll add a new Image layer and start with Adobe Stock and browse for something fun to add.
And everything here is free to use in your projects.
Now that I've chosen and added my first asset, tapping on it will let me enter Transform mode and I personally like scaling from the center to keep my images locked.
So, I'll tap on this button here.
Then I'll drag any of the edges outwards to expand the image.
Now I'll tap the Checkmark to confirm the change.
Great.
Isolating and positioning the main subject
With the new background in place, let's bring in our main subject.
I'll tap at the bottom to close this view of the layer properties.
Then I'll tap the white Add button and bring in a new Image layer.
And this time I have an image on my camera roll I'd like to use.
So, I'll tap Add from photos and choose an image.
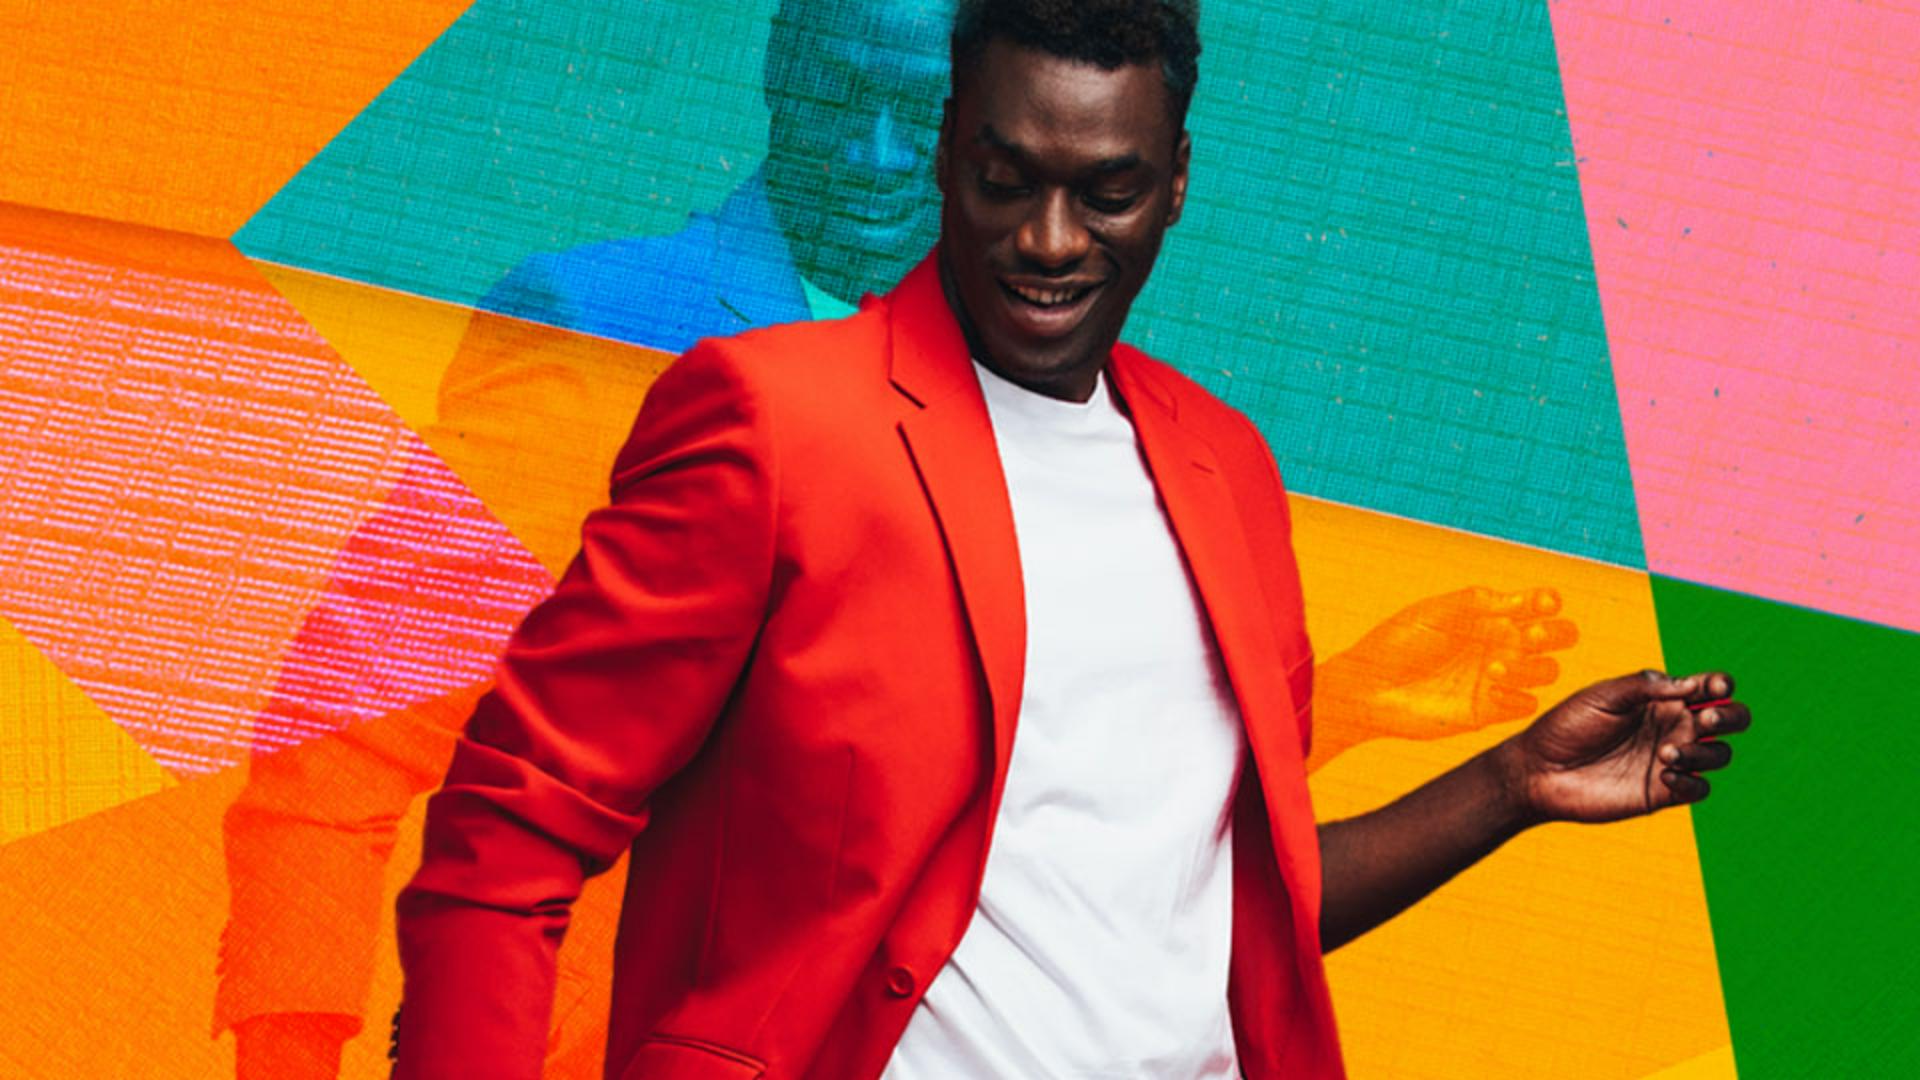
For this one we'll want to isolate this dancer from the background.
So, I'll tap on Select area.
Then after Photoshop detects the objects in the image, I can tap on the subject to add it to the selection.
Once I tap the Checkmark to confirm, I'll want to apply a layer mask, which will hide everything that wasn't included in the initial selection.
So, I'll tap Apply as mask.
Just like with the background, I can now transform and move this layer exactly where I'd like it.
I'll tap the subject, then tap Transform.
Here I can drag one of the corner handles to scale proportionally.
Then I can drag the layer around the canvas to shift the subject into place.
Now let's have a bit of fun and get creative.
Blending duplicated layers for creative effects
I want to duplicate this layer we just created, and I can do that by simply holding down on the canvas and choosing Duplicate.
Tapping on the duplicated layer and shifting it up a touch, I want to now blend it with the content on the layers below.
And for that I'm going to tap on Blend and opacity.
Here I can not only use this Opacity slider to adjust the transparency of this layer, but I can also cycle through the various Blend modes to see how they interact with the layers below.
Each Blend mode is a different formula that blends the colors of this layer with the colors on the layers below.
Overlay looks pretty nice.
When I'm done, I'll tap the Checkmark to confirm, then tap the down arrow at the bottom of the screen to close the Layer properties.
If at any point you want to move your layers up or down to change the order of the items in the image, tap on the layers stack at the bottom right, then tap and hold on a layer's thumbnail to move it.
Doing this allowed me to move the duplicated blended layer below the original dancer.
I'm liking the way this is looking, but I may want to change up the color of the duplicated dancer's clothes.
Using adjustment layers and clipping for color control
And for that, let's tap on the Add button and add an Adjustment layer.
Adjustment layers let you change the look of the layers below without making any permanent changes directly on the image.
Hue and Saturation will help us nicely shift our colors, and I'll drag the Hue slider to the left until the clothes are a nice blue.
I'll then tap on the Checkmark to confirm those changes.
Notice that my color changes are affecting only the blended copy of the dancer.
That's because by default, an adjustment layer is clipped to the layer below it, which in this case is the layer with the copy of the dancer.
Tapping on the Layer properties button notice what happens if I tap this Clipping icon to unclip the adjustment layer.
Now the color change affects all the layers below the adjustment layer, including the background as well as the copy of the dancer.
I'll tap that icon again to re-clip this adjustment to the dancer layer.
Beautiful.
I'll close the Layer properties down at the bottom.
Then I want to add one more object.
Once again, I'll tap the Add button to add a new Image layer, then browse Adobe Stock and I'll search the library for something like music notes.
And you may have already noticed, but there are quite a few stock assets that come with transparent areas.
Those are the assets with the checkerboard patterns, which indicates transparency.
When this asset is added, the notes appear in between the two dancer layers.
And that's because I had the duplicated layer still selected.
This looks fun, but I think a bit of blending could go a long way.
So, I'm going to once again explore our Blend modes.
Then I'll tap and hold this layer in the stack to move it above our dancer.
Then I'll drag the layer on the canvas to move it down, leaving us with a really fun looking result.
From here, you can continue adding images, applying masks, blend modes, adjustments, and a whole lot more to build out the perfect composition.
I'll catch you all in the next one.


