Introduction
[Jesús Ramirez]: Bring your low-resolution images back to life with Photoshop's Generative Upscale.
I'm Jesús Ramirez, and in this video, you'll learn how to use Generative Upscale to enlarge your images and add realistic detail.
We'll explore the available AI models and what makes each one unique.
By the end, you'll know exactly which to use and why.
Let's start with this landscape photo of a cabin.
It's only 800 x 500 pixels, and the goal is to make it larger and sharper.
To do so, go into the Image menu and choose Generative Upscale...
In the dialog box, you'll see the available AI models from this dropdown.
They each have their strengths and provide additional controls.
Use the Firefly Upscaler model to restore low resolution photos.
We'll begin with the Firefly Upscaler, a solid choice for restoring low-resolution photos.
I find that it does a great job with landscapes.
Then choose an output size either 2x or 4x.
The Output Dimensions are shown on the right.
For this example, choose 4x.
Now click Upscale,
Generative Upscale creates a new document for the upscaled image.
and Photoshop will create a new document with the generated image.
You can see the new document tab here.
And it is 3200 x 2000 pixels, which is four times larger than the original.
You will see two layers: The original scaled-up layer without any generative AI, and the generated layer.
And here's the tip: Enable the Zoom Tool and set your view to 100% from the Options bar.
Always work at 100% so you can accurately judge the details and sharpness.
Any other zoom level can be misleading.
Now you can click on the Eye icon to compare the images.
The generated version adds richer detail in the grass, the wood texture on the cabin, and the pine trees in the background.
It's a huge improvement.
Also, since this is a new document, you should press Ctrl S on Windows or Cmd S on the Mac to save so that you don't lose your edits.
Now let's look at the partner models.
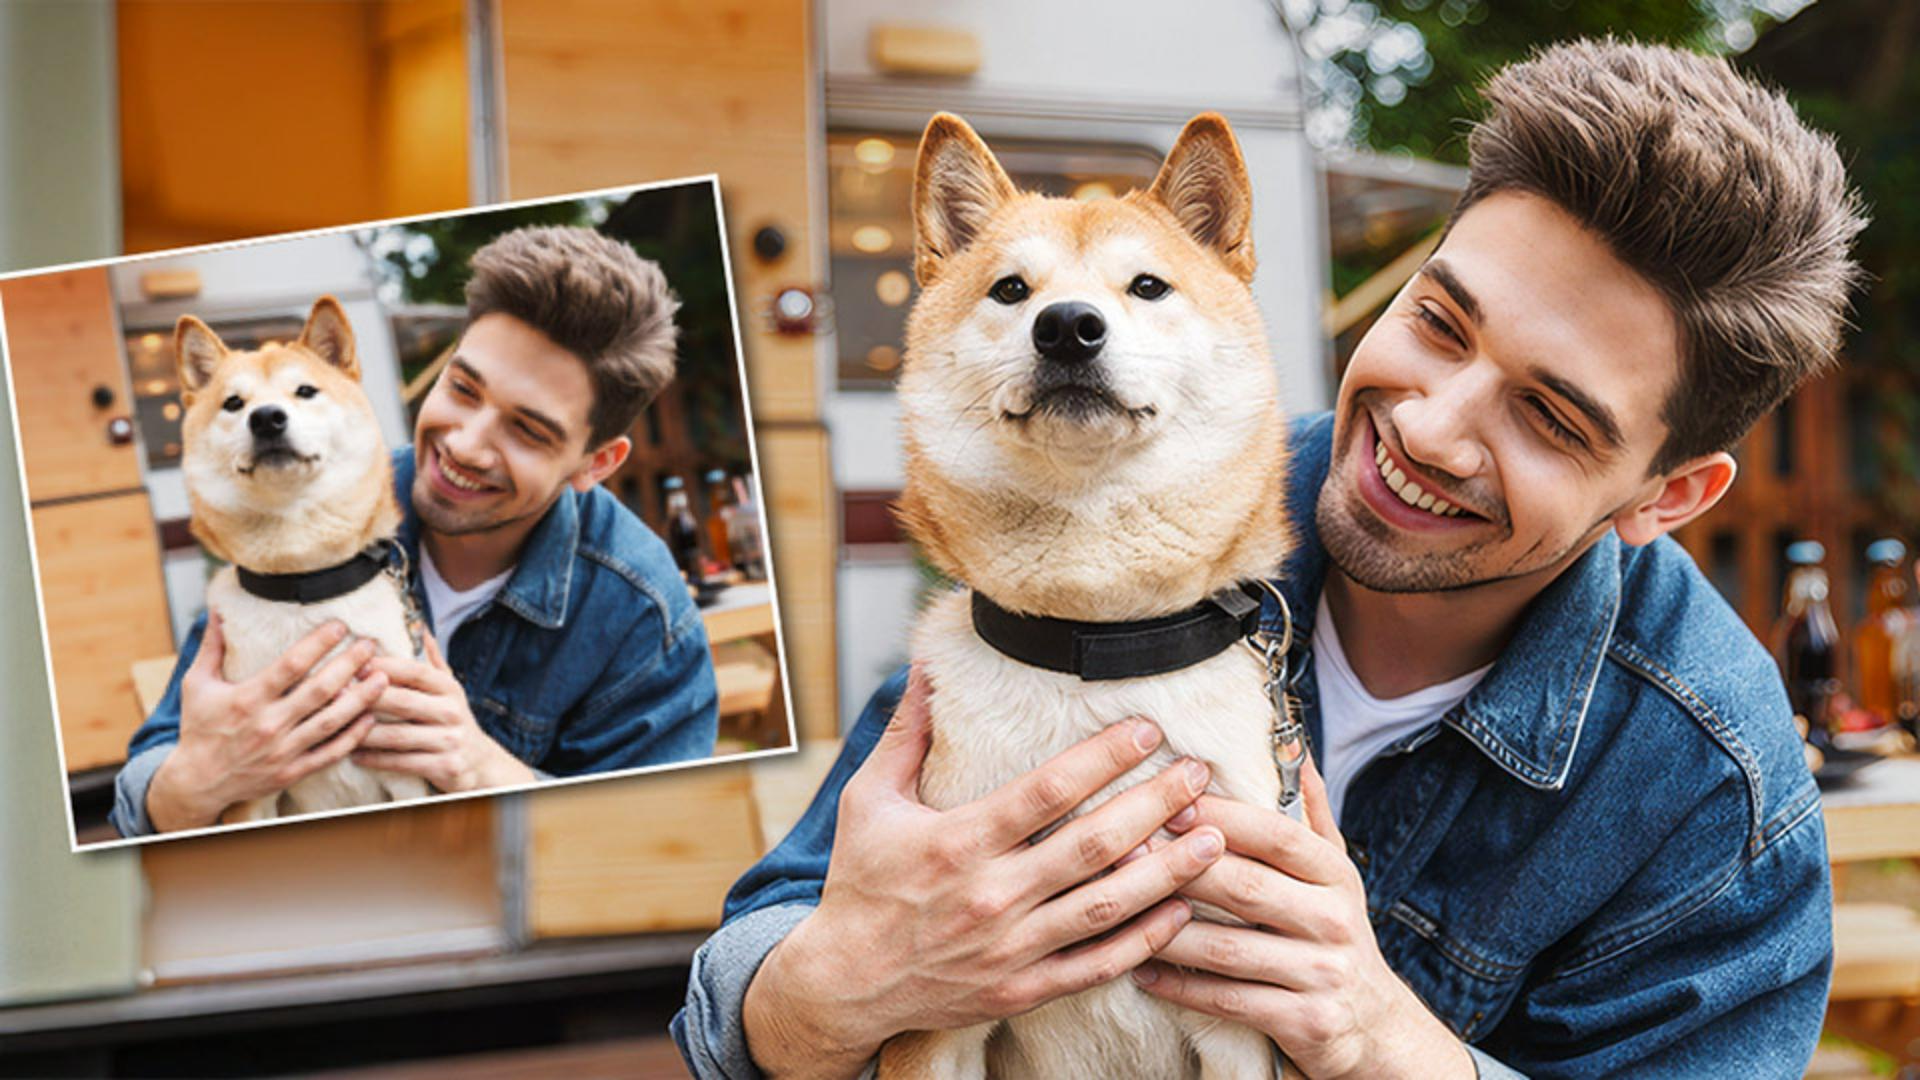
Here we have a photo of a man and a dog, which is also 800 x 500 pixels.
To scale it up, you can go into Image and choose Generative Upscale...
Topaz Gigapixel preserves and restores natural photo details and enhances blurred faces with Face Recovery.
This time, choose the Topaz Gigapixel partner model, which is best for real-world photographs, where you want to preserve natural detail rather than invent new ones.
Because this image contains a face, you can enable Face recovery.
This feature analyzes the photo to identify facial features such as the eyes, nose, and mouth.
It then reveals missing textures and fine details using AI data trained on thousands of real faces.
Is designed to restore, not change expressions, though minor variations can occur since the AI is reconstructing pixels.
Now you can set the Output to 4x, then click Upscale.
The new document opens up with two layers again: The regular scaled-up version and the AI-enhanced version.
Notice a sharper detail in his hair, the dog's fur, the denim jacket, and even the skin.
Topaz Gigapixel maintains a natural and realistic appearance.
Upscale and creatively enhance generated images and digital illustrations with Topaz Bloom.
Let's now look at how you can upscale generated images.
This image of a dressed-up koala holding a camera is 1024 x 1024 pixels, which is currently the maximum output Firefly can create in Photoshop.
You can look at the Properties panel to see the prompt that I used to generate it.
This generated image has a touch of realism, but it's definitely an illustration.
To upscale it, go into Image and choose Generative Upscale...
From this dialog box, choose Topaz Bloom from the dropdown.
This model is built for AI-generated art and digital illustrations.
Instead of only preserving detail, it reimagines the image, adding new artistic textures and depth.
You'll notice a Creativity slider here.
It controls how much freedom the AI has to reinterpret your image.
At low settings, it stays faithful to your original, enhancing existing details with minimal changes.
At higher settings, it adds new artistic details, extra texture on fabrics, reflections on metal or stylish brushwork, which is ideal for concept art or digital illustrations.
For this image, set the Creativity slider to 8 to generate more details and not be so faithful to the original image.
Then set the Output to 4x and click Upscale.
In a few moments you will see the new document.
Once generated, you can make sure you're viewing the image at 100%.
This time we'll use a keyboard shortcut.
Press Ctrl 1 on Windows or Cmd 1 on the Mac to view the image at 100%, and you can press Ctrl 0 or Cmd 0 to fit the image to screen.
I recommend committing these keyboard shortcuts to memory.
They're very helpful in many instances when working in Photoshop.
Again, I'll zoom into the 100% view.
Now we can compare the original and the generation.
Look at the koala's fur and the camera he's holding.
Both now have richer, more defined textures and detail.
The Topaz Bloom model didn't just sharpen the image, it enhanced it creatively, adding detail that wasn't there before.
This model isn't meant to perfectly preserve original realism; it's designed to elevate artwork, providing a more expressive and high-quality version.
Now that you know how Generative Upscale works, try it on your photos.
Again, I'm Jesús Ramirez.
Thank you for watching.


