| 1 |
Click the Text tool in the Tools panel.
 |
| 2 |
Click in the Document window beneath the rectangle. |
|
An insertion point appears. |
| 3 |
On the Macintosh, select Text > Font > Arial. (This step isn't necessary for Windows users because Arial is the default system font.) |
| 4 |
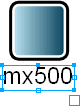
Type mx500, then click in the Document window away from the text. |
|
Any time you click outside a text block after entering text, the Pointer tool becomes selected in the Tools panel.
 |
| 5 |
Select the text using the Pointer tool and drag to reposition it beneath the rectangle as shown below so that the two don't overlap.
 |
| 6 |
If necessary, zoom out slightly by selecting the Zoom tool, holding down Alt (Windows) or Option (Macintosh), and clicking the rectangle. |
|
Tip: You can also select a new view option from the Magnification pop-up menu in the Status toolbar (Windows) or at the bottom of the Document window (Macintosh), or from the View > Magnification menu in the menu bar. |
 |
|
| 1 |
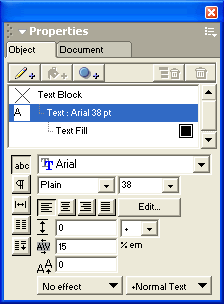
With the text you created in the previous procedure still selected, click the Character button in the bottom portion of the Object panel if it isn't already selected. Character options appear in the bottom of the panel.
 |
| 2 |
Set the type size to 38 and the kerning percentage to 15, then press Enter (Windows) or Return (Macintosh).
 |
|
The text in the Document window changes to reflect its new type attributes. |
| 3 |
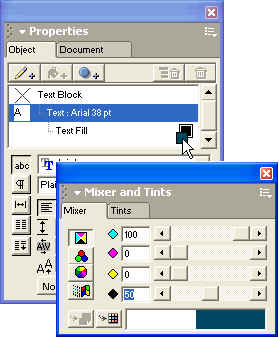
In the Color Mixer panel, set the Black value to 50 and ensure that the Cyan value is still set to 100. |
| 4 |
Drag the resulting new color from the Color Mixer panel's color box to the preview swatch of the Text Fill property in the Object panel.
 |
|
The text in the Document window changes to reflect its new fill color. |
| 5 |
Click the Pointer tool in the Tools panel if it isn't already selected, and Shift-click the rectangle in the Document window to select the rectangle and the text at the same time. |
|
Look at the Properties list in the Object panel. It indicates that two objects are selected. It also shows that the two objects have differing properties, because a dashed line appears beside them. |
| 6 |
If the Align panel is not already displayed, select Window > Align. |
| 7 |
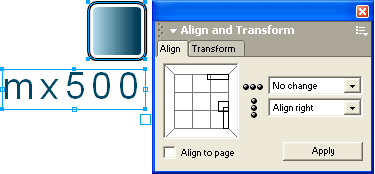
In the Align panel, do the following: |
 |
Select No Change from the Horizontal pop-up menu (the topmost menu) if it isn't already selected. |
|
Select Align Right from the Vertical pop-up menu. |
|
Deselect Align to Page if it's selected. |
| 8 |
Click Apply (Windows) or Align (Macintosh). |
|
The text and the rectangle are now aligned along their right edges in the document.
 |
| 9 |
If necessary, zoom out slightly by holding down Alt (Windows) or Option (Macintosh) and clicking the objects with the Zoom tool. |
| 10 |
Select Edit > Select > None. |
|
When deselected, the objects no longer appear aligned. That's because the Align panel aligns objects according to their bounding boxes. You applied extra kerning space to the text, so there is some space after the final character, making the text appear out of alignment. |
| 11 |
Using the Pointer tool, select the text, and press the Right Arrow key until the rightmost character appears aligned with the right edge of the rectangle. |
| 12 |
You no longer need the Align panel, so click its close box or select Window > Align. |
|
|


