|
Organize your artwork
When you're working with multiple pieces of artwork, as you will do in the next tutorial in this series, it's good practice to organize your document. Grouping related elements and placing them on separate layers are ways to keep your document organized.
Grouping related objects combines them so you can manipulate them as a single object. Layers separate objects in a document into discrete planes, like tracing paper overlays, to make the components of your artwork easier to identify and work with.
Here you'll group the objects in the logo and place them on their own layer.
| 1 |
Select Edit > Select > All. |
| 2 |
Select Modify > Group to combine the objects into a single, more manageable piece of artwork. |
| 3 |
If the Layers panel is not already displayed, select Window > Layers. |
| 4 |
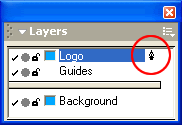
Double-click the layer named Foreground and type Logo, then press Enter (Windows) or Return (Macintosh). |
|
A pen icon is displayed beside the selected layer.
 |
|
The pen icon indicates that the layer is the active layer. Any new graphics you create are placed on the active layer. |
| 5 |
Select File > Save to save your work. |
 |
|
Throughout the next tutorial, you'll work with layers to help maintain organization within the document, making it easier to work with the artwork if you need to make modifications later.
|


