Introduction
Welcome to the Russell Brown show and this special tutorial that's all about photography in a bamboo forest.
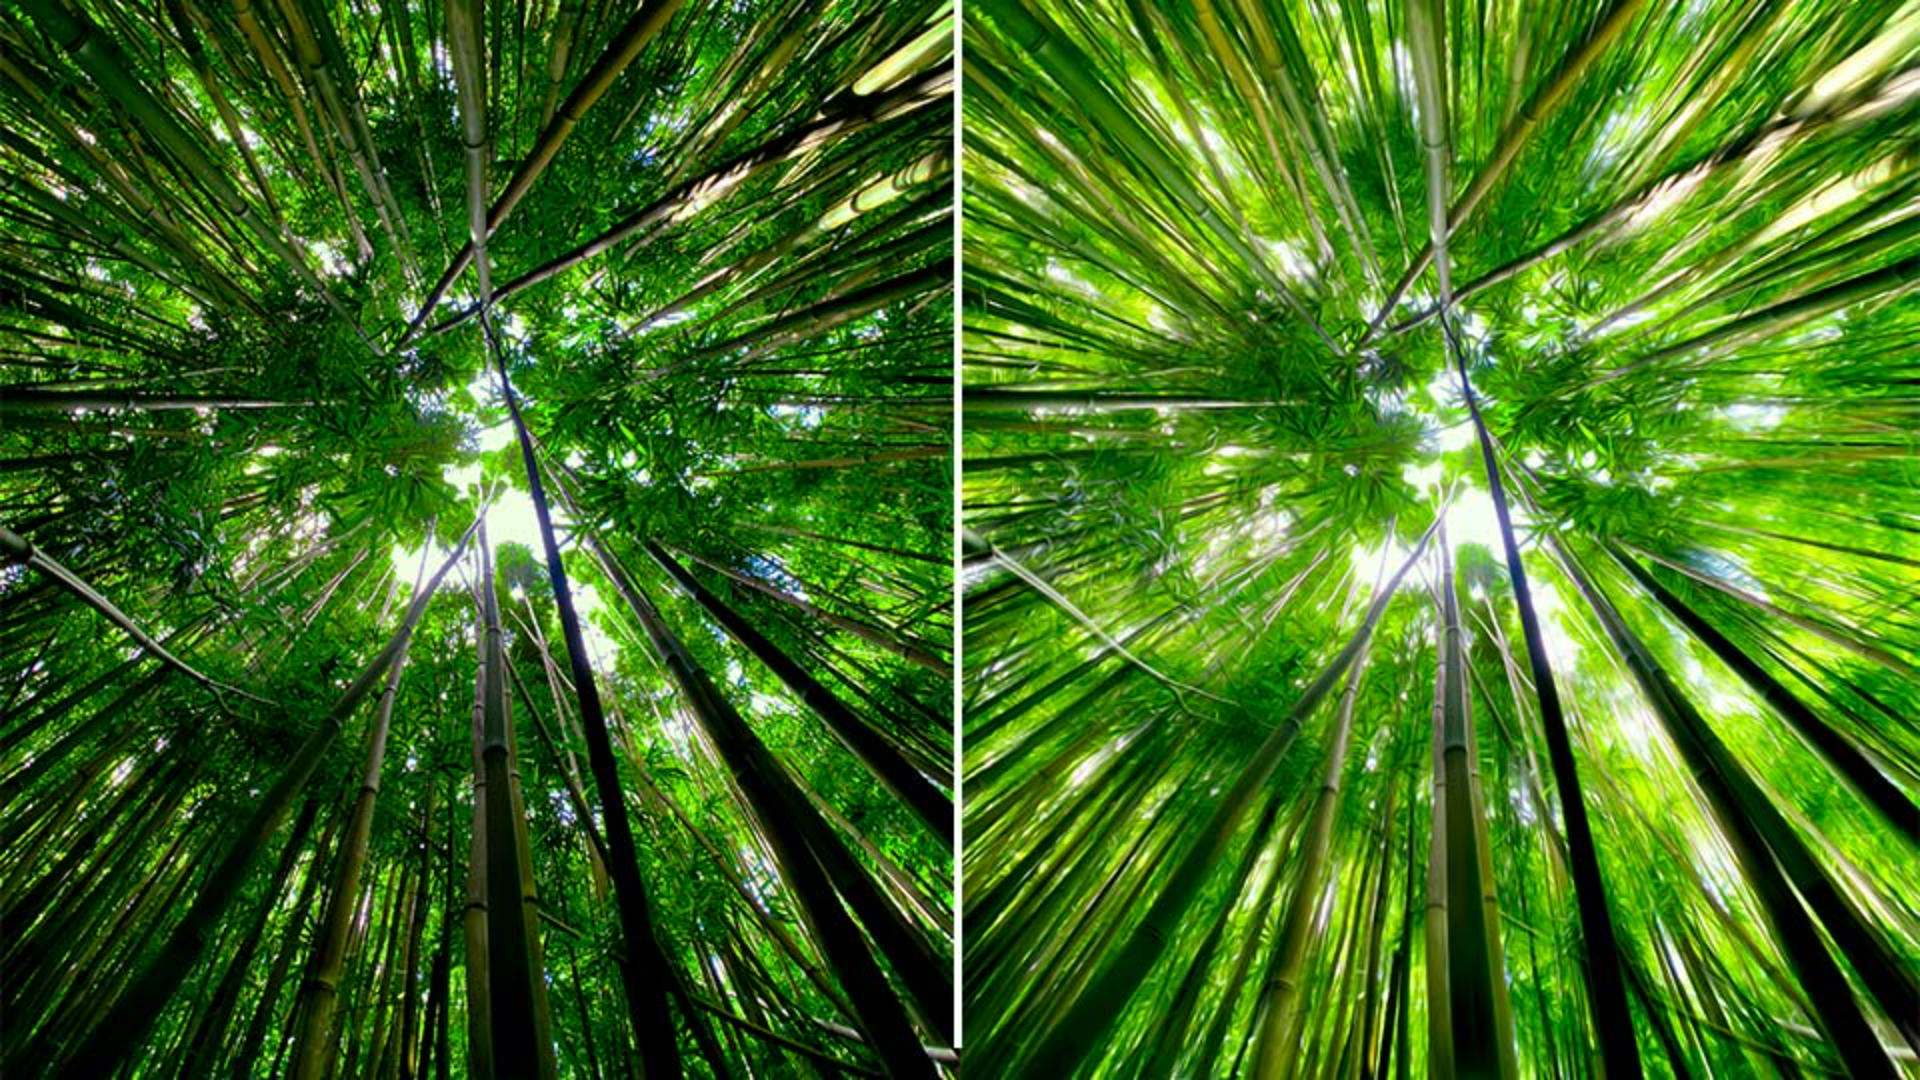
In this project, I'm going to start with this original image that I captured in Maui, Hawaii.
And we're going to end up with something that looks like this and turning it into an illustration using a combination of techniques here in Lightroom on the desktop, as well as Photoshop.
Let's start this project.
And let me show you how this is done.
It all starts here in Lightroom on the desktop.
Preparing the image in Lightroom for an illustrative look
Here's my original image.
And here's the version I've adjusted here in Lightroom.
As you can see here to the right, I've adjusted the Highlights, Shadows and Whites to bring out the detail in the image.
Next Vibrance.
In this project, I'm turning it into somewhat of an illustration.
So, I'm increasing the Vibrance in this case to quite a high value.
Here, you can see I've also adjusted Dehaze to quite a high value as well.
I want to increase the contrast in the mid tones.
And here you can see I've adjusted Noise Reduction, as well as Color Noise Reduction.
And finally, here, I'm removing chromatic aberration, I find that there's color fringing that often happens at strong contrasted edges, like you see here against the bright sky, and the darker bamboo.
Adjusting this can remove that problem.
Now here's a tip and technique that's crazy.
Stretching perspective with distortion and scale adjustments
I've selected Geometry.
And down here, I'm going to adjust the Distortion.
Check this out.
I'm moving the Distortion all the way over to a + 100.
Why am I doing that?
I'm doing that so I stretch the edges all the way around the image.
And in this case, I'm stretching the bamboo near the edge to stretch it out and to accentuate the lines of the bamboo as they move into the sky.
Now I'm going to go down and adjust the Scale.
Check this out.
I can then scale the image here and eliminate the distorted edges.
And here is the before.
And here is the after my color adjustments and the distortion adjustment.
Notice how it stretches the edges really nicely.
It's not always necessary, but I found that it really was a nice touch for this project.
Keep it in mind.
Next, I'm going to right click on the image
Sending the image from Lightroom to Photoshop
here in Lightroom on the desktop.
With a right click, I can access this panel and Edit in Photoshop... as you see here.
Let's switch over to Photoshop right here.
Here in Photoshop I'm going to add some special techniques to give it that illustrative quality.
First, I'm going to target the Background layer and drag it down here to the base of my image right down here, onto this + sign.
By doing so, I create a copy.
With this copy, I'm going to run a filter,
Creating an illustrative effect with the oil paint filter
under Filter, Stylize, Oil Paint...
You may have tried this in the past, but it really works well here with this bamboo forest.
Check this out.
If I apply the Oil Paint, and I set the Stylization, the Cleanliness and Scale and Bristle Detail all to a value of 10.0 and then click OK - check out the results - it really adds a nice effect to this bamboo.
Let's zoom back out to see our entire image.
Now this is okay, but it can be better.
Once again, I'm going to drag this layer that I've just applied the filter to - the Background copy - down to the base and create an additional copy.
Then let's set the blend mode by tapping on Normal right here.
Then I can reveal the blend mode of Screen.
Check it out.
When I apply the Screen onto the original image, it then lightens up the image, especially in the shadow area around the edge.
However, I think the center is a little bit too bright.
So, I want to reduce the amount of brightness in the center.
Enhancing the look with blend modes and masking
To do that, I'm going to apply a mask to this screen layer.
Tapping down here at the base, I can then apply a mask as you see here, and it's currently blank and it's white.
My current foreground color is black, and I'm now going to go in with a paintbrush, a soft round brush, Hardness of 0 and the Size is about 700 px.
I'm then going to tap with the brush in the middle.
Notice it got slightly darker.
Tap again, and it's even darker.
If I hold down the Option key and tap on the mask itself, I can reveal that I've applied this darkening to the center of the mask.
Thus, it hides the lightness of that top layer and gives me the image that I'm looking for.
I have the nice bright edges, but it's not burnt out in the center.
This is then my final image that I created from the bamboo forest.
It's a combination of Lightroom and Photoshop and the Oil Paint filter.
Give this technique a try if you want to add a really nice illustrative, bright quality to an image you're working on.
There you go.
Give it a try.