Introduction
[Dave Ko]: Ever work on a scene where it just needs that little touch of drama?
Well, rain is a great way to add some drama to any scene.
Today, I'm going to show you how to add rain to any scene using After Effects.
Hi, my name is Dave Ko, and I've been using After Effects for more than 25 years as a motion designer.
As a kid, I used to watch a lot of sci-fi, and that was a game changer for me.
That's what got me started in wanting to create visual effects.
I'll be working from the Adding Rain to Video project file.
Opening the project and preparing the scene
In there you'll find everything you need to follow along.
So let's open that up and make it rain.
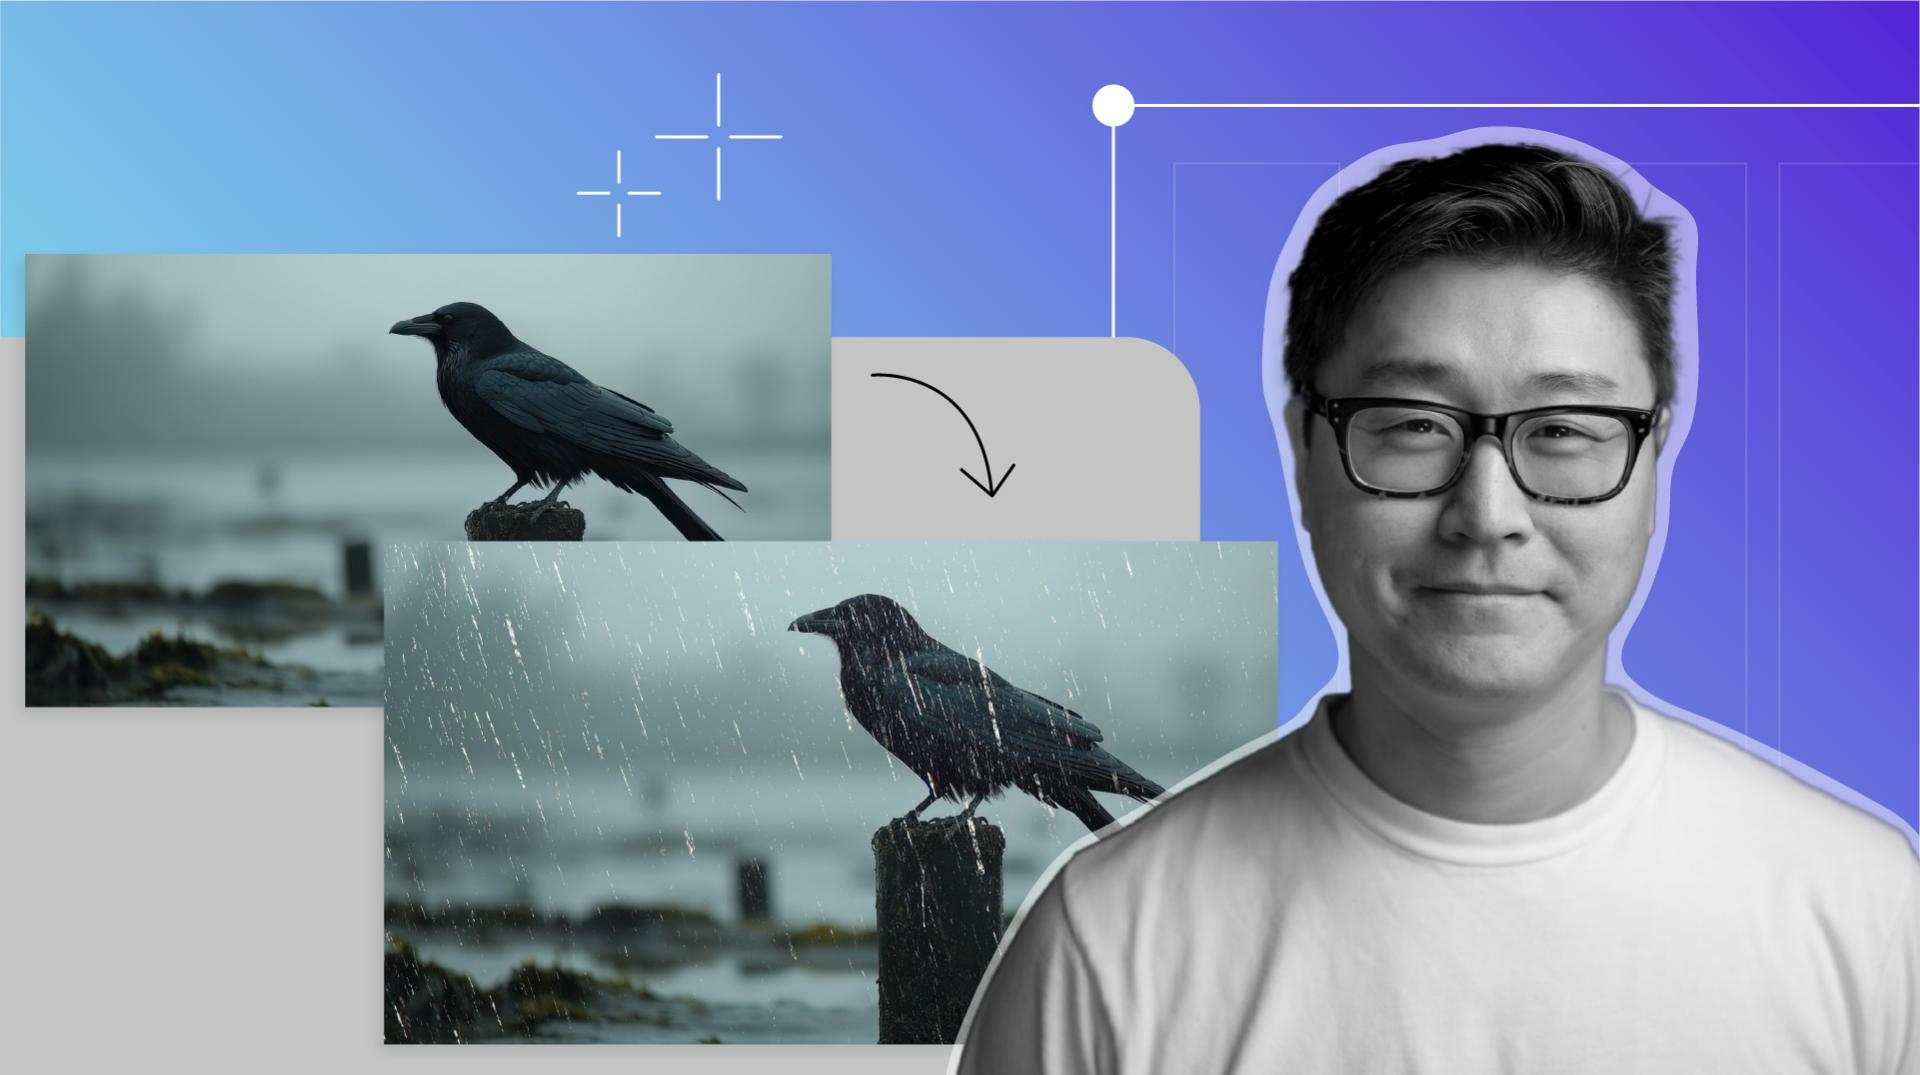
You'll notice I've added the Crow video to the Timeline already.
I like to select Fit for the Viewing Size, so the video is as large as it can be and will be automatically adjusted if I need more space in the Timeline panel.
Next up, we'll add an Adjustment Layer by going to Layer,
Adding the CC Rainfall effect with an adjustment layer
New, Adjustment Layer.
We'll press Enter and rename it Rainfall.
This will be our CC Rainfall effect layer.
With this layer selected we'll go to Effect, Simulation, CC Rainfall.
Playback the video and you should see the rainfall in the scene.
It's not bad as it is, but let's go in and make some adjustments to make it more realistic. [silent clip playing] The CC Rainfall effect should be in the Effects Controls panel in the top left-hand corner.
If it's not there, you can go to Window, Effect Controls: Rainfall.
In the Effect Controls panel,
Customizing rain properties for realism
there are a bunch of properties you can adjust.
Let's change the number of Drops to 1000 because 5000 drops are a little too dense for what we want.
The Size of the drops is a little too big, so let's try 2.
Since we're making a second Rainfall layer in the rain behind the crow, let's set the Scene Depth to 2000.
We'll leave the Speed at 4000, which is a nice natural looking speed for rainfall.
And we'll change the Wind to 100, so it's not falling completely straight down.
The Variation % (Wind) we'll set to 2, so there's some subtle variation in the wind direction.
The Spread we can change to 10, so there's some space and randomness to the rainfall.
The Opacity is looking pretty good at about 35%.
Too low, and it's hard to see the rain, but too high, and the rain starts looking thick and unnatural.
Now that you know what these properties do, feel free to play with the settings to find what works best for your project.
Creating depth by duplicating and adjusting rainfall
Now, we can duplicate this Rainfall effect layer to create more depth to our rain behind the crow.
Let's change the number of Drops to 4000, the Size of the drops to 1.5, so there are more, but they're smaller and more subtle.
We'll increase the Scene Depth to 5000, so the rain is not all concentrated in the front, but it's falling deeper into the background.
We'll lower the Speed slightly to 3500, because things further away tend to look like they're moving slower, and everything else we can keep the same.
To control where the rain appears, we'll add a mask.
Masking rain to separate foreground and background
Think of it as a shape that defines which parts of the rain layer stay visible.
In this case, we're giving the rain more depth by separating the rain that falls in front and behind the crow.
With our Rainfall 2 layer selected, we'll grab the Pen Tool up top and start drawing our mask around the crow.
Let's speed this up a little bit.
Masking takes a little while.
When we're done drawing our mask, we'll set our first Mask Path keyframe.
Let's also set the Mask to Subtract because we want to remove the rain that overlaps the crow.
When animating the mask of the moving crow, I like to set my Mask Path keyframes only where parts of the crow move from one position to the next.
Remember, patience is key.
This will take a bit of time.
The mask doesn't have to be perfect.
We'll add a Feather of about 50 pixels to take care of any imperfections and give it a more natural feel.
Let's switch to our Selection Tool.
When masking, I like to use the least amount of keyframes.
Not only is it less work, but it makes the motion smoother.
Once we're done masking, we can scrub through the Timeline to check that the Mask Path is tracking with the crow. [silent clip playing] That's looking good.
Let's press the Spacebar and play back our rainy scene.
I'll change the View Size to Fit.
You did it.
You created rain out of thin air like a digital magician.
I hope this video will inspire you to play with the other simulation effects After Effects has to offer. [silent clip playing]


