Introduction
Dust removal in Lightroom makes it possible to quickly identify and remove spots from your pictures that were created by dust on your camera sensor.
Hi, I'm Glyn Dewis, and in this tutorial I'm going to show you how to use the Dust Removal feature in Lightroom to automatically detect and remove spots in your photographs that are actually dust on your camera sensor and save you a ton of time.
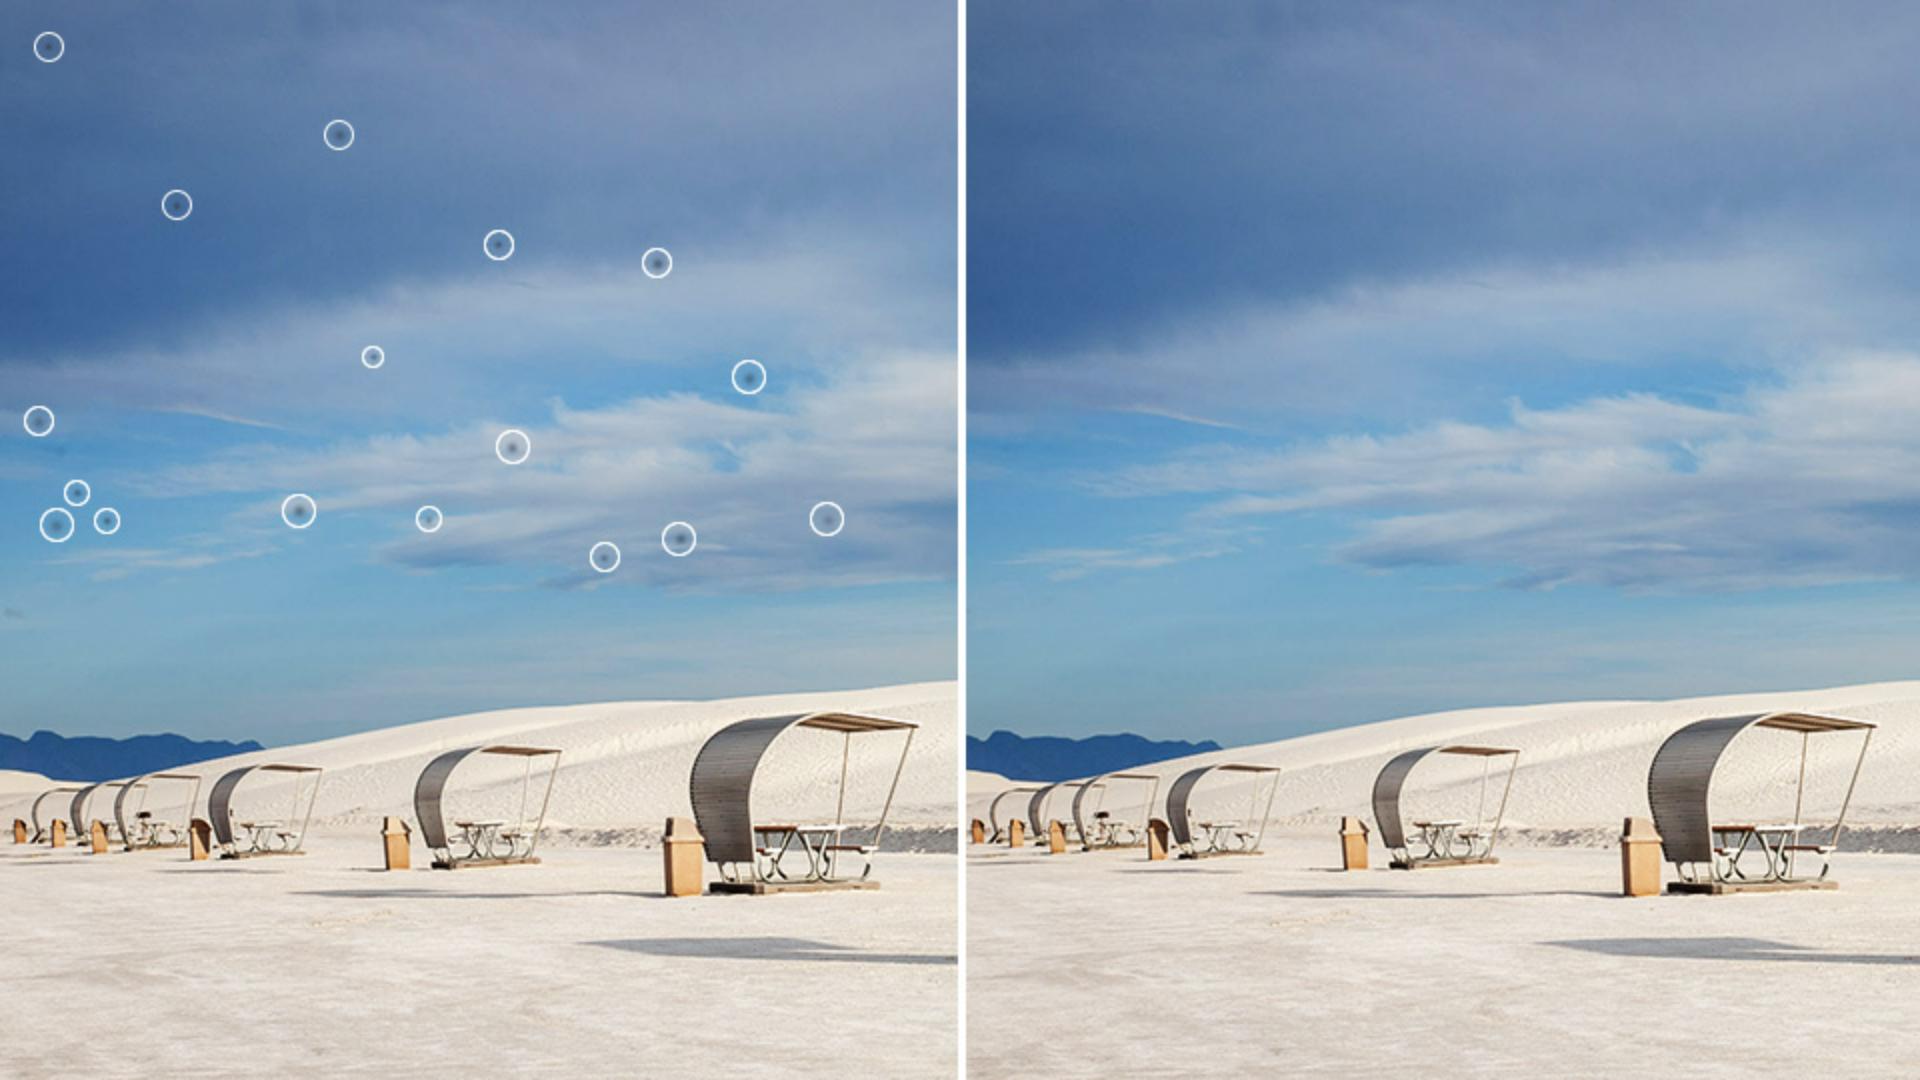
I'm going to show you this incredible feature on this image here, which as you can see when I zoom in, does have a few visible dust spots.
Before this Dust Removal feature was added into both Lightroom and Lightroom Classic, the way we would remove spots like this would be to go to the Remove section by clicking on the icon on the right-hand side of the screen, then click in the Visualize spots checkbox to turn on this black and white preview.
Then we would use the Remove Tool and brush over each dust spot individually to remove it, but depending on how many spots and marks there were, could mean this process would take considerable time.
Remove dust spots automatically with Distraction Removal
However, in the Distraction Removal section we now have Dust.
And this uses AI to identify and remove spots automatically.
I'll reset what I've just done.
Now take a look at how quick and easy it is to remove the dust spots using the AI in the Distraction Removal technology.
All we need to do is click in the Apply checkbox to turn it on, and then just a few seconds later, it's done.
All of the spots are gone.
Of course, if a spot was missed, we can still quickly manually brush over with the Remove Tool.
Customize the dust removal results
The AI Distraction Removal could potentially mistake a part of the image as a spot, when in fact it isn't.
It might be a distant flying bird, for example.
To cancel out a particular removal, all we need to do is select it, and then click on the Trash Can or press the Delete key.
Also, if one of the removals wasn't exactly to your liking, you could simply click on it and then press the Refresh icon here once or several times until you get the desired result.
Copy dust removal settings
An even bigger timesaver is that you can also copy and apply Dust Distraction Removal onto multiple images.
And that's because the technology uses AI and it will remove the dust spots particular to each image.
I'll press the letter G on my keyboard to go to the Grid view, so that I can see each of the images that I have, that I want to remove dust spots from.
And if I click on each, you can clearly see the dust spots.
I'll go back to the image that I've already used the Dust Distraction Removal on and click on it so that we can see it has this border now going around the thumbnail.
Then at the bottom of the screen we see the option to Copy Edit Settings.
However, because I only want to copy the Dust Distraction Removal, I click on the Gear icon to the right-hand side, and this is where I can choose which settings to copy.
As there are a number already selected, I'll click on Select here at the top and choose None so that no settings are chosen.
Then I'll come down to the Remove section and click in the Checkbox to select it.
I'll then open the menu and from inside, untick or deselect the other options so that Dust is the only one selected.
And then I'll press Copy.
Apply dust removal to multiple photos
To then remove the dust spots of all of the other images, I'll click on one to select it, then hold down the Shift key and click on the last one, which is the one here on the far right.
And doing so, we can see that each of the four images has the border around the thumbnail, meaning they are selected as well.
Then at the very bottom of the screen, I'll simply click on Paste Edit Settings, and just a few seconds later it's finished.
You can see now, as I show each of these other images how the dust spots have all gone.
Amazing.
That's the AI Dust Removal built into Lightroom and Lightroom Classic, which as you can see, works incredibly well, and like so many of the other features, can help save you a ton of time.
When to apply dust removal in your editing workflow
It's also worth mentioning that the best time to use this feature in your workflow is before you do any kind of masking, as this will prevent having to re-render any AI-generated masks.
But go take a look at some of your own images.
And here's something I thought I'd never say: Enjoy automatically removing any spots that you find.