Introduction
Have you ever wanted to edit and enhance one of your photos, but you just didn't know where to start?
Taking advantage of the many presets that are available in Lightroom can be an excellent way to begin.
And for some photos, a preset may be all that you need.
Hey everybody, Seán Duggan here from the Adobe Learn team.
In this tutorial, you'll learn how to use presets to enhance the entire image as well as parts of the photo, like the subject or the sky.
Let's check it out!
You can access the presets
Accessing presets and understanding preset categories
from the icon of the two overlapping circles in the upper right.
In the Presets panel, you can see that the presets are grouped into three categories Recommended, Premium, and Yours.
Applying premium presets and adjusting their intensity
Let's start with the Premium presets.
These are a collection of high-quality presets, many that are created by professional photographers that are curated and organized into categories for specific looks or for certain types of photos.
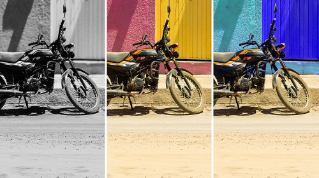
Let's try out some of the Portraits: Edgy presets on this photo.
As you hover the cursor over each preset, you'll see it previewed on the main image.
If you find one that you like, select it to apply it to your photo.
You can adjust the Amount slider to increase or decrease the effect of the preset.
If you want to remove the preset, just click the Undo icon at the top of the Presets panel.
If you want to compare a before and after view, click the Show Original icon in the lower right corner.
Click this again to return to the view with the current edits.
Using adaptive presets to edit subjects, skies, and backgrounds
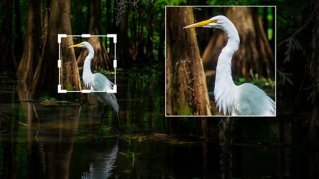
At the top of the list, you'll find the Adaptive presets.
These presets are designed to target specific parts of an image and are ideal for making changes to portraits, the subject in an image, the sky or blurring the background.
I'll open the Adaptive: Subject group, and I'll choose the Pop preset to brighten up the subject.
And you can see that the change is only affecting the subject in this image.
That looks pretty good.
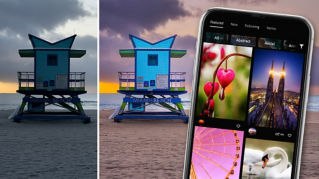
Now let's check out the Recommended presets.
At the top of the panel,
Exploring recommended presets and learning from edits
you can choose from several style groupings such as Subtle, Strong, B&W, Cinematic, and so on.
Let's check out some of the B&W presets.
A preset is just a saved collection of settings.
If I open the Edit panel by clicking this icon on the right, you can see that some of the sliders have been adjusted, and if I move the cursor over the other presets, you'll see the settings change.
You can always modify the look of a preset by making further adjustments in the Edit panel.
If you like the look of a certain preset, you can click the More like this button on the preset thumbnail to see additional presets that will create a similar look.
Now, you might be wondering where these preset recommendations come from.
Well, it's a pretty cool system.
Here's how it works.
Lightroom analyzes the exposure, colors, and content of your image, and then it finds similar photos that have been shared in the Community section, and it's suggesting the edits from those photos.
The idea behind this is that if certain edit settings work well for a similar photo, then they might work well for your photo too.
If you really like one of the Recommended presets and want to easily find it again, click the three dots icon on the thumbnail to save the preset to your presets.
You can even see the photographer who created the preset, and you can view their profile in Lightroom Community and follow them, if you want to see more of their images.
The section for Your presets
Saving, reusing, and importing your own presets
is where you can find the basic presets that come with Lightroom, and you can see that these are grouped into categories.
This is also where you'll find any community presets that you save from the Recommended presets, as well as the User Presets, which are the presets that you create by capturing the saved settings from an image that you've adjusted.
To save a preset from an image that you've edited, locate the photo that you want to use and in the Your presets panel, click the + icon.
In the dialog that appears, you can choose which settings you want to save as part of the preset.
Now for this image, I'm mainly interested in saving a preset that has this black and white treatment, as well as the specific sepia-blue color look that I've added.
I can see that the Profile: B&W 01 and the Color settings that I used to create this look are checked.
For this preset, I'm going to turn off the Light settings, just because the brightness adjustments that I made are pretty specific to this particular photo.
Then I'll give it a Name and click Save.
And now that preset appears in the User Presets section, and I can apply it to other photos.
Let's find another portrait that it might work with.
There, that looks pretty good.
If you've purchased a collection of presets, you can add them to Lightroom by clicking the three dots icon at the top of the Presets panel and choosing Import Presets...
Presets are a great way to jumpstart your image processing or add a final dash of visual seasoning to a photo.
And if you take time to see how the Edit sliders have been adjusted to create a preset, they're also an excellent way to learn more about image editing.
Take some of the presets for a spin and see what new creative paths you can discover.
I'm Seán Duggan and I'll see you in the next video.