#2c2c2c

Animation FEATURES

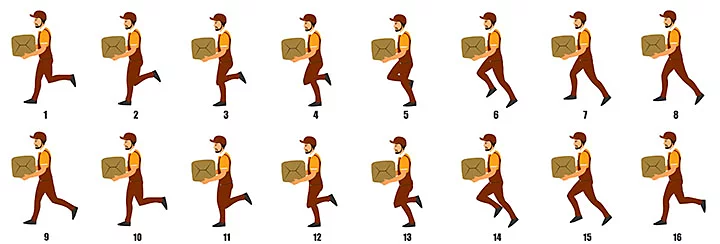
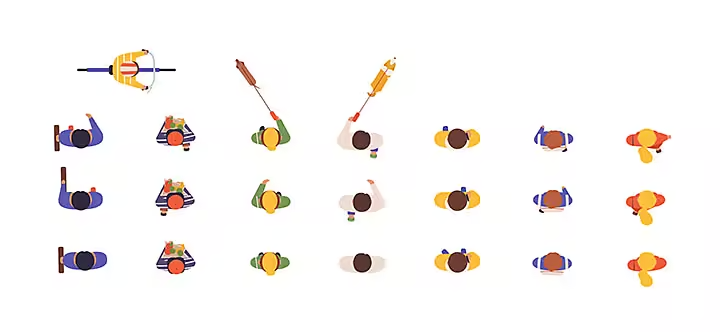
What is a walk cycle and how can I create one?

Creating a walking cycle is a great way to practise your animation skills. Knowing how to animate a walk is a key skill in the animator’s arsenal and one you’re likely to use regularly in your work. Discover how to get started with this process and create your own walking animations in this guide.

Explore Animation

basic walk cycle drawing

What is a walk cycle?

A walk cycle is an animation technique using illustrated frames stitched together to create a sense of movement. The series of frames contains consecutive drawings of a walking figure. When combined together, the animation appears to walk.

Why is a walk cycle important?

Walk cycles are a good way to visualise the basics of human movement. They’re also an efficient method of animating the act of walking. Once you’ve nailed the cycle, you can just repeat it, rather than animating each new walking scene again. However, getting the movement of walking to look natural can be difficult without the right method and lots of practice. That’s where walk cycles come in.

The way a character walks conveys much more than movement. After all, you can tell a lot about a character from their body language, gait and walking pace. So it’s important that you ensure these elements are reflected in your work.

These illustrations are used in a variety of animation practices, including 2D, 3D and many forms of cartoon creation. Whether you’re working with 3D digital models or 2D sketches, you need to know the basics to get the best start.

https://main--cc--adobecom.hlx.page/cc-shared/fragments/seo-articles/animation-software-blade/centered-text

What are the four basic walk cycle stages?

1. Forward contact point.

The contact position is the start and end-point of your movement. Wherever your character’s front foot hits the ground, that’s your forward contact point.

Your character should be positioned with their back foot on the ground and their front leg extended in a walking motion. The front foot should be hovering just above the ground, as if about to land. Keep some natural bend in the leg and consider how your character’s weight, mood or pace might affect their movement ahead of the next step.

2. First passing pose.

The passing pose is the moment one leg passes the other. Here, the front foot is on the ground, while the back foot is raised striding forwards. It should be a reverse of your forward contact point, as your character shifts their weight into the opposite leg ahead of moving onwards.

3. Back contact point.

At this point, the position of your character’s legs should have reversed. Now the back leg is planted firmly on the ground, out in front. The front leg, meanwhile, is raised off the ground, towards the back of the body.

4. Second passing pose.

The initial cycle completes as your character transitions into the second passing pose. Here, the original front foot moves back to the front. The original back foot returns to the rear. The two legs crossover, ending in the same place as the sketch in step one began.

Other elements to consider.

Some animators include an additional separate step in their walk cycle creation. Though it’s just as easy to incorporate it into one of the four steps above. The Up and Down poses are essential for showing movement in the rest of the body. Animating the legs is great, but our heads, torso and arms move as we walk. You’ll want to animate these too as they bounce along - up and down.

Examples of animated walk cycles.

There are several types of walk cartoon, covering a range of mediums and dimensions including:

2D.

2D walking animations usually involve sketches and illustrations. You’ll need to scan these creations into a computer to animate them digitally or you could use traditional Cel painting techniques to animate frame-by-frame.

3D.

3D techniques involve animating a 3D character within software. For this method, you’ll need to build your figures in a digital 3D render. From there, you can map out your character’s movement and gait in specialised software.

Creature.

Creature walking cycles use similar processes to human animations. However, depending on the creature in question, you might find that you have to animate four legs, eight or even more. It’s good practice to do your research beforehand to understand how particular creatures move and the way this movement affects their body.

Tutorial: how to make a walk cycle in 8 steps.

Start your walk cartoon creation by following the steps below.


1. Do your research.

Look for pre-existing examples of walk cycles to get a feel for the sort of style you’d like to recreate. Watching other animators and artists can help to inspire your own walks. Plus, you’ll get an idea for how the finished product should look.


2. Map out the route.

Mark out your contact points. These are where your character’s feet will hit the ground as they move forward.


3. Illustrate the forward point.

Remind yourself of the forward point position above. This is where your character begins their journey. The front leg should be bent and raised out in front, with the back foot firmly planted on the ground.


4. Draw the passing position.

Add your passing position next. This movement should appear as a seamless continuation of your forward point. The front leg should be heading backwards and the back leg lifted, heading forwards. This is the stage in which your legs will crossover.


5. Animate the body.

Now, you’ll want to ensure that you animate the rest of the body. Arms swing when we walk, heads bob and torsos bounce. Getting all these little movements in will make your walk seem more natural and believable.


6. Add bend and weight.

Your character’s weight will affect how they move. Make sure you’ve accommodated this in your illustrations. Consider how your figure’s knees will bend, how their hips will rotate and how their feet will absorb the impact as they meet the ground. You’ll want to sketch all these elements in to ensure a more natural look.


7. Return to the back contact point.

This is where your legs have completed their crossover. The original front leg should be at the rear of the body, slightly lifted. The original back leg is firmly planted in front.


8. Crossover again.

Repeat the crossover process, but in reverse. Don’t forget to repeat any adjustments you made to heads, arms and other areas of the body for this second movement. Once you’re done, your figure should end their cycle in the same position as they started.


https://main--cc--adobecom.hlx.page/cc-shared/fragments/seo-articles/animation-software-blade/centered-text1

Walk cycle tips.

  • Keep your contact points the same. These are the parts of the frame where your characters feet hit the floor.
  • Consider how weight affects gait. The perceived ‘weight’ of your characters would affect how they walk, in real life. Make sure your illustrations convey similar notions.
  • Plan ahead. Know where your character is heading. Mapping the direction of travel first will give you more control.
  • Revise and redraw. If things don’t look right the first, second or even tenth time, don’t be afraid to revise your drawings and remodel your characters.

Walk cycle FAQs.


How many frames is a walk cycle?

How many frames feature in your walking animation will depend on how fast you want your figure to move. Usually, brisker walking pace means more frames. The standard number of frames to use is eight.


How do you animate a 2D walk cycle?

You’ll need animation software to edit your 2D illustrations. Scan your drawings using a smartphone or tablet to convert them to a digital format suitable for computer-based animation.


What makes an effective walk cycle?

Getting the crossover right, the moment one leg passes the other in stride, is key to an effective walk cycle animation. Each frame should have just enough movement that the overall picture appears smooth in motion. Don’t forget to animate the arms, torso and head too, as all of these body parts move when walking. Not doing so will make the image seem unnatural and unbelievable.


Discover more about animation.

https://main--cc--adobecom.hlx.page/cc-shared/fragments/seo-articles/get-started-notification-blade