Adjustment layers let you edit without permanently changing your image
[Rob de Winter]: Adjustment layers are one of the most powerful things in Photoshop that let you change the look of your photo and make variants for your clients without ever touching the original.
You can adjust colors, contrast, brightness, add grain, make things black and white, and because it all lives on a separate layer above your photo, you can tweak or undo anything at any time.
My name is Rob de Winter, Adobe instructor, designer, and author from the Netherlands.
In this video, I'll show you three ways to use adjustment layers: apply it to your whole photo, apply it to a specific area using a selection, and apply it to just one single layer using a clipping mask.
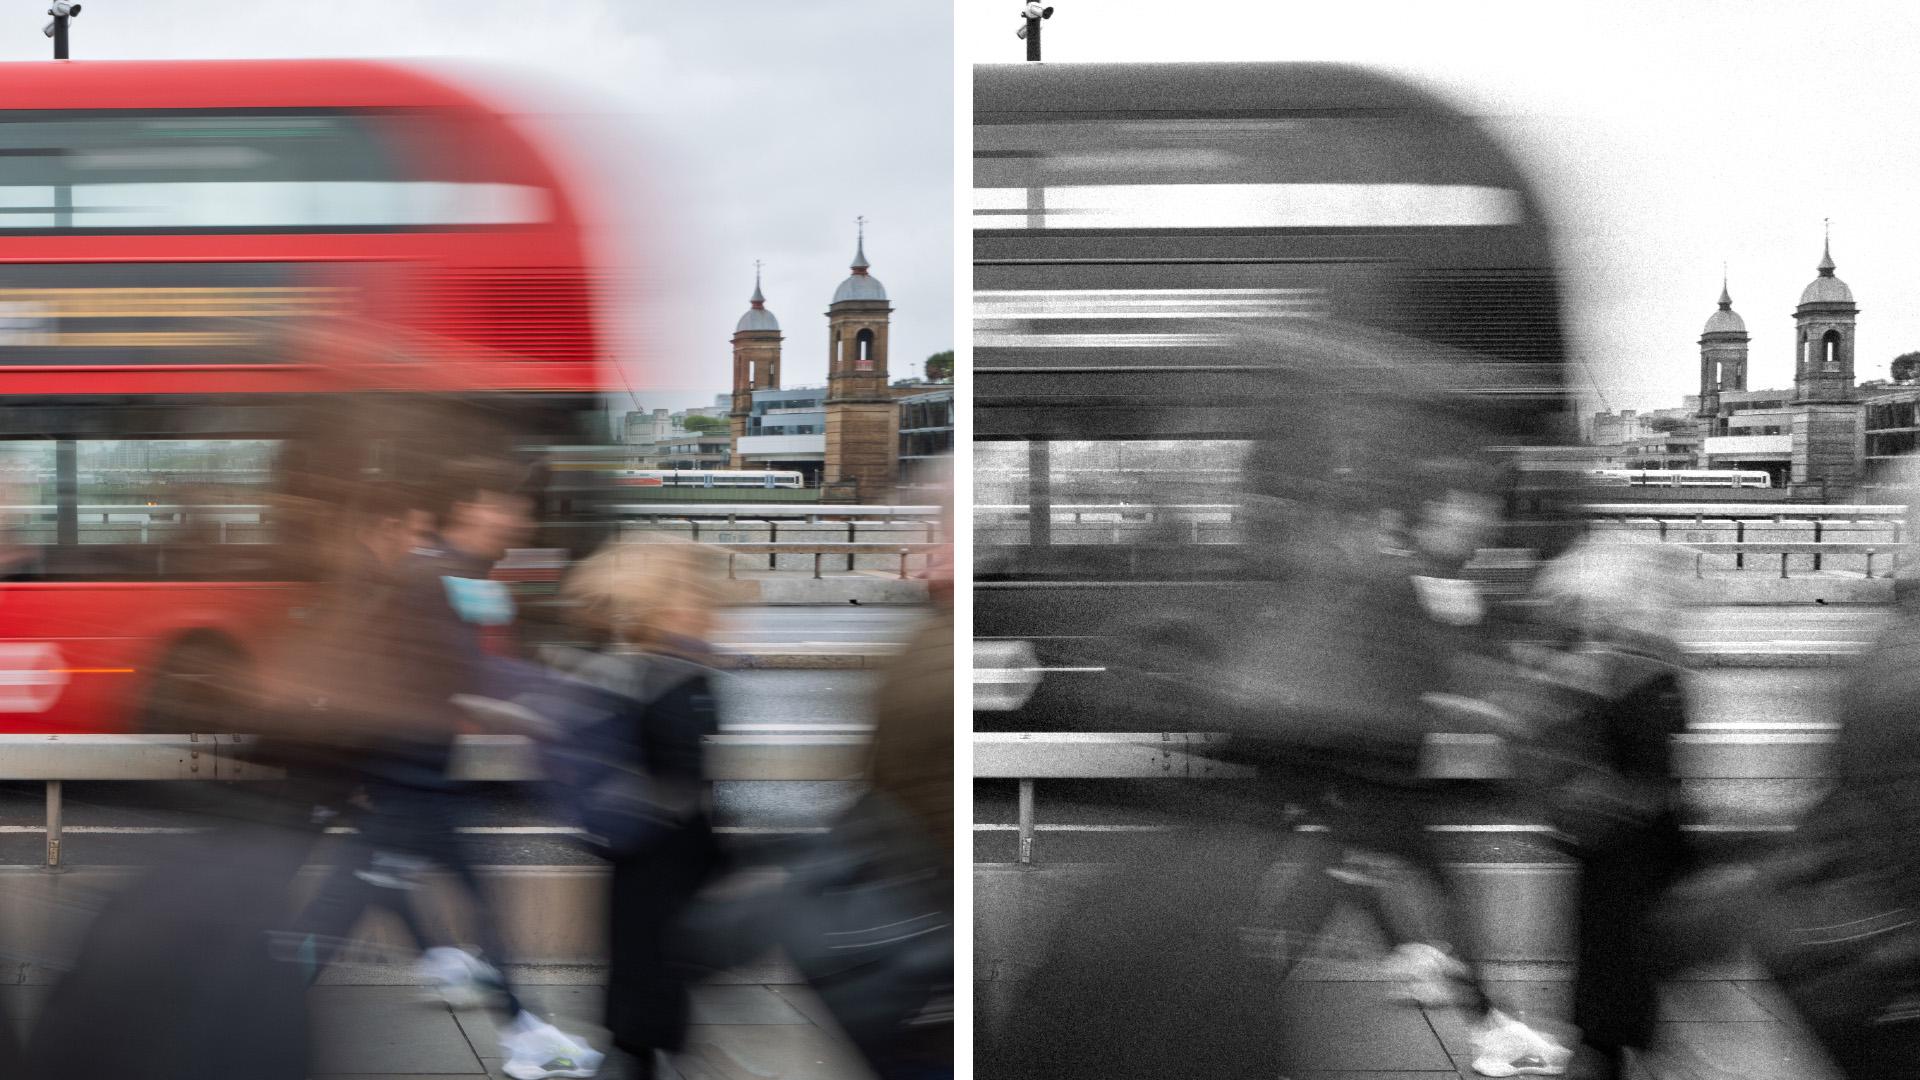
Here's a photo I took in London.
Adjust the entire image to quickly shape mood and direction
There's a lot of movement in it, and I think that works really well with some added grain like old-school film grain.
Photoshop recently added a brand-new grain adjustment layer, so let's use that.
Make sure your Background layer is selected.
Go to the Adjustments panel.
If you don't see it, go to Window and click Adjustments, and now choose Grain.
The Grain layer appears above your photo and immediately affects everything below it.
In the Properties panel, drag the Amount slider to add grain.
You can also increase the Size and Roughness of the grain for more impact.
If you want to compare before and after, click the Eye icon in the layer to toggle it on and off.
Now let's add a second adjustment layer on top.
Let's make the photo black and white.
Click the Adjustments panel again and choose Black & White.
The whole photo goes black and white instantly.
In the Properties panel, you can fine-tune individual colors.
For example, drag the Reds slider to make the red bus in the background darker or lighter, and drag the Yellows slider to adjust the yellows.
The key thing about adjustment layers is that they stay editable.
Click back on the Grain layer and you can still change the Amount of grain.
Or click the Black & White layer, and you can still adjust the black and whites.
Nothing is permanent.
If the photo feels too dark overall, add one more adjustment layer - Exposure.
Drag the Exposure slider up slightly to brighten the whole result.
All three adjustment layers are now stacked above your original photo.
And if you want to go back to your original photo, simply hide or delete the adjustment layers.
Here's a photo I took in Greece.
I think the scene is beautiful, but the sky could be much more contrasty.
Right now the clouds are barely visible and the sky is too washed out compared to the rest of the photo.
I want to bring out those clouds and make the sky bluer without affecting the rest of the photo.
Select what you want to edit, then apply an adjustment layer to control where edits
The trick is to make a selection first and then add the adjustment layer.
Select the Object Selection tool from the Toolbar, hover over the sky and Photoshop detects it automatically.
Click to select it.
With the sky selected, open the Adjustments panel again and choose Clarity and dehaze.
This is a new adjustment layer in Photoshop.
Dehaze is designed to remove haze, but it works great for making cloudy skies more dramatic.
Clarity increases local contrast.
In the Properties panel, drag the Dehaze slider up - around +30 is already a big difference.
Add a little Clarity on top of that.
Toggle the layer on and off to compare before and after.
The clouds become much more visible and the contrast between the house and the sky improves a lot.
You can do the same for the sea.
Select the Background layer and then click on the sea with the Object Selection tool.
Open the Adjustments panel and choose Color Balance.
In the Properties panel, push the Cyan and the Blue sliders to add more blue to the sea.
The result ties the sea and the sky together nicely.
The workflow here is always the same:
Enhance key areas to guide attention and add depth
make a selection first and then add the adjustment layer.
Photoshop automatically creates a mask so the adjustment only affects the selected area.
Use a clipping mask to isolate edits to a single layer
Here's a photo from Spain with a paraglider added as a separate layer above the background.
I want to change the color of the paraglider's sail without touching anything else in the photo.
A regular adjustment layer would affect everything below it, and the solution is a clipping mask.
Click on the paraglider layer to select it.
Open the Adjustments panel and choose Hue/Saturation.
You'll see that dragging the Hue slider changes the colors of your entire photo.
To clip the adjustment layer to only the paraglider layer, hover your cursor between the Hue/Saturation layer and the paraglider layer in the Layers panel, hold Alt on Windows or Option on macOS; you'll see a Clipping icon appear.
Click to clip the layer.
And alternatively, you can also click the Create Clipping Mask button in the Properties panel while the adjustment layer is selected.
Both methods do the same thing.
Now the adjustment layer only affects the paraglider.
In the Properties panel, click the red color swatch to target only the red tones.
Drag the Hue slider to shift the red into a different color like purple.
You can also adjust the Saturation to fine-tune the intensity.
Because we added a clipped adjustment layer, the background stays completely untouched; only the paraglider changes.
You've now seen three ways to use adjustment layers in Photoshop: on the whole photo, on a selected area, and clipped to a single layer.
They're non-destructive, stackable, and always editable, and once you start using them, you'll wonder how you ever worked without them.
Now give it a try yourself with your own photos.
I'm Rob de Winter, and I'm looking forward to seeing you in other Adobe videos.