Introduction
Have you ever taken a photo where the horizontal and vertical angles were just a little askew?
The geometry controls in Lightroom may be just what you need to fix the perspective and get the image looking the way you want.
Hi, I'm Seán Duggan with the Adobe Learn team.
We've all taken photos like that, especially in scenes that contain architecture.
Let me show you how to use the Upright feature to correct the perspective and fix the tilted angles in your images.
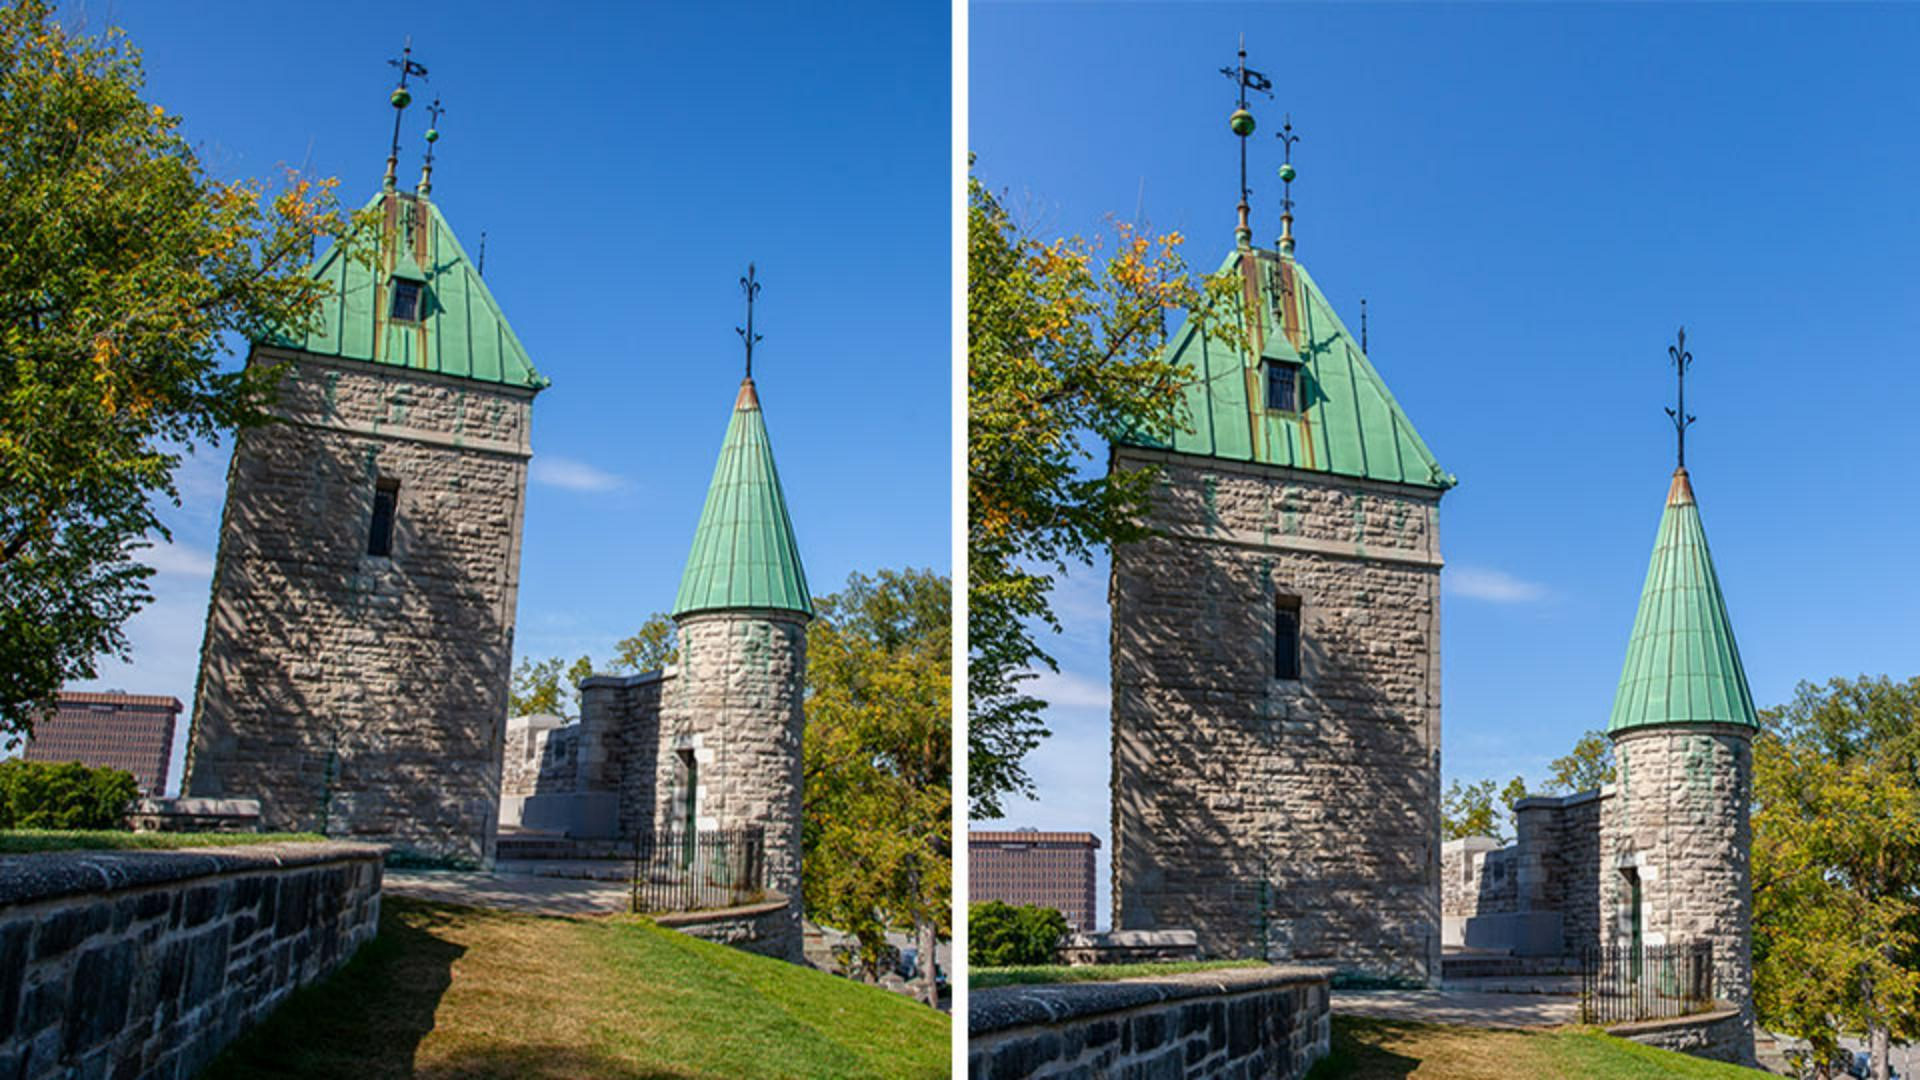
I like everything about this photo of the old fortifications in Quebec City, except for the tilted angles on those towers.
Fortunately, it's easy to fix that.
Before I get to the geometry corrections, the first thing I'll do is open the Optics panel
Preparing the image with optics and lens corrections
and make sure that Remove Chromatic Aberration and Enable Lens Corrections are both checked.
This will ensure the best results with the geometry adjustments.
Next, I'll click the Crop Tool and in the Geometry section is the Upright menu, which offers some presets for perspective correction.
Below that are the manual Transform adjustments.
For this tutorial, we're going to focus on the Upright feature.
Using upright presets for perspective correction
I always start with Auto.
I can select that in the Upright menu or by clicking the Magic Wand icon.
And Auto did a great job.
For many photos, this may be all that you need to do.
By the way, if you hover the cursor over the name of the Upright preset, you'll see a tooltip that provides an explanation of what it's doing.
Now let's check out some of the other options.
I'll try Vertical next because I want to compare it to Auto.
I really like how the towers are looking with Vertical.
As the name suggests, this option identifies the vertical lines in the scene and does its best to ensure that they really are vertical.
The only issue is that we have these empty areas in the lower corners that need to be cropped off.
To fix that, I'll click the Constrain Crop checkbox, which applies a crop that is the same aspect ratio as the original photo.
For this image that works okay, but for some photos, you may choose to use the Crop controls at the top of the panel and adjust the crop to a different Aspect ratio.
To apply this correction and the crop, I can tap the Enter key on the keyboard, or I can just click the Edit icon to exit the Crop panel.
Let's move on to another photo.
In this image, the perspective is off
Comparing upright options across different images
because I was viewing the wall at an angle and also pointing the camera upwards.
I've already enabled the options in the Optics panel, so let's take the Upright presets for a spin and see what they can do.
First, let's try Auto.
Much better, but the image still looks a bit askew.
For this photo, Level will not have much of an effect because there's no horizon line in the scene to level out.
Vertical doesn't work at all with this scene, so let's see what Full will do for us.
Now we're talking; that actually looks great, and it's exactly what I was hoping for.
Now, if I click and hold the Eye icon to compare this to the original image, you can see that there is some significant cropping being applied.
So just be aware that depending on the photo, the Upright corrections may result in some image area being cropped.
For this image, that's not a problem, and I think it looks great like this, but for some photos, it could be an issue.
And here's a photo tip for you.
When you're out with your camera and you think that you may take advantage of this Lightroom feature to correct the perspective in a shot, it's better to shoot a view of the scene that's a bit wider, and include some extra image area that can be cropped off when the correction is applied.
Let's look at one last example.
With this image, I've already applied the Auto Upright preset, and if I click and hold on the Eye icon to show the original, you can see that it's already much better.
Upon closer inspection with the grid overlay, however, I can see that the verticals are not perfect, and more importantly, the horizontal edges on the side of the marquee are still not horizontal.
For situations like this, the Guided Upright feature may be just what you need.
Fine-tuning perspective with guided upright
You can access Guided Upright either from the Upright menu or from this icon next to the Auto icon.
To start, I'll designate a line in the image that I want to be vertical.
The tool has a magnifying loupe to help you precisely place the guideline.
I'll click and drag down to align this with the actual edge of the building and then release at the bottom.
You won't see any change with just one guideline; you have to place two before you'll see a correction.
Next, I'll go to the edge of the vertical theater sign and I'll do the same thing.
And with the magnified view, I can place this very precisely along that edge.
And when I release the cursor, the first correction is applied.
So far, so good.
But I also want to place horizontal guides, so this side of the theater marquee is squared up.
It's the same procedure.
Click and drag to place a horizontal guideline along the top edge of the marquee, and then I'll do the same for the lower edge.
Much better.
If you want to remove a guideline and start over, just click the line to select it and then tap the Delete key on the keyboard.
Practical tips and final review
Before we wrap this up, here's one final tip.
Earlier with this example, I mentioned that I was using the grid overlay to evaluate the vertical and horizontal lines.
To cycle through the different overlays for the Crop Tool, just tap the letter O on the keyboard until you find the overlay you want.
The next time you find that the angles in an image are a bit askew and in need of a perspective correction, give Lightroom's Geometry and Upright controls a try.
I'm Seán Duggan with the Adobe Learn team, thanks for watching.