Introduction
If you're just starting - on your creative journey in Illustrator or maybe you're more experienced, one drawing tool you should get to know - is the Curvature Tool.
It's a more precise drawing tool, - it can be.
And creating with - it is easy and intuitive.
You click to make points and Illustrator figures out - the curve between those points.
You can even make straight lines with it - and edit any path.
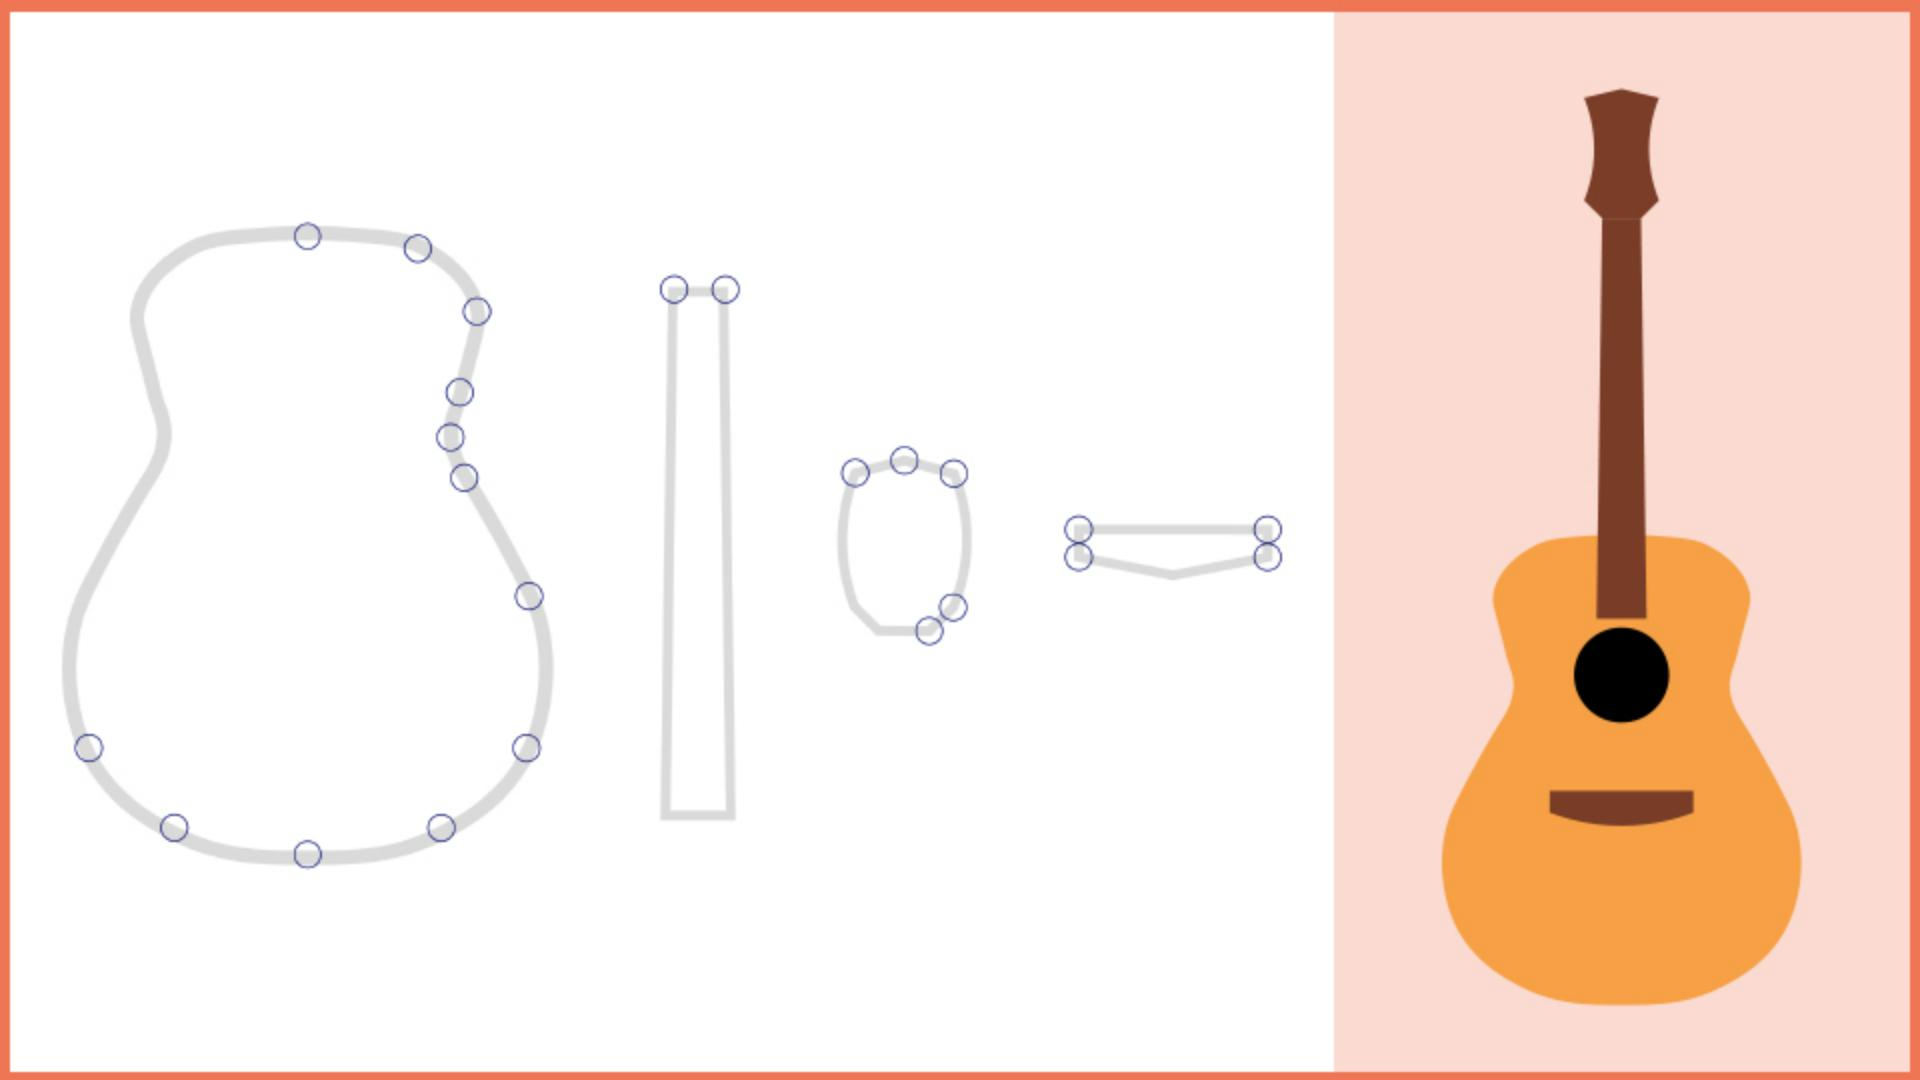
So let's explore the Curvature Tool - by creating the parts of this guitar.
Along the way, you'll learn everything - you need to know to be proficient with it.
Drawing smooth curves with the curvature tool
So select the Curvature Tool - in the Toolbar, Come out to the parts of the guitar, and we're going to start - by drawing the main guitar body here.
I'll zoom in a little.
Before you start creating, - you should set the Fill color and Stroke.
Make sure the Fill is None.
Now let's set the Stroke weight to 3.0 so it's a little thicker and has a Stroke color of black.
Now, I added some circles - to this template to show you where to add points, - but only for the first part of the path.
The idea is to explore - and see what happens.
Starting here, click and release - to start the shape.
Come to the next point, click and release.
Now move the pointer.
Do you see the curve?
Illustrator lets you know - what your path will look like with the preview, - if you were to click right now.
If you come down here to the next point - and look at the curve, it's not perfect, but it's close.
Click and move the pointer away.
Continue down the shape here, - clicking and moving to see the path.
Now, if you make a mistake, - maybe you put a point in the wrong spot, you can simply drag the point - back into place.
Like that.
Now, when you get to this point, I want you to use the points - you added on the other side to guide you.
I'll start adding mine.
When you reach the first point again, a circle appears next to the pointer, which means the path will close - if you click.
So click.
Let's try this shape next, - it's the neck of the guitar.
Creating straight lines and corner points
It's basically a bunch of straight lines.
So start by clicking here, move the pointer over to this other corner and the points need to be aligned - with each other.
So to do that, - you can press the Shift key and click.
Move the pointer away and you'll see - that the path is once again curved.
But we need a straight line.
You can double click - on a point you already made to convert between a curve - and a corner or back again.
So double click this point - and move the pointer away.
Now come down here and same thing, - it needs to be a corner.
This time you're going to make - a corner point by pressing a key while you make it.
So come to this point, - press the Option or Alt key.
You can see this little line - next to the pointer?
It means it's going to be a corner - or a straight line, Click and that point is a corner.
The next point needs to be aligned - with the last point and it needs to be a corner.
So we're going to press two keys.
We're going to press Shift and Option - or Shift and Alt, then click.
Remember, Shift aligns the point - and Option or Alt makes it a corner.
Return to the first point and Option or Alt click to close the path - and make sure it's a corner, moving on to the end of the neck here.
Now you'll see a little bit more - about editing points on a path you create.
Editing paths by adding and refining points
Come here and start by clicking, then to make a corner here, Option or Alt click the next point.
To align this next point - and make it a corner, press Shift and Option or Shift and Alt, then click.
At this point the path needs some help.
It's straight, - but it should actually be curved.
So you're going to add another point - to curve it.
Move the pointer back over the path - and a + will show next to the pointer.
Click to add a new point, then you can drag it anywhere.
In this case to follow the path.
Aside from clicking, to add a point - or clicking to select a point, you can also select the point and press Delete or Backspace - to remove it.
Let's keep going.
Option or Alt click - to add a corner point here.
Now we need to get a corner point that's also a line here, - so what should we hold down?
Press Shift Option or Shift Alt - and click here.
Press Option or Alt and click here - to make another corner.
To make the curve, - click here on the template path.
To make a corner press Option or Alt - and click.
To end the path, come up here and press Option or Alt - to click and keep the corner.
Completing complex shapes with mixed curves and lines
Now the last shape, - this bridge, it's more straight lines.
So starting here to make a corner - press Option or Alt and click.
To align this point to the first - and make it a corner, hopefully you're starting - to remember these press Shift Option or Shift Alt and click.
Same here, press Shift Option - or Shift All and click.
Now we want the path to go here, - and it's got to be a straight line.
So press Option or Alt and click.
Make another straight line over here, press Option or Alt and click.
And to finish, move the pointer over the first point here.
Now it's already a corner, - you can see the blue preview.
If you were to press - Option or Alt right now, it would actually become a curve.
So simply click.
That's it.
You've gone through the basics - of working with the Curvature Tool.
It's time to put your skills to the test.
So you can either recreate - what we just did or come over here to the right and try creating - some of these shapes with the Curvature Tool. -