[Kenneth Hines Jr.]: ¿Quieres mejorar en posprocesamiento para crear imágenes creativas y dinámicas?
Quizás la herramienta Curvas sea la solución.
Soy Kenneth Hines Jr., embajador de ZEISS.
Hoy vamos a ver cómo funciona Curvas y cómo la herramienta, una de las más potentes de Lightroom, puede ayudar a crear imágenes más dinámicas.
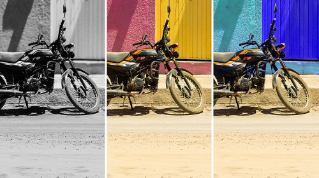
Con Curvas puedes ajustar los valores tonales de las imágenes.
Hay dos formas de hacerlo: con la curva de puntos y con la curva paramétrica.
Comencemos por la curva paramétrica, que ofrece una gran representación visual de cómo cada parte de la curva influye en los valores tonales de una foto.
Con la curva paramétrica, puedes arrastrar arriba o abajo un punto de la línea para aclarar u oscurecer la imagen.
Puedes mover los reguladores de debajo para seleccionar partes concretas de la gama tonal.
Puedes hacer ajustes similares con los reguladores del panel Luz, pero Curvas ofrece mucho más control.
Veamos ahora la curva de puntos.
En la curva, haz clic en la línea diagonal para añadir puntos de control para la sección de la gama tonal que quieras ajustar.
Puedes añadir hasta 16 puntos para hacer ajustes precisos en la curva.
Así es como funciona.
Yo prefiero añadir tres puntos: para las sombras, los tonos medios y las iluminaciones, pero puedes poner los que quieras en el lugar que prefieras.
Si pones un punto y después quieres eliminarlo, haz clic en él con el botón derecho para eliminarlo y ver otras opciones.
También puedes mantener pulsada la tecla Opción o Alt para que aparezca Restablecer curva arriba del panel Curva y poder restablecer los ajustes para empezar de nuevo.
Curvas también incluye un ajuste específico para realizar ajustes en pantalla en la curva paramétrica o de puntos.
Al hacer clic y arrastrar en la zona iluminada, se ajusta esa parte de la gama tonal.
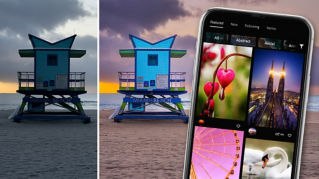
Veamos ahora una imagen a la que ya he aplicado mis otros ajustes, al margen de Curvas.
En esta imagen del Oculus, quiero añadir más contraste.
Lo haré ajustando los tonos oscuros.
También quiero realzar las iluminaciones; se puede hacer ajustando las iluminaciones.
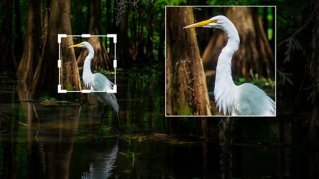
Con la curva de puntos también se puede acceder a los canales de color para aplicar ajustes de curva de colores a la imagen.
Seleccionemos el canal de color verde de la curva de puntos y apliquemos este color a las sombras de la imagen.
Voy a colocar los puntos en las sombras, los tonos medios y las iluminaciones, y voy a subir el punto de las sombras.
Así, el verde solo se aplica a esa región.
Ahora, haremos lo mismo con el canal de color rojo, pero lo haremos en las iluminaciones de la curva para conseguir un tono rojo.
Aplicamos los tres puntos y ajustamos las iluminaciones.
Realizados los ajustes, podemos ver el antes y el después de los ajustes de la curva activando el icono de ojo en la parte superior derecha del panel Curva.
Creo que ha quedado genial, la imagen tiene un aspecto más creativo.
Explora Curvas por tu cuenta para ver cómo puedes dar a las imágenes un aspecto aún más dinámico.
Soy Kenneth Hines Jr..
Espero poder seguir explorando Lightroom contigo muy pronto.