One of the final touches in any compositing project is to create a unified look and feel so that the color and tonal qualities will match among the different image elements.
In this tutorial we'll explore some ways to create a unifying color treatment for a composite in Photoshop CC.
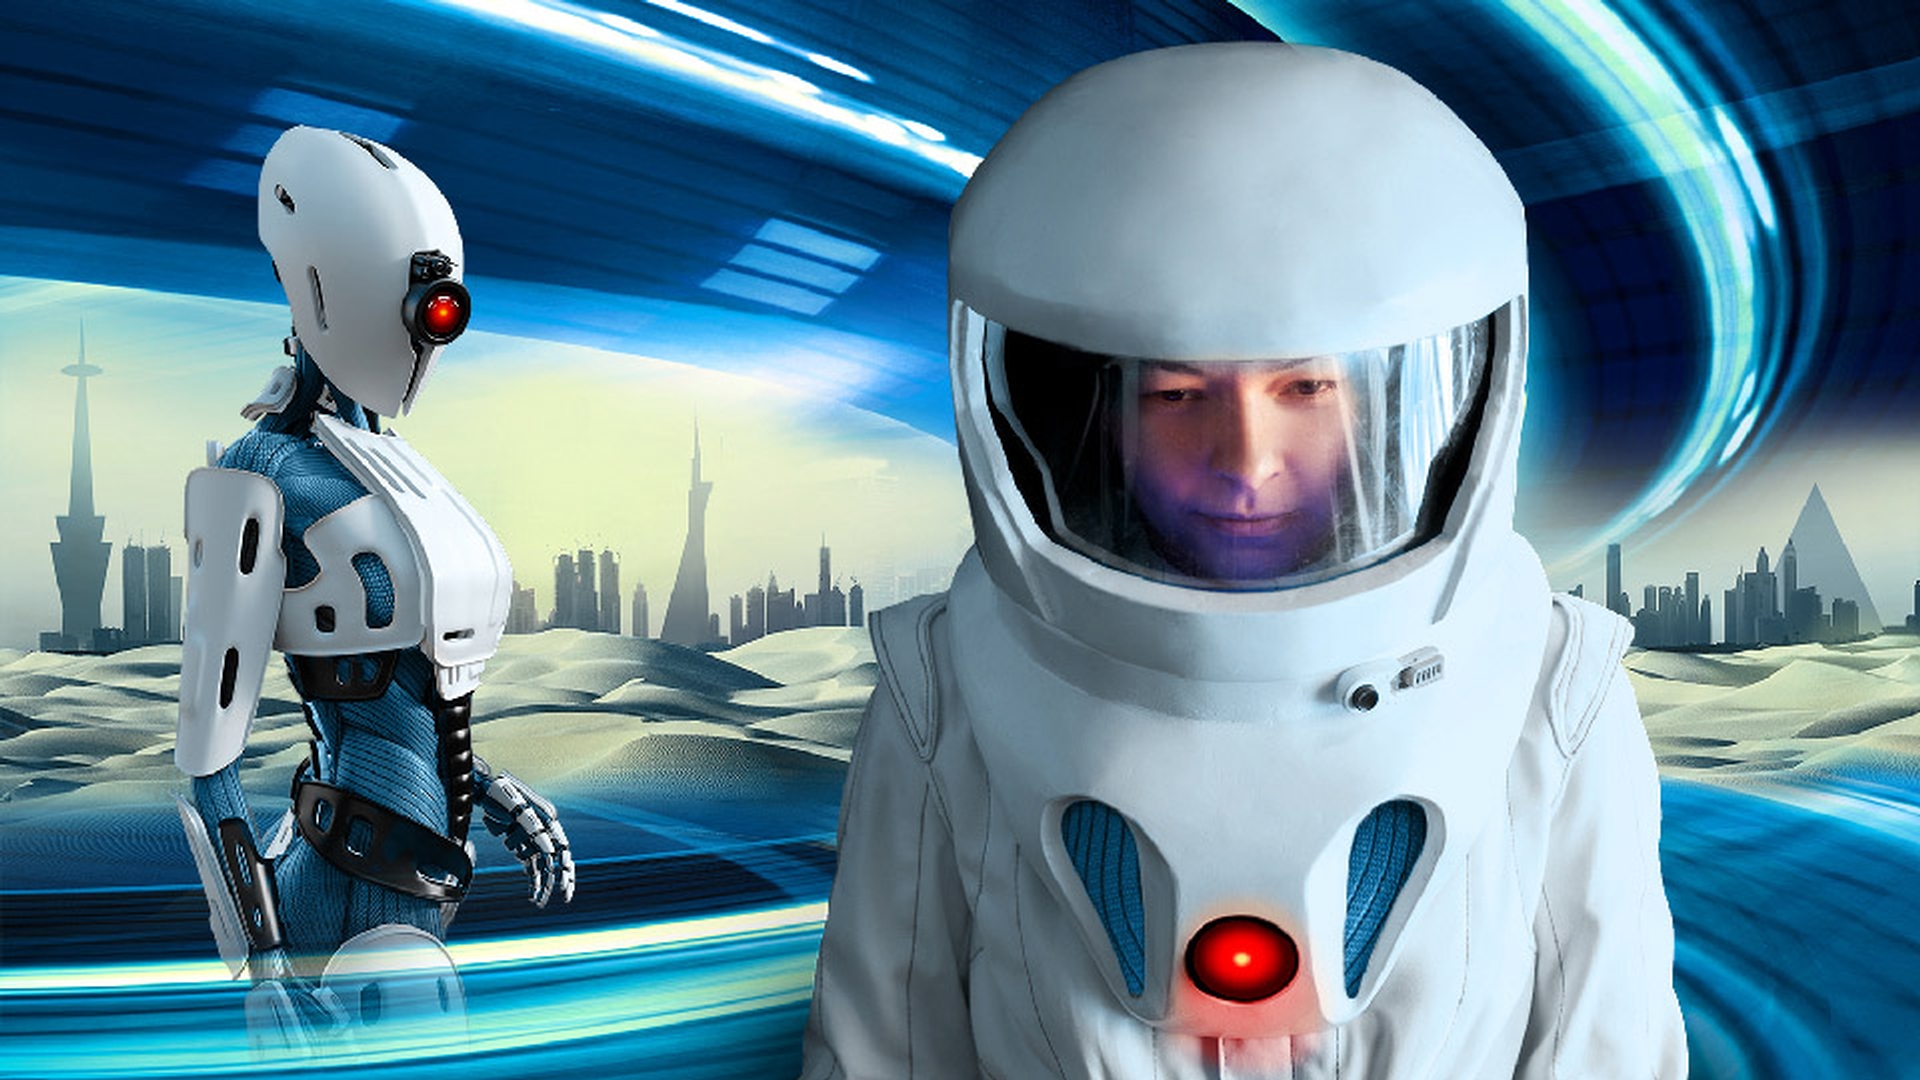
For this project we have a science fiction composite and I want to try out an overall cool and blue look for the entire scene.
First, I'm going to create a layer with the average color of the blue background.
This can sometimes be an effective way to create a unifying color treatment based on colors that are present in a single layer.
I'm going to turn off the visibility of the robot and astronaut group by clicking on its eye icon and I'll just click on this triangle here to close the group.
My Background layer is active, so I'll come up to the Layer menu and choose New, Layer via Copy.
Command J or control J is the very useful shortcut for that.
Next, I'll click on the Desert City layer in the Layers panel and I'll drag that down underneath the new copy layer.
I'll click on that Background copy layer to make it active and I'll come up to the Filter menu and choose Blur, Average.
So, this takes all the colors on that layer and it averages them into a single color.
To blend this in, I'll open up the Blend Mode menu at the top of the Layers panel, come down to almost the bottom and I'll choose Color.
So that looks good, but the tent is a single color and few things in life, even on other planets, are a single color so I'm going to come up and lower the Opacity for that layer to about 55%.
I think that looks pretty good.
The other thing I'm noticing if I turn this layer off and then on again is that I'm losing some of this nice rich blue saturation in that motion blur.
So, I can fix that by coming up to the Layer menu and choosing Create Clipping Mask.
Now what this will do is it will clip or attach this active layer to the layer immediately underneath, so that whatever this layer does it's only affecting this underlying layer and not the other layers under that.
So that looks good.
Let's move on to the Robot & Astronaut.
Going to click on their eye icon to make them visible and then click on the group name to make it active.
I'm going to come over to the Eyedropper Tool and I'm going to select and sample the color right next to the robots' eye.
Now what I want to do with this sampled color is I want to turn it into a color fill layer, but I also want to use the same layer clipping mask technique that I used on that color average layer a moment ago.
I can do this with a really useful shortcut.
I'm going to hold down the Option key on a Mac, or the Alt key on Windows and I will come and click on the Create new fill or adjustment layer button down here at the bottom of the Layers panel.
I'm going to choose Solid Color... and that Option or Alt key shortcut is what prompts this dialog to pop up where we find this very useful checkbox to use previous layer to create a clipping mask.
I'll choose that and click OK and then I'll click OK in the Color Picker.
And you can see that this new color fill layer is indeed only affecting the robot and the astronaut.
Let's open up the Layer Blend Mode menu in the Layers panel and we'll come down, and I can choose either Hue or Color.
Each of these has a different effect.
The Color mode is a lot more pronounced and affects more of the image.
Hue on the other hand is more subtle and will not tint areas where there is little or no color saturation to begin with, such as the light areas on the astronaut and the robot.
For the scene I like Hue so I'm going to choose that.
Next, I'm going to edit this layer mask for this Color Fill 1 layer.
So, I'll click on it to make it active, come get the Brush Tool.
Down at the bottom of the Tool panel I see that black is my foreground color, so I'm just going start painting on that layer mask to bring in the red light and the glow of the light on the front of the astronaut suit and also on the eye of the robot.
And finally, I'm going to lower the Opacity of my Brush down to about 60% and I'll paint on the astronauts face just to bring in some nice color, so she looks a little bit more healthy there inside of her suit.
So, you can see that creating a color treatment for a composite project can really tie everything together, so that it works as a unified image.
It's a final dash of image seasoning that is an essential part of creating successful composites from multiple photos.