Pre-deployment Configuration
The configuration and deployment of digital signature components is complex and usually the responsibility of an Public Key Infrastructure (PKI) administrator. If you only use self-signed certificates for simple signing workflows, skip this section.
Recommendations
To leverage Acrobat’s rich digital signature capabilities, follow these best practices:
Familiarize yourself with this guide, the Preference Reference, and the Customization Wizard.
Learn about setting registry and plist preferences, including feature locking, paths, the relationship between the UI and the registry, and other topics.
Install the application and configure it via the UI. Set the preferences in the Security and Signatures categories.
Use the Wizard to copy the registry settings and files from your installed application to the new installer. This is the easiest way to create new settings as well as leverage existing installs.
Use the Wizard’s UI to set additional preferences. For example, use its Files and Folders feature to deploy signature-related acrodata files.
Deploy the application as described in the Administration Guide.
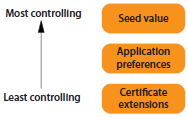
Understand how workflow behavior is determined by registry configuration, certificate extensions, and seed values.
In general, the smaller the scope of the variable, the more controlling it is. For example, an application has a default timestamp server configured, a certificate contains an OID that specifies a different timestamp server, and a seed value specifies a third timestamp server for a particular signature field; in this case, the seed value timestamp server is used.
Deployment checklist
The product ships with default settings, and all of these steps are optional. Review this list to craft the installation you need. Additional settings and details appear in the Preference Reference
Establish PKI Trust via CDS, AATL, EUTL, or local trust lists.
Set up Directory Server Connections.
Set up the Signing Environment requirements, workflow, and method. You may also want to create enterprise signature appearances as described in Custom Signature Appearances.
Configure the Timestamp Servers list, defaults, and usage.
Configure Signature Validation logging, revocation checking, service providers, and so on.
Tune Certificate Revocation Checks for OCSP, CRL, and the interaction of each.
Review the Preference Reference for additional other signature-related preferences you may need.
If required, enable FIPs compliance.
Review the application security preferences to secure your application, data, and network. Configuration involves two main tasks:
Enabling protections that restrict potentially malicious content and actions.
Trusting specific files, folders, and hosts in your workflow. For example, certified documents can be trusted for exemption from the restrictions above.
Test.
Deploy.
Document encryption
When FIPS mode is disabled, you can still create encrypted documents that are equivalent to documents encrypted with FIPS mode enabled if you do one of the following:
Use AES-128 or AES-256 with certificate-based encryption, or
Use AEM Document Security, which only supports AES-128 and AES-256.
PKI trust
Every PKI leverages a method for trusting the public key certificates. Signers embed a copy of their certificate in their signature, and document recipients validate that signature by determining if the certificate is both valid and trusted. Establishing trust involves issuing signing certificates that chain up a certificate with a high level of integrity. In this way, trust propagates down from the certificate issuer (trust anchor) to all users. Enterprises usually set up trust through a single entity rather than for each its users. Adobe Reader and Acrobat provide two ways to effortlessly establish trust without an additional software download or configuration: CDS and AATL.
Certified document services (CDS)
Certified Document Services (CDS) is a signing solution that allows authors to create Adobe PDF files that automatically certify to the recipient that the author’s identity has been verified by an Adobe CDS provider and that the document has not been altered. CDS signatures ensure the highest level of document integrity because the user’s digital credentials must be stored on a cryptographic hardware device, and they must be issued by a WebTrust certified authority using strict verification guidelines.
Adobe Acrobat Trust List (AATL)
The Adobe Approved Trust List (AATL) program allows signers to create digital signatures that automatically validate on document open. By default, both Acrobat and Reader download a list of “trusted” root digital certificates every 30 days. The product then trusts the digital signatures created with any credential that chains to those pre trusted AATL certificates.
The following preferences allow you to configure how and when the AATL updates.
| Keyname | Default | Summary |
|---|---|---|
| {keyname} | {defaultvalue} | {summary} |
European Union Trust List (EUTL)
The European Union Trust Lists (EUTL) is a public list of over 200 active and legacy Trust Service Providers (TSPs) that are specifically accredited to deliver the highest levels of compliance with the EU eIDAS electronic signature regulation. Adobe’s support works in the same way as AATL.
The following preferences allow you to configure how and when the EUTL updates.
| Keyname | Default | Summary |
|---|---|---|
| {keyname} | {defaultvalue} | {summary} |
Other digital ID options
Other methods for setting up trusted workflows include:
MSCAPI integration and the Windows Certificate Store. See the Windows preferences in the Preference Reference.
Roaming ID Server Integration, see the Roaming ID preferences in the Preference Reference.
PKCS#11 token and smart card integration
If your company uses PKCS#11 devices such as smart card readers or tokens, distribute the drivers or modules at deployment time. Most configuration must occur manually.
Set
cAdobe_P11CredentialProvider.Distribute the module file, such as
dkck201.dllwith instructions about where to locate it.Instruct users to restart Acrobat.
Directory server connections
Directory servers can be integrated with the product’s Trusted Identity feature so that users can access certificates company-wide in signature and certificate security workflows (see tAddressBook above). Server information is stored in a directories.acrodata file.
%FDF-1.2
1 0 obj
<</DirectoryData<</Entries<</1<</authenticationType
0.0/dirStdEntryDirType/LDAP/dirStdEntryID/Example.PKMS.ADSI.dir0
/dirStdEntryName(VeriSign Internet DirectoryService)/dirStdEntryPrefDirHandlerID
/Example.PKMS.ADSI/dirStdEntryVersion 65536/maxNumEntries 100.0/port
1234.0/server(directory.verisign.com)/timeout 60.0>>
endobj
Many organizations use Lightweight Directory Access Protocol (LDAP) directory servers to enable LDAP-aware clients to retrieve email addresses, network services, software directories, and so on. Acrobat products can use LDAP servers as x.509 public key certificate repositories. End users leverage these certificates in certificate-based security workflows when they encrypt a document as wellas when validating a signature. While the product ships with the VeriSign Internet Directory Service as the default server (viewable in the Security Settings console), admins typically set an internal server as the default.
Search the Preference Reference for LDAP for a complete list of registry-level options.
Server configuration
For Acrobat to search for certificates on an LDAP server, the server must be able to respond to a specific LDAP scheme. In addition to returning standard, generic information, the server must be able to respond to the request userCertificate;binary as defined by RFC 4523, Section 2.1.
Note
While Acrobat is case insensitive, LDAP servers may not be. The LDAP server should be capable of handling the specific request that Acrobat sends. Verify your server uses the exact format of userCertificate;binary.
Product configuration
Administrators can configure directory servers in several ways:
Pre-installation (Recommended): Tune the installer with the Adobe Customization Wizard prior to application deployment. The process involves configuring a directory server in your template installation and using the Wizard to copy the
directories.acrodatafile to the tuned installer.Post-installation setting distribution: Export server configuration details in an
acrobatsecuritysettingsor FDF file and distribute it across the organization. Users can automatically import the settings by double clicking on the file. This method is useful for configuration of an existing installation.Post-installation instruction distribution: Tell users how to configure the server manually.
To configure a directory server manually:
Open the Security Settings Console. The method varies across versions. For 11.0, choose Preferences > Security > Configure Server Settings > More.
Select Directory Servers in the left-hand list.
Choose New.
Configure the LDAP server settings in the Edit Directory Server dialog:
Directory Name: An arbitrary directory name.
Access Type: LDAP is the only type supported.
Server Name: The server name.
Port: The server port.
Search Base: A comma-separated list of name-value pairs used in the search. For example,
c=us,cn=Brown Trout,ou=Engineeringfor country, common name, organizational unit.This server requires me to log on: Check if the server requires a username and password.
User name: Leave blank.
Password: Leave blank.
Timeout: The number of seconds to keep trying to connect.
Maximum Number of Records to Receive: The number of records to return up to 10.
Optional: Make the server the default one to search by highlighting the directory server in the right-hand panel and choosing Set Default.
Choose OK if a confirmation dialog appears. A star appears next to the default server.
Signing environment
Administrators can configure preferences to control the signing workflow, when and how a signature is created, the conditions for successful signature creation, and so on. For example, these preferences tell the application where to look for Windows certificates, control signature appearances, and provide control over message digest algorithms.
Signing format
Replace the default signature format.
| Keyname | Default | Summary |
|---|---|---|
| {keyname} | {defaultvalue} | {summary} |
Signing hash algorithm
Replace the default hash algorithm.
| Keyname | Default | Summary |
|---|---|---|
| {keyname} | {defaultvalue} | {summary} |
Signing digest comparison
Require a message digest match.
| Keyname | Default | Summary |
|---|---|---|
| {keyname} | {defaultvalue} | {summary} |
Signing Preview Mode
Require the use of Preview Mode.
| Keyname | Default | Summary |
|---|---|---|
| {keyname} | {defaultvalue} | {summary} |
Signing certification
These settings pertain specifically to certified signatures in certified documents. See also bTrustCertifiedDocuments.
| Keyname | Default | Summary |
|---|---|---|
| {keyname} | {defaultvalue} | {summary} |
Long term validation
Without certain information added to the PDF, a signature can be validated for only a limited time. This limitation occurs because certificates related to the signature eventually expire or are revoked. Once a certificate expires, the issuing authority is no longer responsible for providing revocation status on that certificate. Without conforming revocation status, the signature cannot be validated.
Long-term signature validation (LTV) allows you to check the validity of a signature long after the document was signed. LTV requires embedding signature validation in the signed PDF. Embedding these elements can occur when the document is signed, or after signature creation.
The required elements for establishing the validity of a signature include the signing certificate chain, certificate revocation status, and possibly a timestamp. If the required elements are available and embedded during signing, the signature can be validated requiring external resources for validation. Acrobat and Reader can embed the required elements, if the elements are available. The PDF creator must enable usage rights for Reader users (File > Save As > Reader extended Document).
Note
When a timestamp server is used, the signature validation time must be set to Secure Time. CDS certificates can add verification information, such as revocation and timestamp into the document without requiring any configuration from the signer. However, the signer must be online to fetch the appropriate information.
Information and methods used to include this long term validation (LTV) information in the PDF comply with Part 4 of the ETSI 102 778 PDF Advanced Electronic Signatures (PAdES) standard. For more information, see blogs.adobe.com/security/2009/09/eliminating_the_penone_step_at.html.
| Keyname | Default | Summary |
|---|---|---|
| {keyname} | {defaultvalue} | {summary} |
Signing revocation checking
Require a revocation check for the signer’s certificate.
| Keyname | Default | Summary |
|---|---|---|
| {keyname} | {defaultvalue} | {summary} |
Timestamp servers
Timestamping a signature tells you that a document and signature existed prior to the indicated time. While all signatures are associated with the signer machine’s local time, they may also include a timestamp provided by a timestamp server if one is configured. Because a user can set that time forward or back, a local time is less reliable than a timestamp time. Local times are labeled as such in the Date/Time and Summary tabs of the Signature Property dialog. Timestamps are usually provided by third-party timestamp authorities. Because timestamp authorities may charge for their services, Acrobat does not automatically set a default timestamp server if multiple servers are listed.
Certificate-level timestamp configuration can also be set by specifying the server URL in an X-509 certificate extension. For details, see X.509 Extension OIDs in See OIDs and Certificates.
Diplaying timestamp server time
By default, the signature appearance displays the signing time from the signer’s computer clock. To display the timestamp server time in a signature appearance:
Go to
HKLM\SOFTWARE\Policies\Adobe\(product)\(version)\FeatureLockDown\cSecurity\cPubSec\.Create the new DWORD
bUseTSAsSigningTimeand set it to 1.Go to
HKCU\Software\Adobe\(product)\(version)\Security\cASPKI\cASPKI\cSign.Set
bReqSigPropRetrievalto 1. Create the preference if it does not exist.Verify the computer time does not vary from the signature validation revocation check response time specified by
HKCU\Software\Adobe\(product)\(version)\Security\cPubSec\iMaxClockSkew. The default is 65 minutes.iMaxClockSkewallows admins to account for a network delay, time synchronization issues, and so on without invalidation signatures.
iMaxClockSkew allows admins to account for a network delay, time synchronization issues, and so on without invalidation signatures.
Signature validation
Signature validation preferences specify conditions for trust, the display of status icons, logging, how validation occurs, and other requirements. The process requires that the signer’s certificate or some other certificate it chains up to must be trusted for signing (a trust anchor). In Acrobat products, this means a trusted certificate appears in the application’s trusted identity list in the Trusted Identity Manager and that it’s trust level is appropriately set. While end users trust certificates on-the-fly directly from a signature in a PDF, admins typically configure machines to eliminate any manual tasks.
Many of the following preferences interact with signing preferences and should be set accordingly.
Validation logging
The log file must already exist. When Protected Mode is enabled, the log file path must be one that Protected Mode permits such as the sandbox’s Temp directory or the product AppData directory. Alternatively, enable bUseWhitelistConfigFile and specify a custom location.
| Keyname | Default | Summary |
|---|---|---|
| {keyname} | {defaultvalue} | {summary} |
Certificate revocation checks
Revocation checking can occur both during signature creation and signature validation, and product settings may be configured to control both the user’s ability to sign and to validate signatures. A check can occur for the signing certificate as well as for the certificates associated with any revocation check responses. OCSP and CRL checking are both supported, and MSCAPI checks will use one or the other, or both.
OCSP and CRL references interact as follows: If a signature has a chain such as Certificate Authority Root (CA) | Intermediate Certificate Authority (ICA) | End Entity Certificate (EE) and OCSP revocation checking preferences are specified for the CA but CRL preferences are not, then Adobe_OCSPRevChecker and Adobe_CRLChecker behave as follows:
While doing OCSP revocation checking for the ICA, the preferences specified for the CA are used. If the scope for the preferences is specified as infinite, then the CA preferences are also used for revocation checking the EE.
While doing CRL revocation checking, if no preferences have been specified either for the CA or the ICA, then the preferences present at
cASPKI:cAdobe_CRLRevCheckerare used instead.
General settings
Specify revocation checking providers.
| Keyname | Default | Summary |
|---|---|---|
| {keyname} | {defaultvalue} | {summary} |
Specify signature revocation checking constraints.
| Keyname | Default | Summary |
|---|---|---|
| {keyname} | {defaultvalue} | {summary} |
OCSP revocation checking
OCSP revocation checking can occur both during signature creation and signature validation on both the signing certificate as well as for the certificates associated with any revocation check responses.
OCSP responders: Determining if they are authorized to do rev checks
RFC2560 defines three methods of determining whether the OCSP responder is authorized to perform OCSP revocation checking. Two methods are strictly defined and the third one is called “local configuration” which Acrobat defines by specifying a set of certificates. If OCSP response is signed with one of these certificates then the responder is considered authorized.
Rule 1 (Acrobat 8.0): defined the local configuration rule as follows by authorizing OCSP responses that come from responders specified by sURL.
Rule 2(Acrobat 9.0): If a custom certificate preference has a new “AuthorizedResponder” boolean entry with a value of true, and the certificate being checked for OCSP revocation as well as the OCSP response both chain up to the customer certificate, then the responder is authorized.
The order in which verifying OCSP responders occurs is as follows:
Local configuration rule #1 (A8 and A9).
Local configuration rule #2 (new in A9).
The two deterministic methods from RFC2560.
Note
The structure and location of the new AuthorizedResponder entry is the same as for SendNonce entry. However, while SendNonce may be specified under ASPKI or a custom certificate preference, AuthorizedResponder may be specified only under custom certificate preferences.
Specifying the Time and Method of OCSP Checks
OCSP revocation checking preferences allow you to control when and how an OCSP check occurs. The following options are available:
Specifying when to do revocation checking as well as the effect of a failed or bad response.
Specifying when and where to go online to get a response.
Specifying whether to include a nonce. Nonces are random generated numbers that are sent with a revocation check request and matched by a response. They improve security by assuring communication with an active, non-spoofed server.
Using or ignoring a response’s
thisUpdateandnextUpdatetimes to control its validity. See RFC 2560 for details.Setting a limit on the amount of time difference between the local time and response’s publish time.
OCSP response embedding changes with 10.1
Prior to 10.1, OCSP responses without nextUpdate were never embedded in a signature. For 10.1 and later, OCSP responses are always embedded irrespective of the presence of nextUpdate; however, whether they are used for signature validation depends on certain conditions:
Validation time is greater than thisUpdate minus the value of
maxClockSkew(the default is 5 minutes). This test is always performed.When
nextUpdateis present and the validation time is less than thenextUpdatetime plus the value ofmaxClockSkew.When
nextUpdateis not present and the validation time is less than thethisUpdatetime or theproducedAttime (whichever is greater) plus the value ofiMaxClockSkew.
If you need a relaxed security environment (for example, when the responder is caching OCSP responses), bIgnoreNextUpdate can be set to 1 to ignore the last test. In this case, embedded responses without nextUpdate are always used for signature validation provided that they pass first test.
Note
This behavior is designed to support Acrobat’s long term validation feature and allows validating a signature with embedded responses that were valid at signing time.
| Keyname | Default | Summary |
|---|---|---|
| {keyname} | {defaultvalue} | {summary} |