Introduction
The Clone Stamp tool allows you to copy parts of an image from one area to another area of the image.
But since you're working in After Effects CC you can do this over multiple frames.
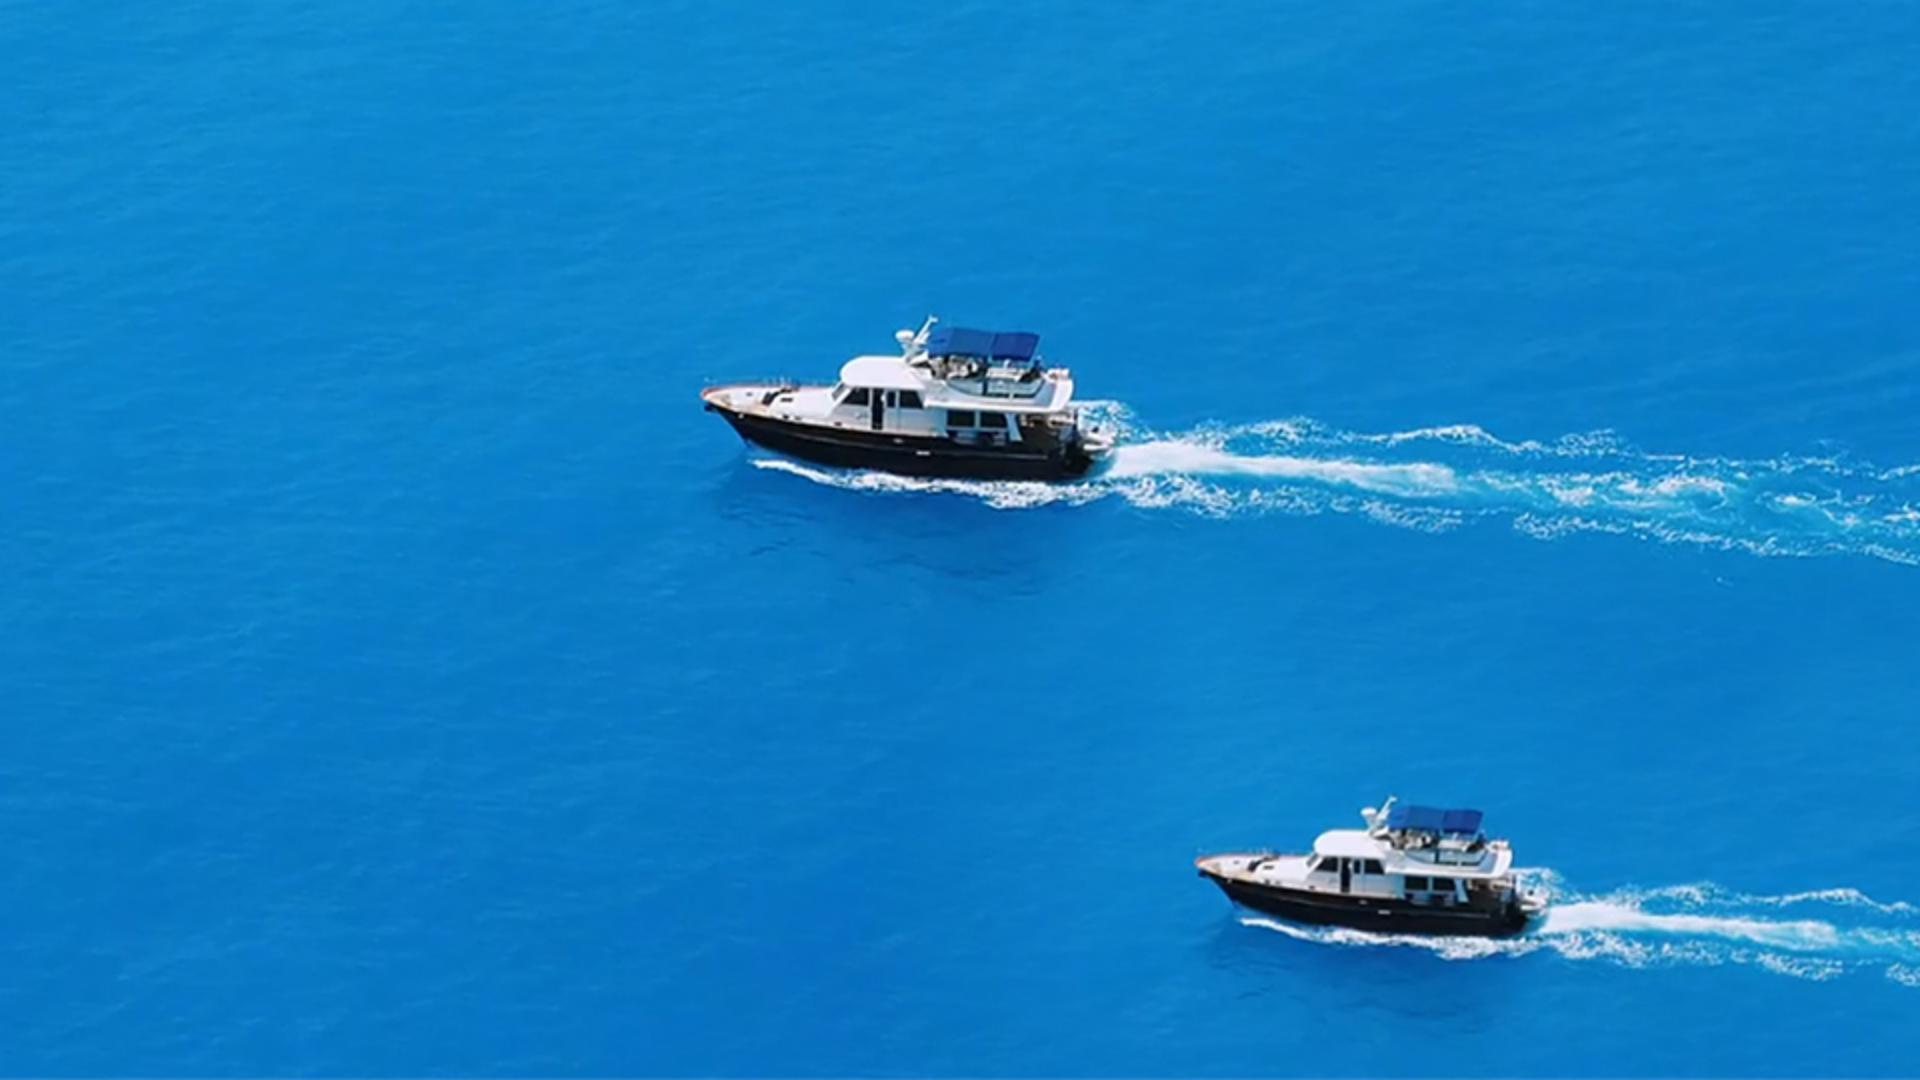
So, in this exercise we're going to make a duplicate copy of this boat down here in the lower right corner,
Setting up the Paint workspace and Clone Stamp tool
so to start let's change to the Paint workspace go to the upper right corner of the interface and click on the double arrows and choose Paint from the workspace.
Then just to make sure we're all on the same page I'm going to go up on your Window, Workspace and I will Reset "Paint" to Saved Layout.
All right.
Now when you're painting with any of the Paint tools like the Clone Stamp tool, you need to paint in the Layer panel.
So, I'll hover between the two panels here and I'll drag to the left to make the Layer panel a little bit larger.
Then I'll grab my Clone Stamp tool.
Now on the right you should see the Paint panel and the Brushes panel.
So, the first thing I'll do is scroll down in my Brushes here
Configuring brush and Clone Stamp settings for multi-frame work
and I'll choose 65 as the brush size and I'll choose a nice soft brush.
Then I'll come up to the Paint section here and in here we can leave all the default settings setup, Normal, RGBA and then for the Duration I want to make sure that Constant is chosen because I want the clone to constantly be cloning over multiple frames not just a single frame.
So, once we've chosen Constant then we can come down to the other options here and I'll just tell you Aligned matters most when you're trying to copy larger things like a horse, where you need multiple brushstrokes the fact that we're only going to use one brush stroke this really doesn't matter in this example.
Now the Source Time Shift I do want to add a time shift of about 1 second, so I'll click on that number and I'll say 100 and I'll press Enter and that's going to go ahead and give me 100 frames.
And you know what?
I only want 24 frames which is going to be one second.
So, we'll set that to 24 frames
Painting a cloned object into the scene
and then we'll come to the Layer panel and hold down Alt on Windows or Option on the Mac and click directly on the boat just once and then come to the lower right corner and click and drag and hold your mouse down as you drag around to paint a boat into the scene.
Then make sure that you have some of the wake in the scene as well.
Now just the fact that there is this little halo around the edges don't worry, we can address that in a second.
Notice the Composition panel is here, and I can see what the end result is going to look like.
Now, let's go to the Timeline and press V on your keyboard to grab your Selection tool and then click once on Layer 1 and press U U to reveal the animated properties.
So, in here, what I want to do is check out the Clone Position and the Position and the Diameter for my stroke.
So, first thing let's increase the Diameter of the stroke.
I'll click and drag, and I'll set that up to around 160 - in this exact instance I'll do 162.
That's just softening the edges around here and you might see a little bit of a transition here.
But when we press the Spacebar to preview the animation that's definitely not going to be nearly as noticeable.
But notice as the frames play out eventually the boat starts to disappear.
And that's because we need to animate where the pixels are being cloned from.
And we do that with the Clone Position.
Animating clone position to track motion over time
So, move your Current Time Indicator to frame 0 add a key frame for Clone Position and then move your Current Time Indicator to the end of the Timeline.
And just scrub on the X parameter for the Clone Position until you see the boat again.
Now you'll notice as I scrub the boat isn't really moving in the corner of the video clip.
So, what I need to do is animate the position of the clone.
So, move your Current Time Indicator back to frame 0 add a key frame for the Position Transform Clone 1.
I'll move to the end of the Timeline and I'll just scrub on the X parameter to transform the Position of Clone 1.
And if we collapse the Transform options and open them for Clone 1,
Refining clone appearance with transform and stroke adjustments
I can also adjust other things like the Scale, so I'll make the clone just a little bit smaller.
Now when I go ahead and preview the animation you can see we've successfully copied the pixels from one area to another.
And we've offset those pixels over time.
And even though the initial brushstroke didn't quite work the way that we wanted, we can always go back and adjust the stroke options after the fact.
In our example I went ahead and increased the overall diameter of the brushstroke to make the halo much less noticeable.


