Introduction
When you put raster images into your Illustrator projects, there are two main methods for cropping or hiding parts of the images.
You can crop an image using the Crop Image feature, which permanently deletes part of that image.
Or you can mask an image, which lets you edit what's cropped.
Later, you'll explore both to see how they're different.
You'll start with cropping an image.
Cropping images with crop image
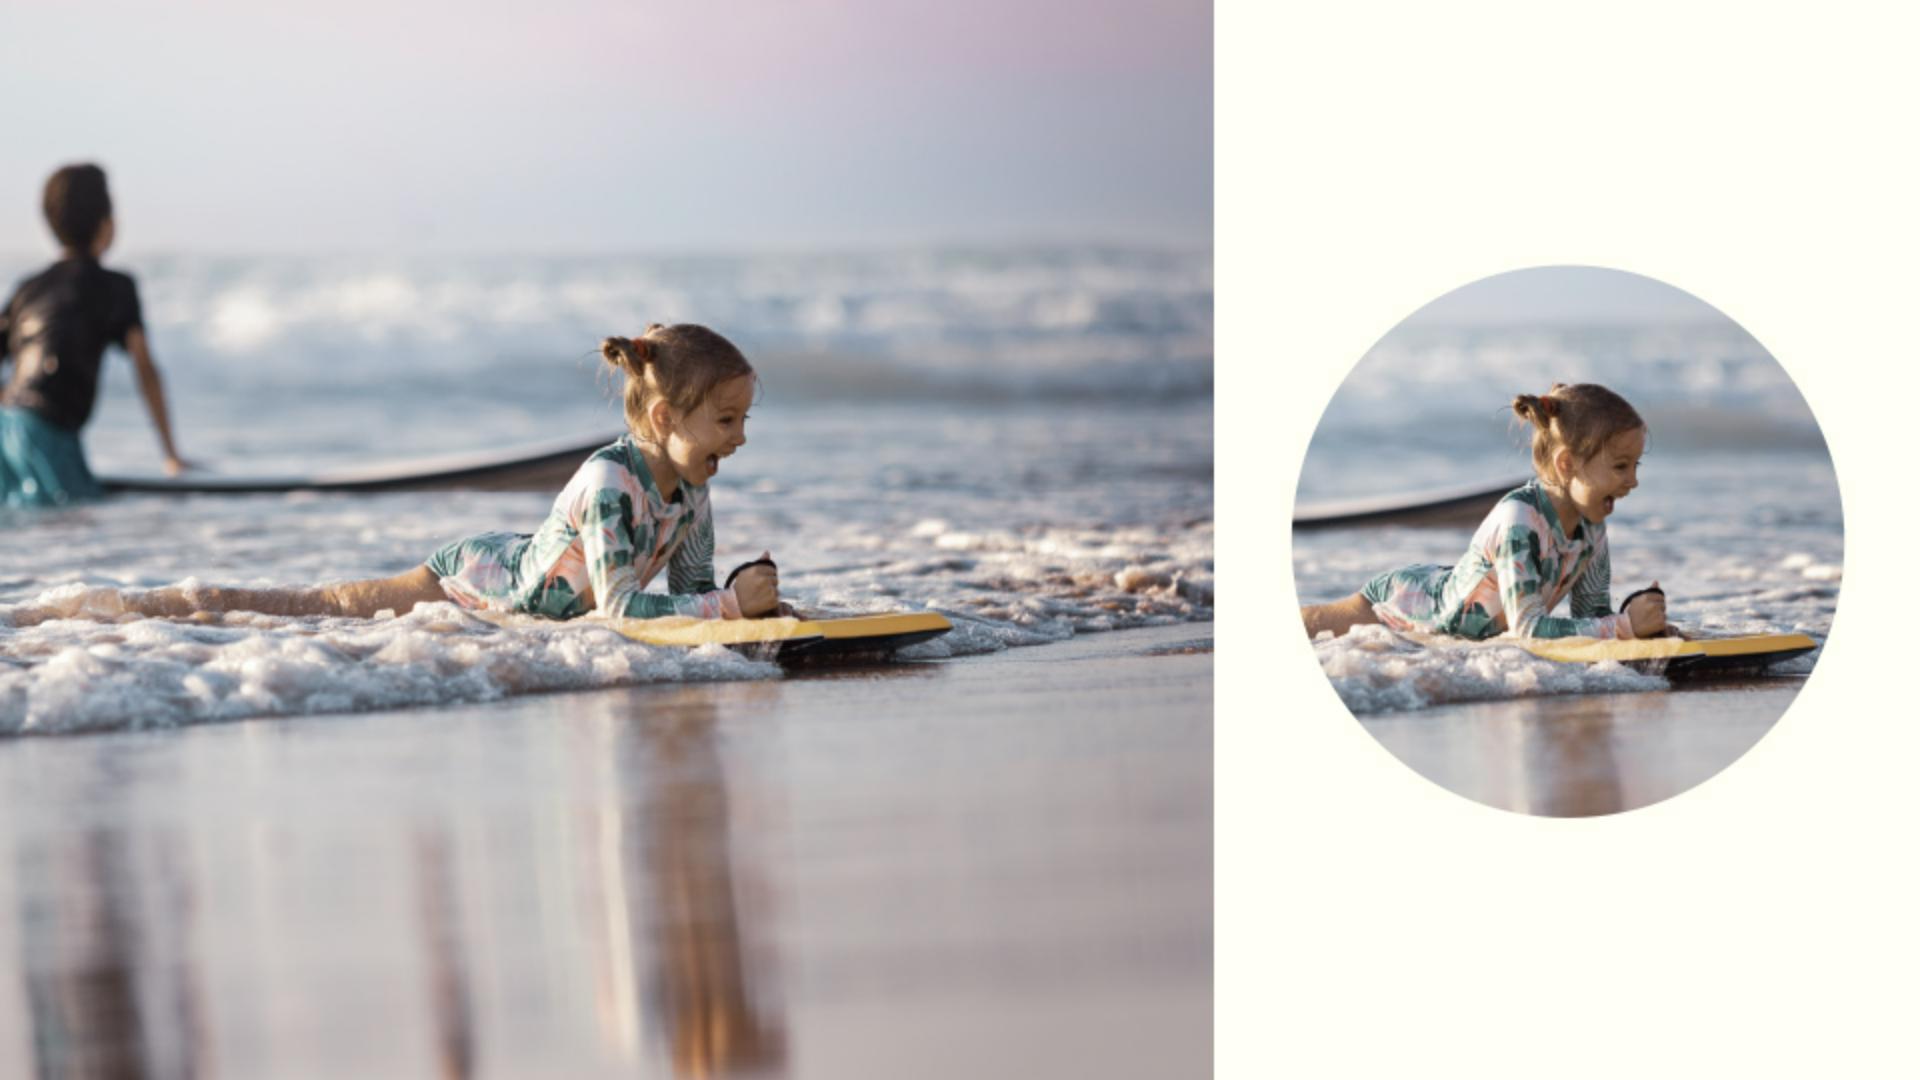
The image off the right edge of the artboard here needs to be trimmed to fit this area, so you can cut off parts that are less interesting.
Select the image to be cropped and move it into place here.
Since we want to see the other content as we crop, so we can judge how much to crop, you'll make the image a little transparent, just temporarily.
So, change the Opacity in the Properties panel, maybe to something around 30.
Now drag it into place right about here.
And we want the surfboards to roughly be in this area.
Now, to crop it, click Crop Image in the Properties panel here.
An image must be embedded to crop it using this method, since the cropping is permanent.
If the image is actually linked, a dialogue box with a warning will appear, and it will be embedded if you continue.
This image is already embedded, so you won't see it.
Now, Illustrator identifies the visually significant parts of the image using a feature called Content Aware.
A cropping box shows on the image, and you can drag crop handles on the box to remove parts of the image you don't want.
So, drag each handle to crop the image.
You can even drag the crop area around to reposition it.
In the Properties panel while you're cropping, up here you can decrease the resolution if you like, using PPI - or pixels per inch.
Typically, the lower the resolution, the smaller the file size, and you can't increase the resolution, so this will stay where it is.
Click Apply and the image is permanently cropped.
Change the Opacity to 100% again, and you've got it.
Now, this image needs to have parts hidden as well
Understanding image masking
but in a shape other than a rectangle, which is all you can do for cropping.
For this one, you'll use a mask.
Masking an image involves hiding parts of an image with a shape, called a mask.
Masking can be useful because it's not permanent.
Here's one way to do it.
Select the image you want to apply the mask to, and in the Properties panel, click Mask down here.
A shape is created that's the exact size and shape of the image.
It's hard to tell, but if you look in the Layers panel by clicking the Layers panel tab here, you can see that the image and the shape are grouped together as a special kind of group called a Clip Group.
Click the arrow here to see what's in the Clip Group, and you can see the shape that was made, called the Clipping Path, and the original image.
With the Selection Tool selected, click away from the image, and then click back on it, and you'll see Clip Group if you go back over here to the Properties panel.
You can edit the mask and the image together,
Editing and transforming masked images
the image alone, or just the masking shape.
Back in the Layers panel, you can see both objects are selected.
If you come to the image right now, and you Shift-drag a corner to constrain the resizing, the shape and the image are both resized.
To undo that, choose Edit, Undo Scale.
Now, to edit either the mask, this shape, or the image, you need to select them independently.
One way is back in the Properties panel, you can click the Edit Contents button to edit the image or the Edit Clipping Path button here to edit the shape.
Click the Edit Contents button and the image is now selected.
We want to make the image a little bit bigger.
So Shift-drag the bottom handle here to make it bigger and fill the artboard.
Any image area outside of this Shape is hidden or masked.
To flip the image, you can click the Flip Horizontal button here.
Now, to edit the mask, which is the shape, click the Edit Clipping Path button at the top of the Properties panel and the mask or shape is now selected.
You can transform it in different ways.
Drag one of the side handles here and press Option on Mac or Alt on Windows to make it narrower on both sides.
And drag the top down too.
Now, the bottom needs to be an angle.
So, you can do that with the Direct Selection tool.
Select the Direct Selection Tool, and click this anchor, and release to select it, and then drag it down.
Do the same for this one here but drag it straight up.
There.
When it comes to fitting images, or only showing parts you want for example, you now have two methods for cropping and masking images, depending on what you need.