See how CentraleSupélec student Hugo Germain uses rotoscoping effects on nature footage in Adobe After Effects to reimagine the exotic marine life of Lord Howe Island, Australia, within this untouched environment.
[Hugo Germain, Engineering Student, CentraleSupelec School] We're here on Lord Howe Island to document the conservation efforts to create an installation with Adobe Creative Cloud.
I want to show the divers in the ecosystem above and below water.
When I started doing animation,
Evolving from animation to video workflow
I worked a lot with the Gif format.
Now I'm also working on video.
Capturing and syncing underwater footage with Creative Cloud
It was the first time I was shooting underwater, the fact that I can shoot something in Premiere Clip and then upload it on the Cloud, it makes my workflow a lot more natural.
I imported the video in After Effects
Compositing and photoscaping marine life visuals
and did some photoscaping of the fish and placed them within the environment that I took in Lightroom Mobile.
Telling an environmental story through immersive visuals
By showing how our rich and diverse system is, I really wanted to make people understand how important is it that we preserve it and protect it.
I hope that people feel really as immersed in this environment as I was.
I feel really empowered that I get to capture this incredible environment with my own eye in a way that will share what I witnessed. [♪ music ♪] [♪ music ♪] [Make it.
Creative Cloud.]
1
Open the project file
Open the rotoscoping.aep project file in Adobe After Effects. Double-click the shark.mp4 layer in the Timeline to open it in its own Layer window.
2
Use the Roto Brush tool
In order to separate the shark from the background, you need to define the edges of the shark in the first frame of the footage. Click the Roto Brush tool.
With the Roto Brush tool selected, define the areas of the footage that you want to keep. Change the view level to fit the entire shark's body in the frame. Use the brush to paint along the interior of the shark’s body. A magenta segmentation boundary appears around the shark, indicating the foreground object to be separated from the background.
After defining the shark’s body, use the Roto Brush tool to refine any edges that are not perfect. Press the Alt/Option key on your keyboard and notice that the brush tool changes from a green circle to a red one.
Hold Alt/Option while painting to define areas of background that you want removed. Pay close attention to areas around the shark’s fin where the initial selection is not perfect. It is important to spend as much time as needed to make your first selection as precise as possible.
3
Refine the Roto Brush Matte
Once you’ve defined your foreground selection, use the Effect Controls panel to refine the edge further.
First click the Toggle Alpha Boundary icon below the footage to preview the shark against a black background.
Now open the Effect Controls panel and find the options listed under Roto Brush Matte. You can get good results by increasing the Feather value, reducing Shift Edge to a negative amount, and adjusting the Reduce Chatter percentage to help smooth the edges.
4
Refine the matte for all frames
Now that you’ve defined the mask for the first frame, you need to step through the rest of the frames in the sequence to make sure the mask is precise. After Effects uses a combination of techniques to automatically calculate the edges of the object that is defined in the first frame, and applies it to the following frames as best as possible. For best results, step through the frames and make manual corrections when necessary.
First click and drag the Roto Brush span (the dark gray bar) to increase its length, so it takes up the full length of the footage.
Next, open the Preview panel and click Next Frame to advance the footage by one frame. If you notice any areas where the edge of the mask needs to be refined, use the Roto Brush tool to make the corrections, adding foreground or subtracting background as necessary. Follow this same step for all the frames in your footage.
When you are satisfied with the selection boundaries throughout the entire footage, click Freeze in the lower-right corner of the Layer window to save the boundary information.
After that process is finished, switch back to the Composition window.
5
Add a background image
To create the composite footage, you will need to add an image behind the shark footage. Drag background.jpg from the Project panel to the Timeline, just below the shark.mp4 layer.
Select the shark.mp4 layer and use the bounding box handles to resize and rotate the shark so it fits the scene to your liking.
6
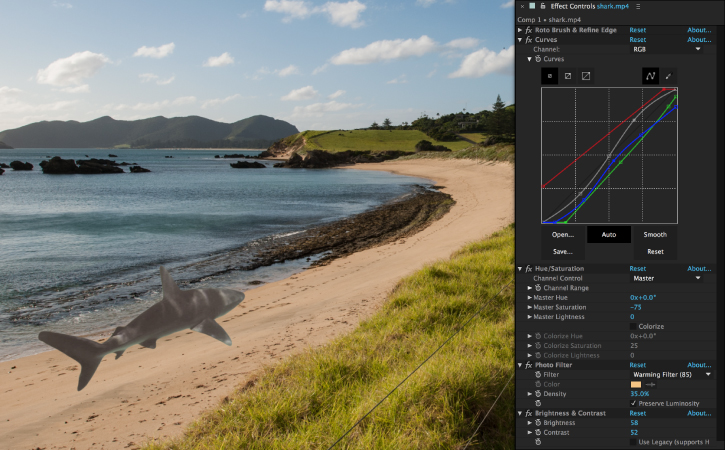
Color-correct the footage
To make a convincing composite, the shark will need some color correction to help match the background. Select the shark.mp4 layer in the Timeline and choose Effect > Color Correction. For this footage, a number of different effect layers are needed to correct the footage.
Add a Curves layer, a Hue/Saturation layer, a Photo Filter, and a Brightness & Contrast effect layer. Experiment with the values to help remove some of the blues and greens from the shark. Removing some saturation and adding some warm tones will help it match the color and lighting of the background landscape.
When you’re satisfied with how things look, click the Play button in the Preview panel to play your finished composition.
You can control how Adobe websites use cookies and similar technologies by making choices below. But note that if you disable cookies and similar technologies entirely, Adobe websites may not function properly.
Cookies are small text files stored by your web browser when you use websites. There are also other technologies that can be used for similar purposes like HTML5 Local Storage and local shared objects, web beacons, and embedded scripts. These technologies help us do things like remembering you and your preferences when you return to our sites, measure how you use the website, conduct market research, and gather information about the ads you see and interact with.
You can make choices in the menu below about what cookies and other technologies you want us to use on Adobe sites when you visit them from this browser. You can always change those choices later by clicking on the Cookie Preferences link at the bottom of the page.
If enabled:
We can improve your experience by tailoring the site and the content to things we think might be of interest
We can better keep track of your preferences — like what language you prefer to use
We will better understand your likely interests so we can provide you more relevant Adobe ads and content on non-Adobe websites and in non-Adobe apps
It will help us improve the performance of our website and those of our partners who use the Adobe Experience Cloud
If disabled:
We won’t be able to remember you from session to session so the experience may not be tailored to your interests
You’ll still have access to the content of the site but certain features that depend on cookies may not function
You’ll still see ads, they just may not be as relevant to you
General information
You can control how Adobe websites use cookies and similar technologies by making choices below. But note that if you disable cookies and similar technologies entirely, Adobe websites may not function properly.
Cookies are small text files stored by your web browser when you use websites. There are also other technologies that can be used for similar purposes like HTML5 Local Storage, web beacons, and embedded scripts. These technologies help us do things like remembering you and your preferences when you return to our sites, measure how you use the website, conduct market research, and gather information about the ads you see and interact with.
You can make choices in the menu below about what cookies and other technologies you want us to use on Adobe sites when you visit them from this browser. You can always change those choices later by clicking on the Cookie Preferences link at the bottom of the page.
If enabled:
We can improve your experience by tailoring the site and the content to things we think might be of interest
We can better keep track of your preferences — like what language you prefer to use
We will better understand your likely interests so we can provide you more relevant Adobe ads and content on non-Adobe websites and in non-Adobe apps
It will help us improve the performance of our website and those of our partners who use the Adobe Experience Cloud
If disabled:
We won’t be able to remember you from session to session so the experience may not be tailored to your interests
We’ll still count your use of our site and services
You’ll still have access to the content of the site but certain features that depend on cookies may not function
You’ll still see ads, they just may not be as relevant to you
Operate the site and core servicesOperate site and measure engagement
Always active
These cookies are required, and they are used to enable the site and related services core functionality. Without them the site could not operate, so they cannot be disabled.
These cookies enable the site and related services’ core functionality and collect statistics about user engagement, such as counting active use to help us understand trends. These cookies cannot be disabled.
Measure performance
These cookies are used to analyze site usage to measure and improve performance. Without them Adobe cannot know what content is most valued and how often unique visitors return to the site, making it hard to improve information we offer to you.
These cookies are used to analyze site usage to measure and improve performance. Without them Adobe cannot know what content is most valued, making it hard to improve information we offer to you.
Extend functionality
These cookies are used to enhance the functionality of Adobe sites such as remembering your settings and preferences to deliver a personalized experience; for example, your username, your repeated visits, preferred language, your country, or any other saved preference.
Personalize advertising
These cookies are used to enable Adobe and our partners to serve ads more relevant to your interests. Without them you will still see ads, but they might not be as relevant to you.
Personalize advertising
These cookies are used to enable Adobe and our partners to serve ads more relevant to your interests. Without them you will still see ads, but they might not be as relevant to you.